Installing Hubhood
Via WordPress
Install the theme under WordPress admin
Log in to your WordPress dashboard.
Go to ‘Appearance / Themes’.
Click on ‘Add New’.
Click on ‘Upload’.
Select ‘hubhood.zip’ file and wait the upload complete.
Activate the ‘Hubhood’ theme.
More info on WordPress.org
Via FTP
FTP Install
Start a FTP connection with your favorite FTP client, like FileZilla.
Browse to the ‘/wp-content/themes/’ on your WordPress installation.
Upload ‘hubhood.zip’ and extract, or unpack the zip file on your computer and upload the ‘hubhood’ folder.
Login to your WordPress dashboard and activate the theme on ‘Appearance / Themes’.
Child Theme
If you want to modify/customize the code of any file of the theme, you should also upload the ‘hubhood-child’ folder to the ‘themes’ directory of your site. After that, access ‘Appearance / Themes’ and activate the ‘Hubhood Child Theme’.

Copy the files you need to modify from ‘hubhood’ folder and upload them to ‘hubhood-child’ folder. You can freely edit the files you have uploaded to ‘hubhood-child’ theme.
The changes done to ‘hubhood-child’ files won’t be overwritten when the core files of Hubhood theme be upgraded.
Updating Hubhood
To keep Hubhood Directory always updated to latest version, you will need to install the Envato Market plugin. This plugin is recommended during the installing process:

If by any reason you don’t have it installed yet, go to “Appearance / Install Plugins”. You can also download the Envato Market plugin here.
Installing the Envato Market plugin manually.
- Download the
envato-market.zipto your computer. - Login to WordPress and go to the ‘Plugins’ menu.
- Click ‘Add New’ and upload the
envato-market.zipfile, then activate.
Alternatively you can manually install the item via FTP
- Download the
envato-market.zipand unpack the archive. - Upload
envato-marketto the/wp-content/plugins/directory. - Activate the plugin through the ‘Plugins’ menu in WordPress.
After you have the Envato Market plugin activated, click the ‘Envato Market’ menu in WordPress dashboard to connect to the API. You need to generate an Envato API Personal Token, just need to follow the steps:

And that is it. After set your personal token, you will receive theme update notifications on your WordPress dashboard every time a new version of Hubhood Directory be available.
Installing Plugins
Plugins Included (Free)
Custom Fields for Gutenberg: Currently, custom fields are mandatory for WP Job Manager. This plugin enables custom fields for Gutenberg. Required for WordPress version 5.0 or higher.
Hubhood Add-ons: sets up important custom features for the theme, like widgets, taxonomies, meta boxes, reviews functionality, etc.
WP Job Manager: one of the world’s most popular and recognized listing plugin.
Easy WP SMTP: helps to configure SMTP to send emails with WordPress.
Envato Market: you will need this plugin to integrate your WordPress installation with Envato API. This way you’ll be able to keep Hubhood Directory always updated to latest version, right from WordPress dashboard, without need to download it manually from Themeforest on every update. Click here for detailed instructions.
Loco Translate: need to translate all site texts to your language.
One Click Demo Import: helps to import the demo content.
Regions for WP Job Manager: enable regions for listings.
Safe SVG: allows users to upload SVG files to WordPress. Activate it if you want to upload your own icons as SVG files.
Woocommerce: give access for users to manage their account data. Woocommerce is required too if you want to sell listing packages.
Plugins Not Included
Currently, all functionalities of the theme preview are built-in, no additional purchases of third party plugins (no hidden costs).
Installing Plugins
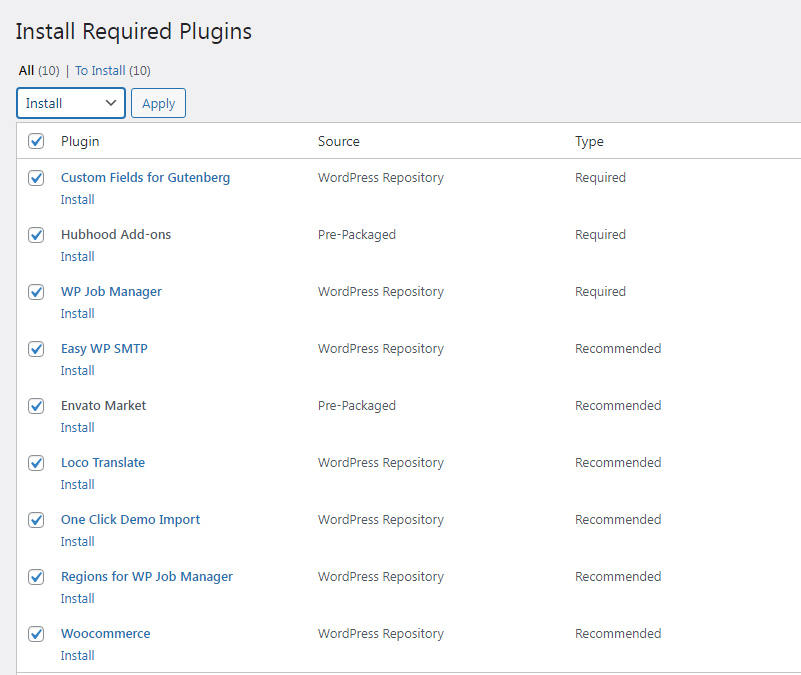
Right after activate the theme, you will see a notice containing the list of Required and Recommended plugins:

Click on ‘Begin installing plugins’ and, on next screen, enable all check boxes. Choose ‘Install’ on the ‘Bulk Actions’ selector and ‘Apply’.
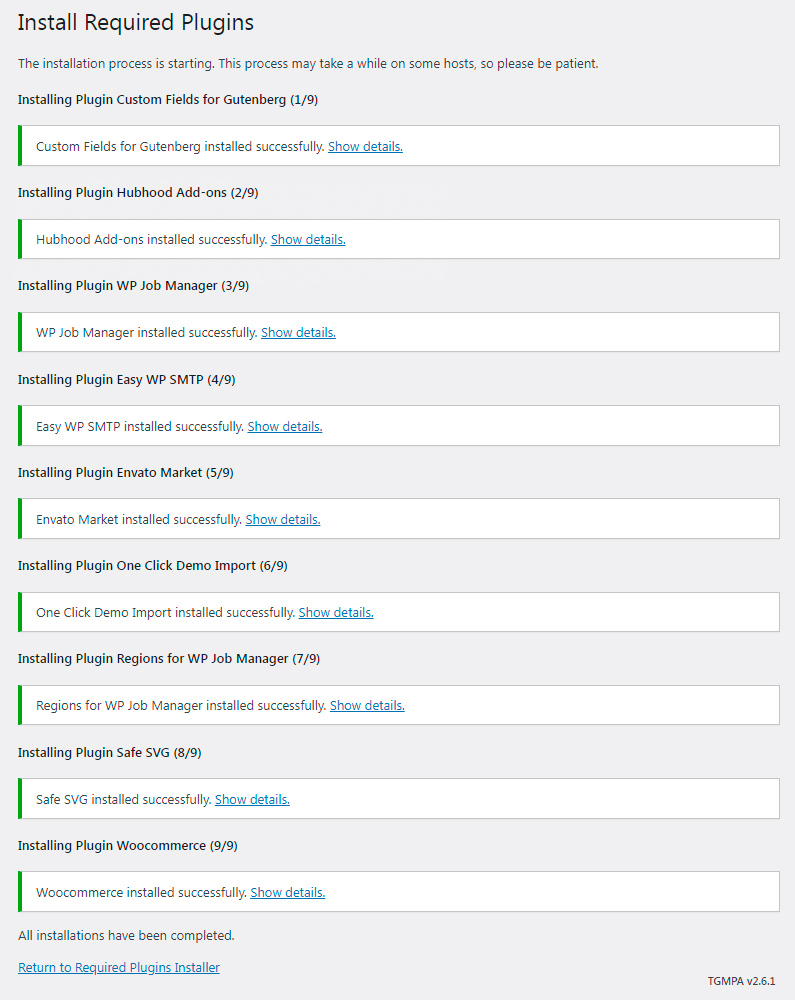
After complete the installation, a confirmation screen will be displayed, just check if all plugins were properly installed with no errors. If everything is OK, scroll down and click on ‘Return to Required Plugins Installer’.
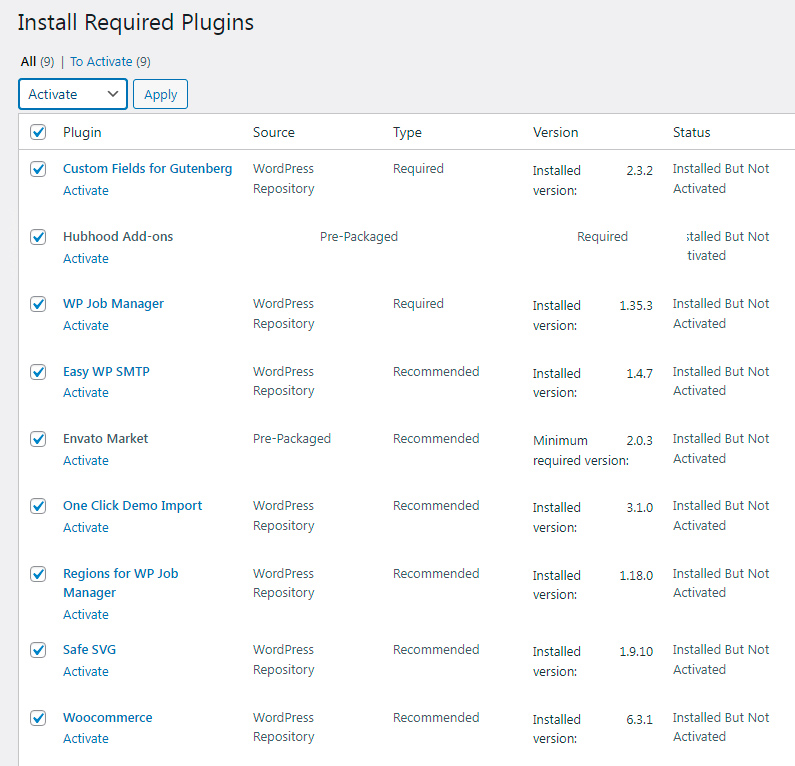
It will return to the last screen. Enable all check boxes again, choose ‘Activate’ on the ‘Bulk Actions’ selector and ‘Apply’.
Demo Content
Importing Demo Data
After activate all plugins, the next screen will display a new link: Go to demo import page.
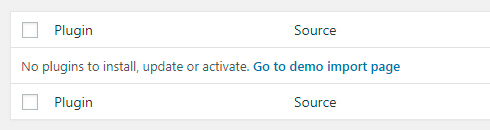
Click on this link or access Appearance / Import Demo Data’ and you’ll be redirected to ‘One-Click Demo Import’ page.
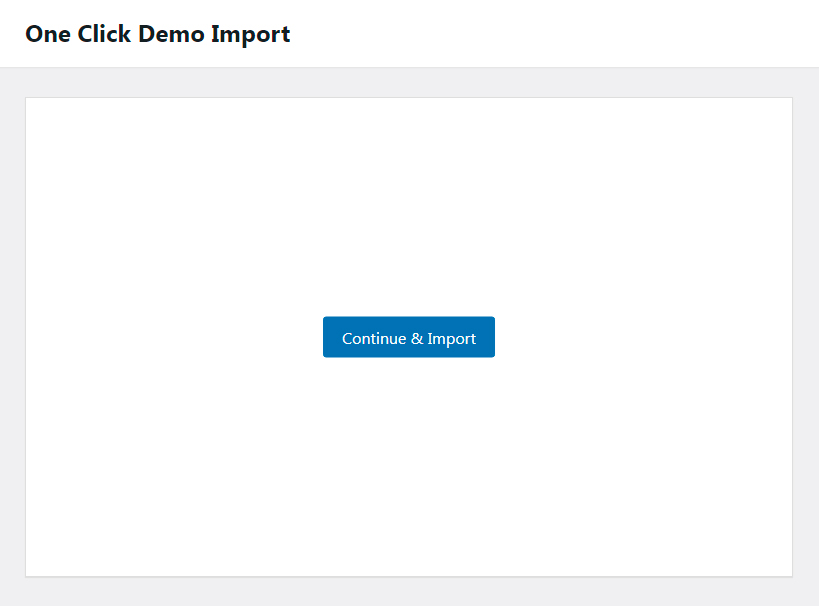
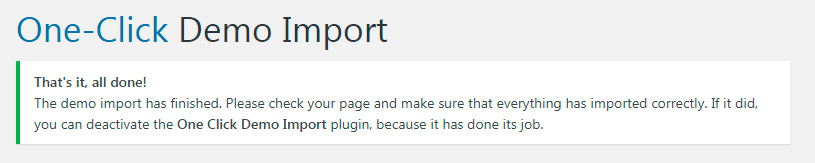
Click on the ‘Continue & Import’ button and wait. Don’t close this window before the process complete.
Notice: as described on Hubhood’s product page on Themeforest, the images available on the theme preview can’t be redistributed and won’t be available on your site after the demo import, empty placeholder images will be imported instead.
Hubhood Widgets
Hubhood Widgets
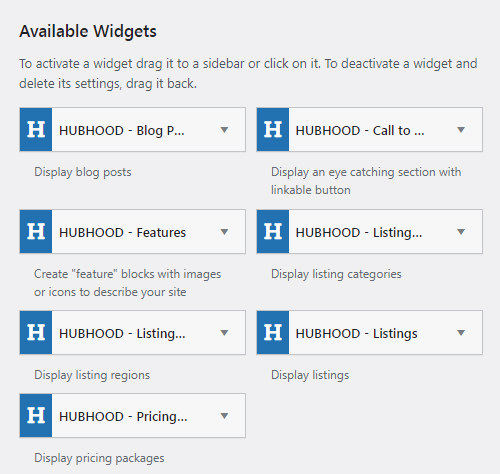
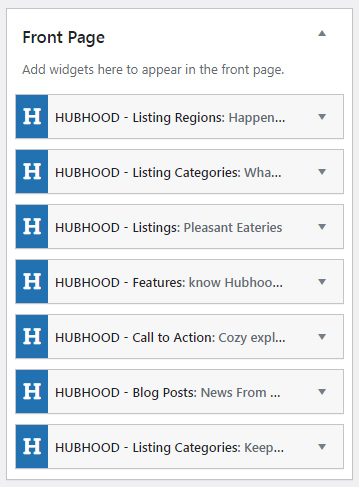
Hubhood comes with custom widgets included, go to ‘Appearance / Widgets’ to verify. If you have installed and activated all required and recommended plugins, the widgets listed below will be displayed firstly:
New widgets may be available for the current version of the theme.
Mostly recommended to the front page:
- HUBHOOD – Blog Posts: displays blog posts ordered by ‘Date’ (most recent) or in ‘Random’ order.
- HUBHOOD – Call to Action: displays a ‘call to action’ section with options for title, subtitle, description, background image, link and text for the button.
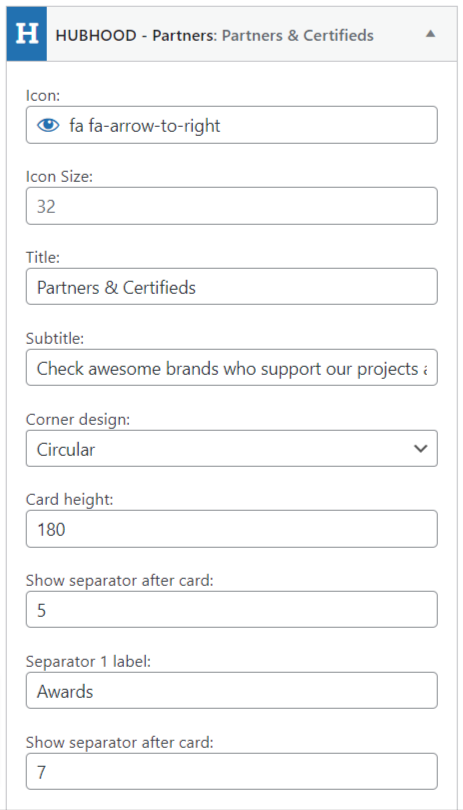
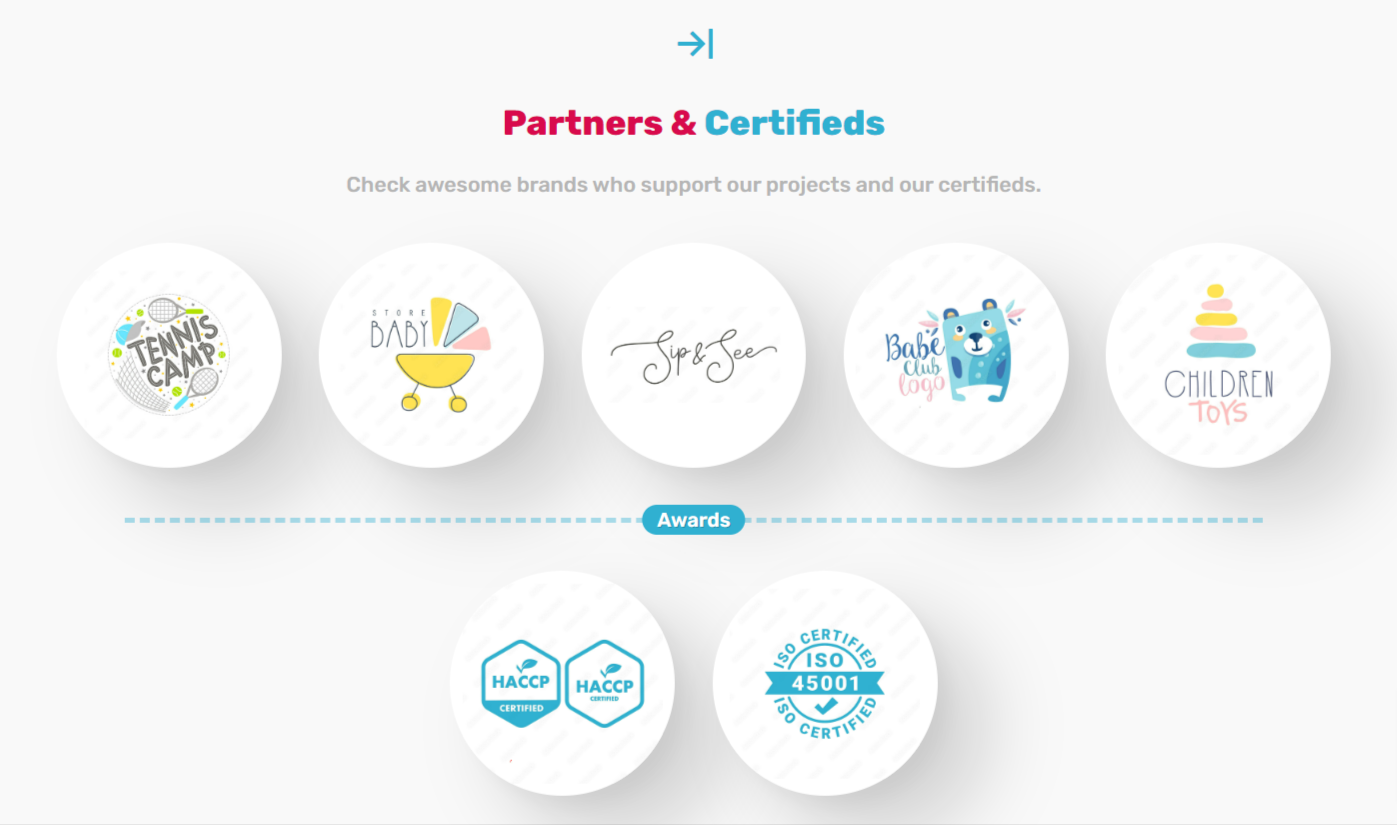
- HUBHOOD – Features: create ‘feature’ blocks with options for title, icon or image, description, and optionally link it to any URL of your site or external sites.
- HUBHOOD – Listing Categories: display listing categories with their background images and amount of listings.
- HUBHOOD – Listing Regions: display listing regions with their background images.
- HUBHOOD – Listings: display listings ordered by ‘Date’ (most recent) or in ‘Random’ order.
- HUBHOOD – Pricing: display listing packages available to purchase.
Home Page
Setting The Front Page
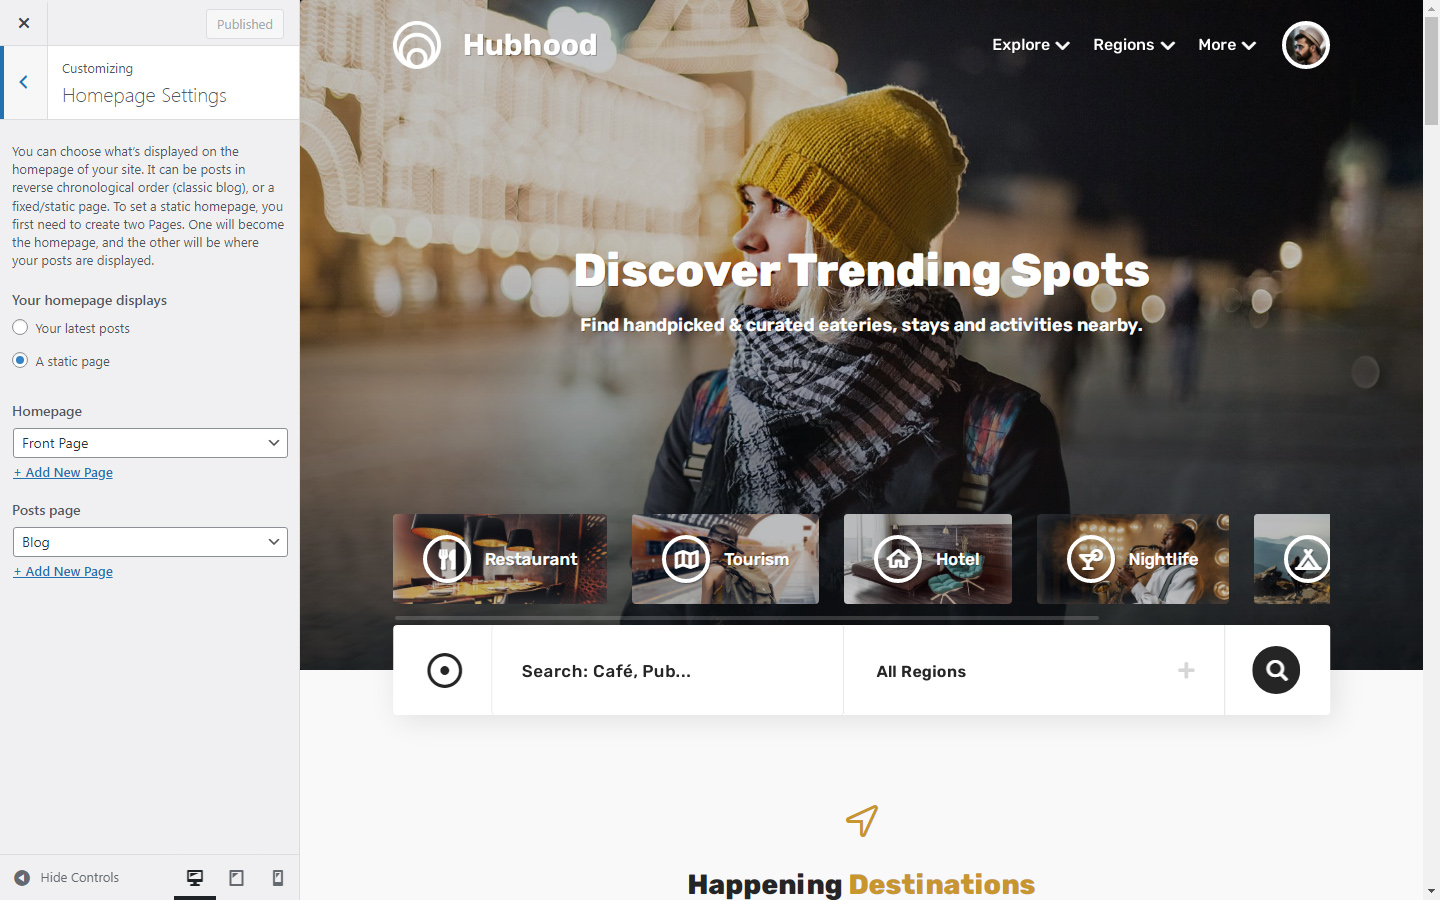
On the WordPress dashboard menu, go to ‘Pages / Add new’ to create a new page. Insert a recognizable title, like ‘Front Page’, and leave the page content empty. On ‘Page Attributes / Template’, choose ‘Front Page’.
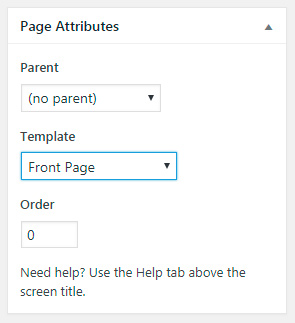
‘Publish’ the page.
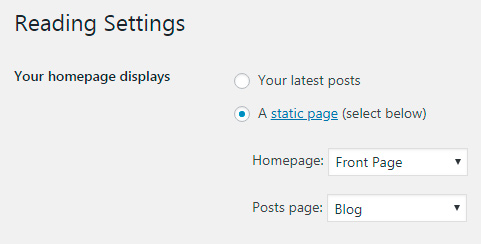
Now, on the WordPress dashboard menu, go to ‘Settings / Reading’. Choose ‘A static page’ to the ‘Your homepage displays’ section, and configure your brand new page to the ‘Homepage‘ selector.
Front Page Title
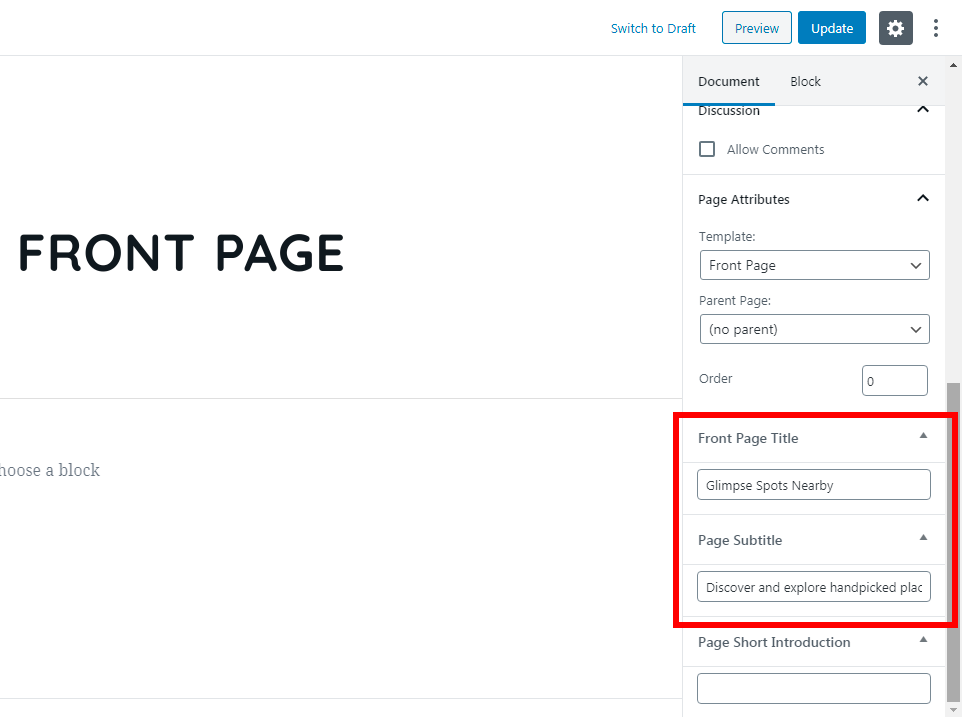
To set the front page Title and Subtitle, go to ‘Pages’ to edit the page you have just created (Front page).
Scroll down the right sidebar, until the end, and you will see both fields:
Front Page Hero Image
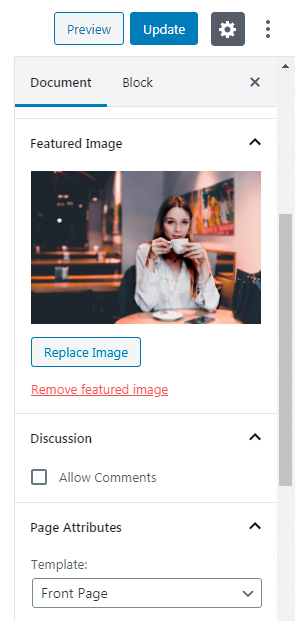
To set the cover (hero) image to front page, go to ‘Pages’ to edit the page you have just created (Front page). On the right sidebar, ‘Document’ section, scroll down to see the ‘Featured Image’ component. Upload and select your hero image. Click on ‘Update’ button to conclude.
Front Page Content
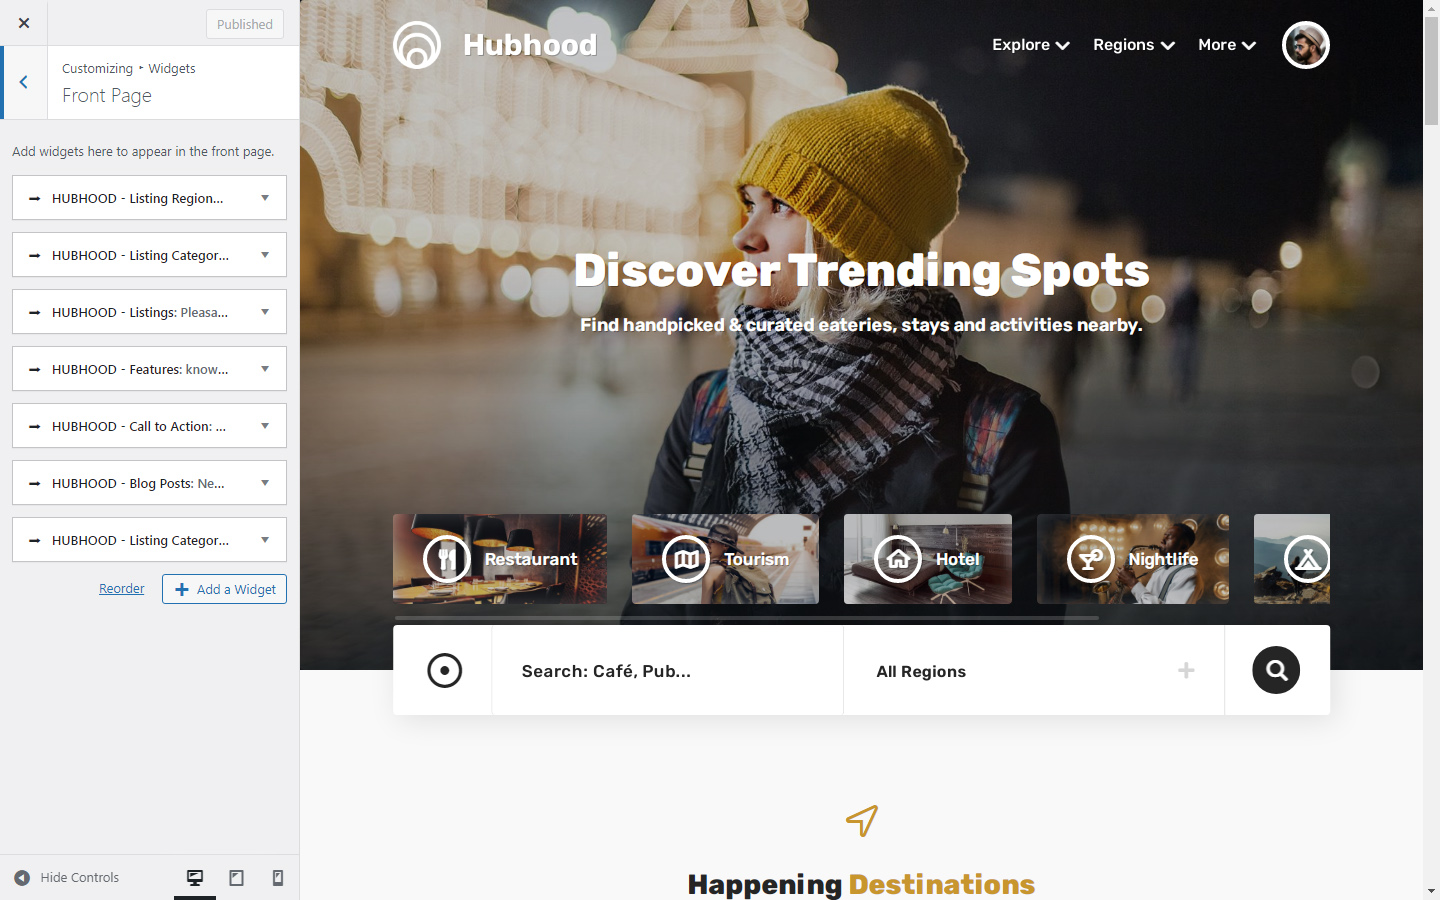
The front page content is populated with widgets. Go to ‘Appearance / Widgets’. and drag/drop the ‘Hubhood’ widgets into the ‘Front Page’ sidebar. Configure and order the widgets as you wish.
Customizer
Intro
The WordPress Customizer is a very helpful tool that makes possible to quickly modify settings or contents of your site and preview the changes before turn it public.
Site Identity
On ‘Appearance / Customize / Site Identity’, you can set a custom logo to be displayed on the top bar of the site. If the logo isn’t set, the ‘Site Title’ will be shown instead.
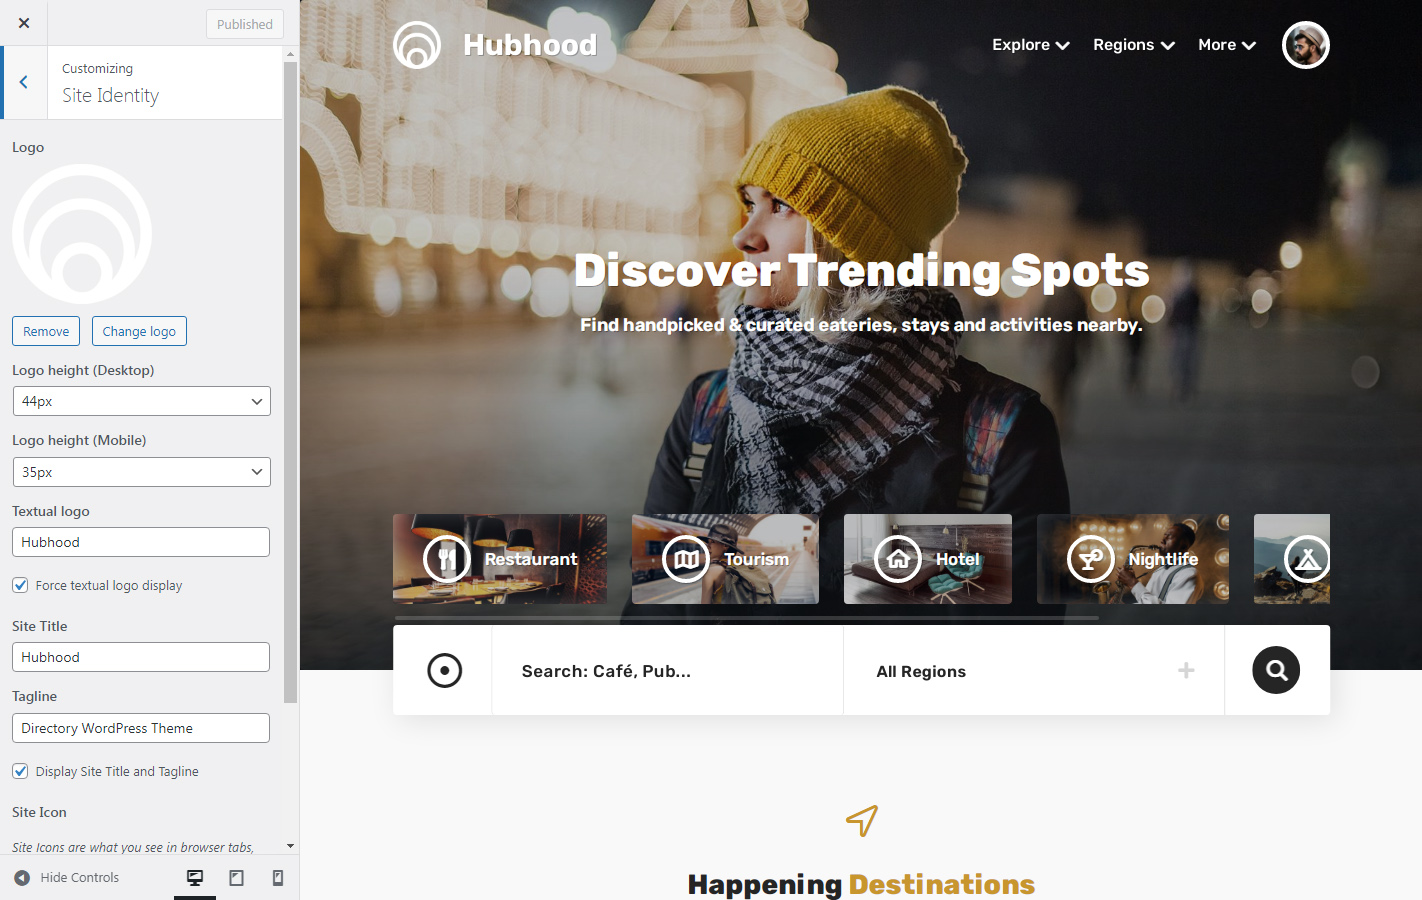
To better describe your site for search engines, you can optionally set a ‘Tagline’ text too.
On this same section of the WordPress Customizer, you can upload and set the ‘Site Icon’. Read the available description of this option for more details.
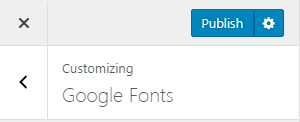
Google Fonts
Hubhood is smartly integrated with Google Fonts. Go to ‘Appearance / Customize / Google Fonts’ and check the predefined fonts available to:
- Body Font: the default font for all texts of your site.
- Headings Font: a secondary font to display heading sections, titles and other special texts more highlighted. The recommendation is to use a thick font.
The default Google Fonts available are recommended by typespiration.com.

You can also add new Google Fonts to the font list, click on ‘Need help?’ to check the instructions.
And if you don’t need certain custom fonts you have added, use the ‘Delete a Google Font’ selector. You need to add at least one font to see the ‘Delete a Google Font’ selector.
To add or delete fonts, you need to click on ‘Publish’ button.
Colors
On ‘Appearance / Customize / Colors’ you can customize the ‘Theme Color’, ‘Front Page Header’, the ‘Site Background Color’. New options may be available for the current version of the theme.
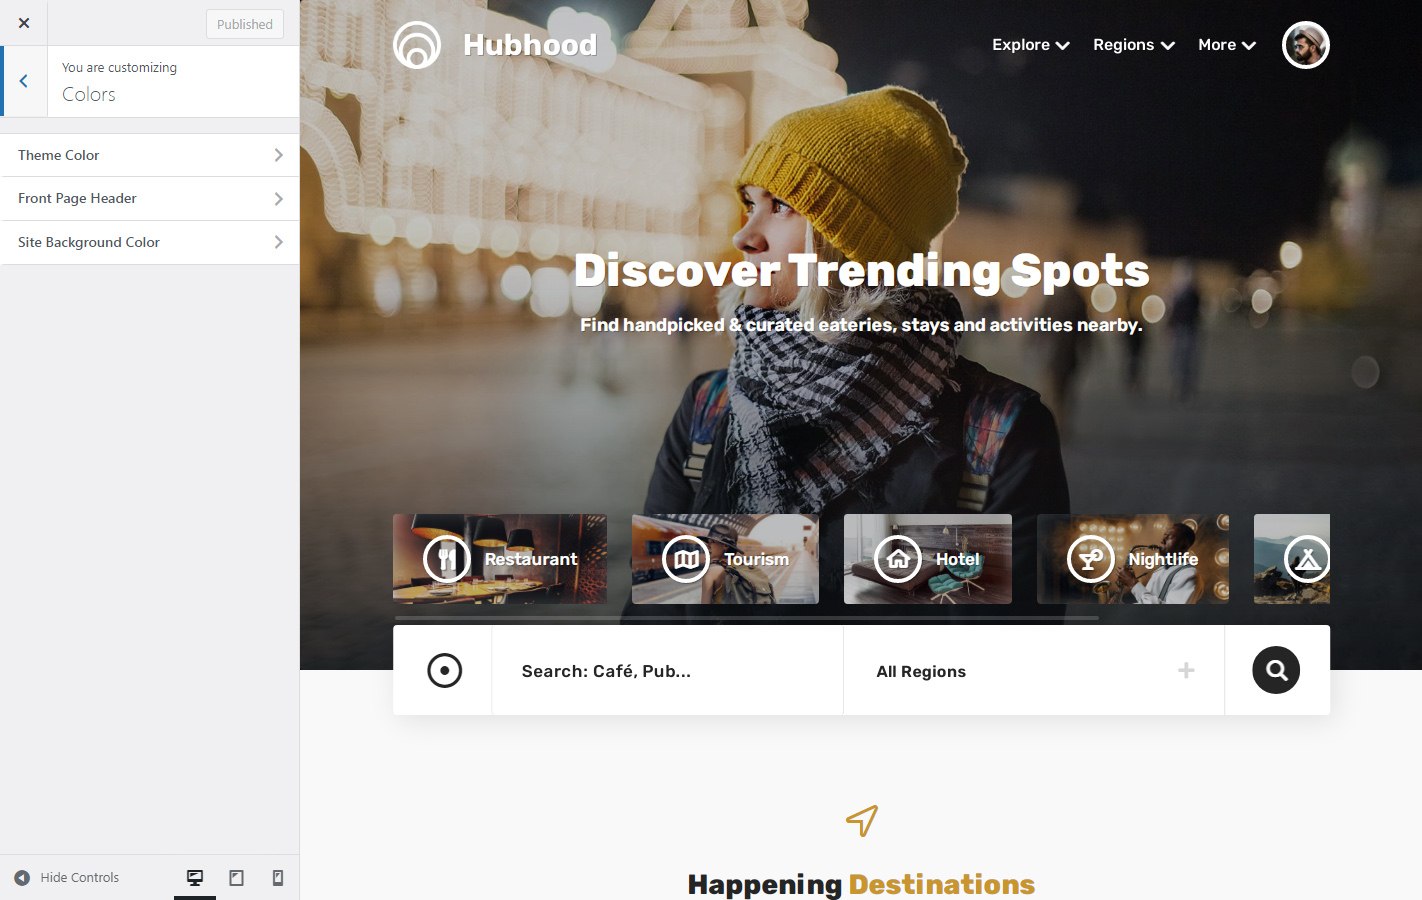
The background color is a ‘very’ optional configuration provided by the WordPress core, most of the sites can keep this option unset or use a light color.
Header Image
If set, this fallback Header Image will be displayed as cover image in last case, if background images are not set to:
- Pages (except front page)
- Blog search (if not set on Theme Options / Default cover image to blog search page, tags, archive, etc)

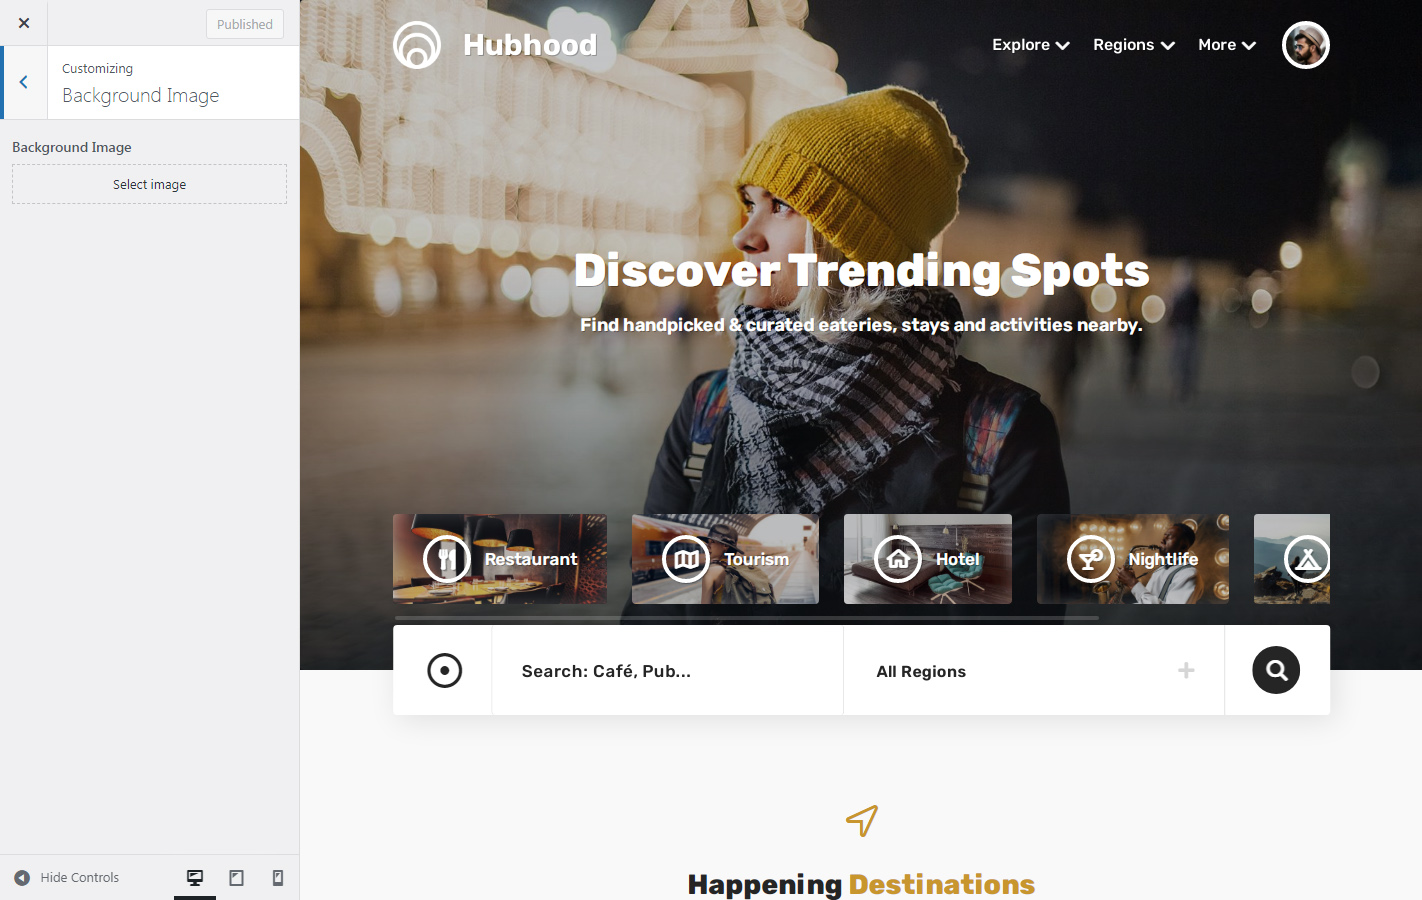
Background Image
Like the ‘Background Color’, the ‘Background Image’ also is a WordPress core feature. Upload any image if you wish a background image to the site. Most of the sites can keep this option unset or use a very light and clean background image.
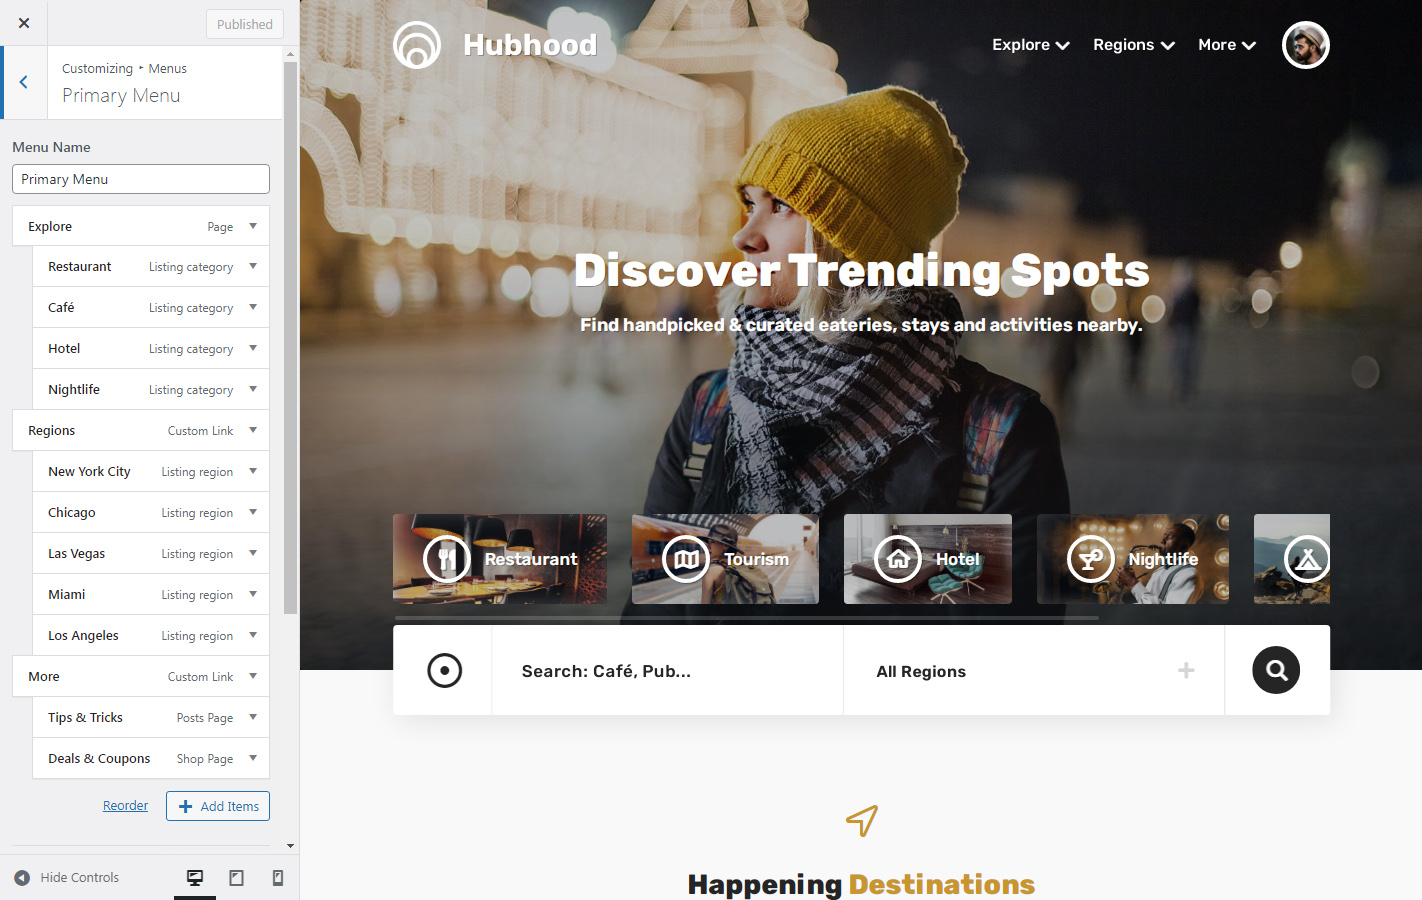
Menus
Currently, Hubhood has these menus:
- Primary Menu: shown publicly on the top bar of the site.
- Prefooter Menu: shown before footer. Recommended for social networks (as shown on the theme preview) or any other list of links.
- Footer Menu: displayed on the very bottom of the page.
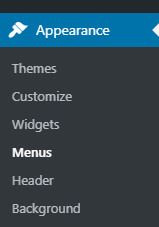
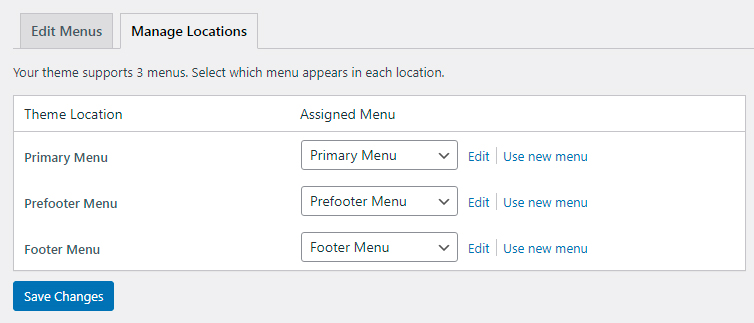
Go to ‘Appearance / Customize / Menus’ or ‘Appearance / Menus’ to create or set your menus.
Primary Menu – Via WordPress Customizer
Click on ‘View Location’, select a menu (if available) and ‘Publish’.
Primary Menu – Via ‘Appearance / Menus’
Click on ‘create a new menu’ if not available yet.
Add the desired links available to pages, categories, listing categories, listing regions, custom links and so on. After add links, you can drag and drop them to reorder or define levels, that is, which links should be displayed as a submenu of other links.
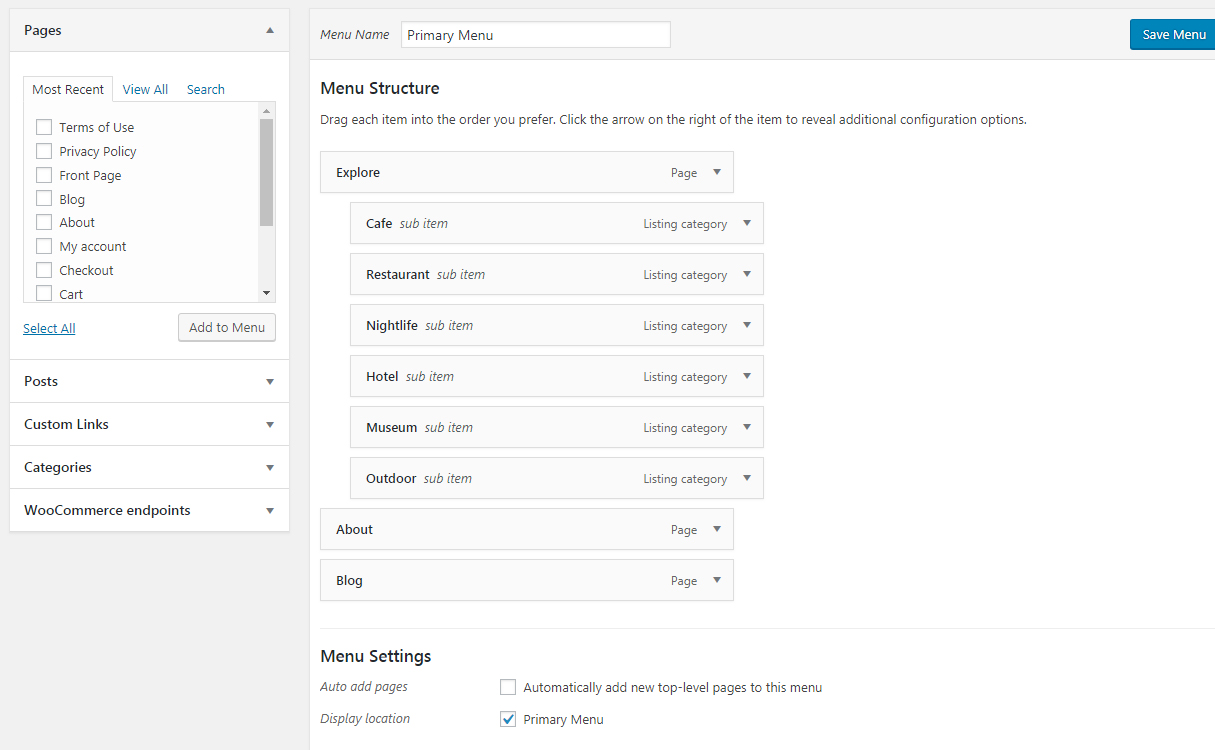
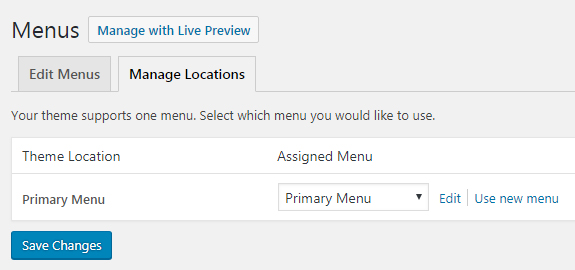
After finished, go to ‘Manage Locations’ and select this menu as ‘Primary menu’.
Footer Menus
Prefooter Menu
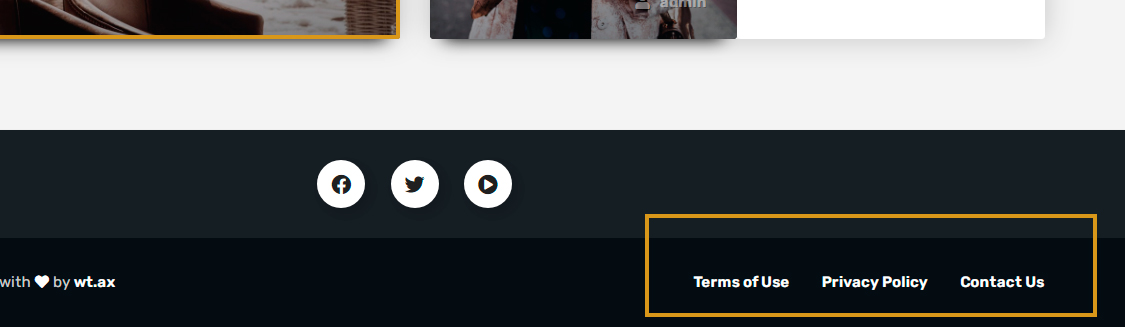
On the footer of the theme preview, you can see circular buttons for Social Networks. This is the Prefooter Menu:

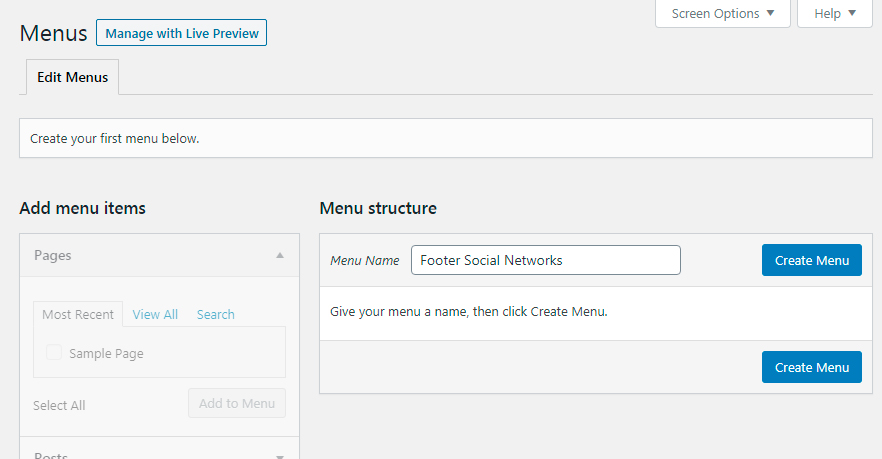
To set your Social Networks on the footer, go to ‘Appearance / Menus’.
Create a new menu and give it a name, example: ‘Footer Social Networks’.
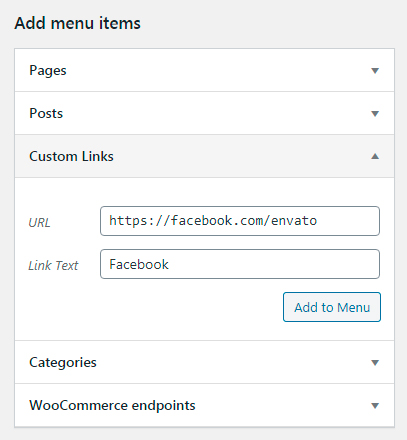
Create and Add a custom link to your menu by using the URL of a social network.
Hubhood will recognize links for the most popular social networks and automatically append icons.
After finish, your ‘Prefooter Menu’ should look like this:
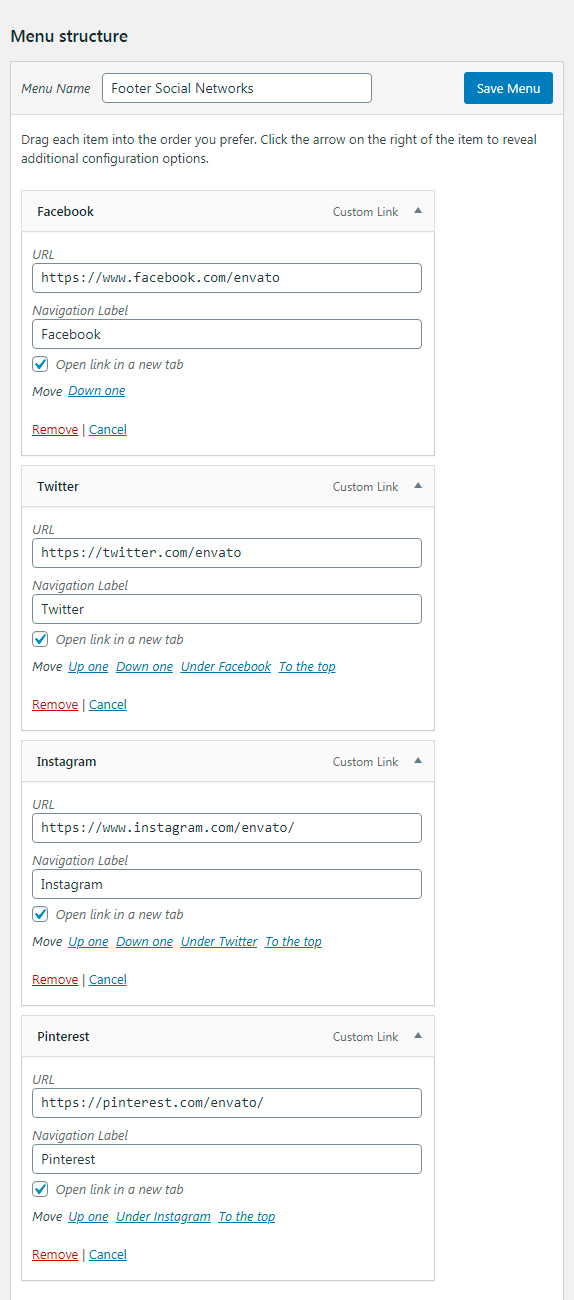
Click on ‘Save Menu’ button to conclude these changes.
After set all links of your prefooter menu and save it, go to ‘Manage Locations’ and select this menu as ‘Prefooter Menu’.
Footer Menu
The same steps explained above can be applied for this menu. The Footer Menu looks like this:
After set all links of your footer menu and save it, go to ‘Manage Locations’ and select this menu as ‘Footer Menu’.
Widgets
On ‘Appearance / Customize / Widgets’, you can add/remove widgets to:
- Front Page,
- Blog Sidebar
Notice that these widgetized areas (sidebars) only will be visible on WordPress Customizer if the current preview page contains it. For example, to edit the Blog Sidebar widgets, you need to browse to any blog page, like a blog category or article.
It is very simple to manage widgets with WordPress Customizer, just choose a widgetized area available, click on ‘Add a Widget’ or drag and drop the current widgets to reorder. You can also manage widgets on ‘Appearance / Widgets’.
For more info about the custom widgets available to Hubhood, see Hubhood Widgets.
Homepage Settings
This section simply offers a alternative way to set and preview the Front page and the Blog page before turn the changes public.
Theme Options
General
Access the ‘Appearance / Theme Options’ menu to verify additional configurations to Hubhood.
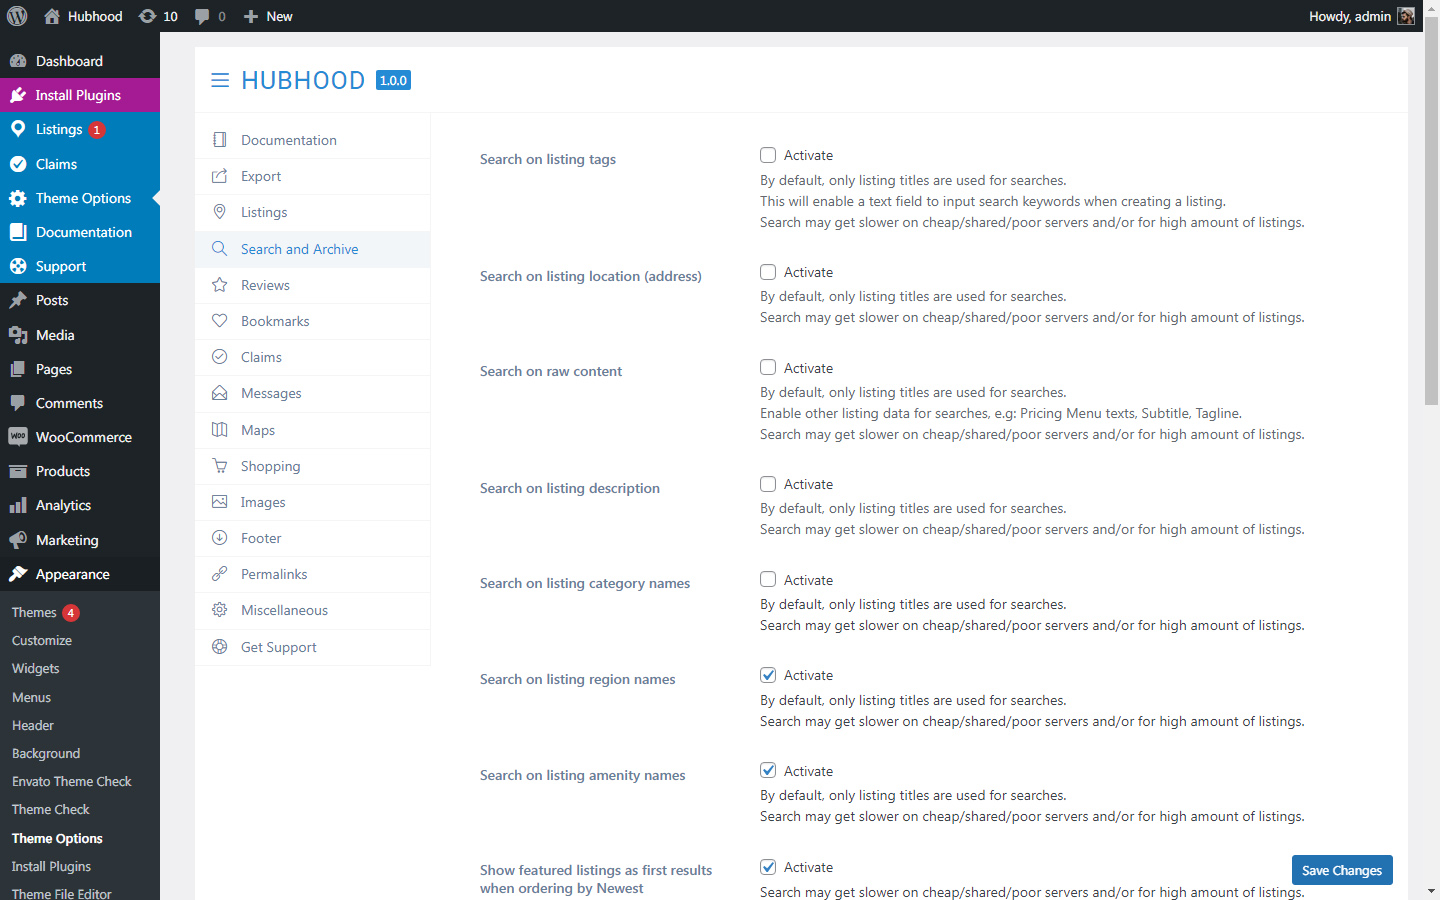
These options are very intuitive and self explanatory in their titles, and certain options have a detailed description below. Please contact us if you have any question.
Background Images
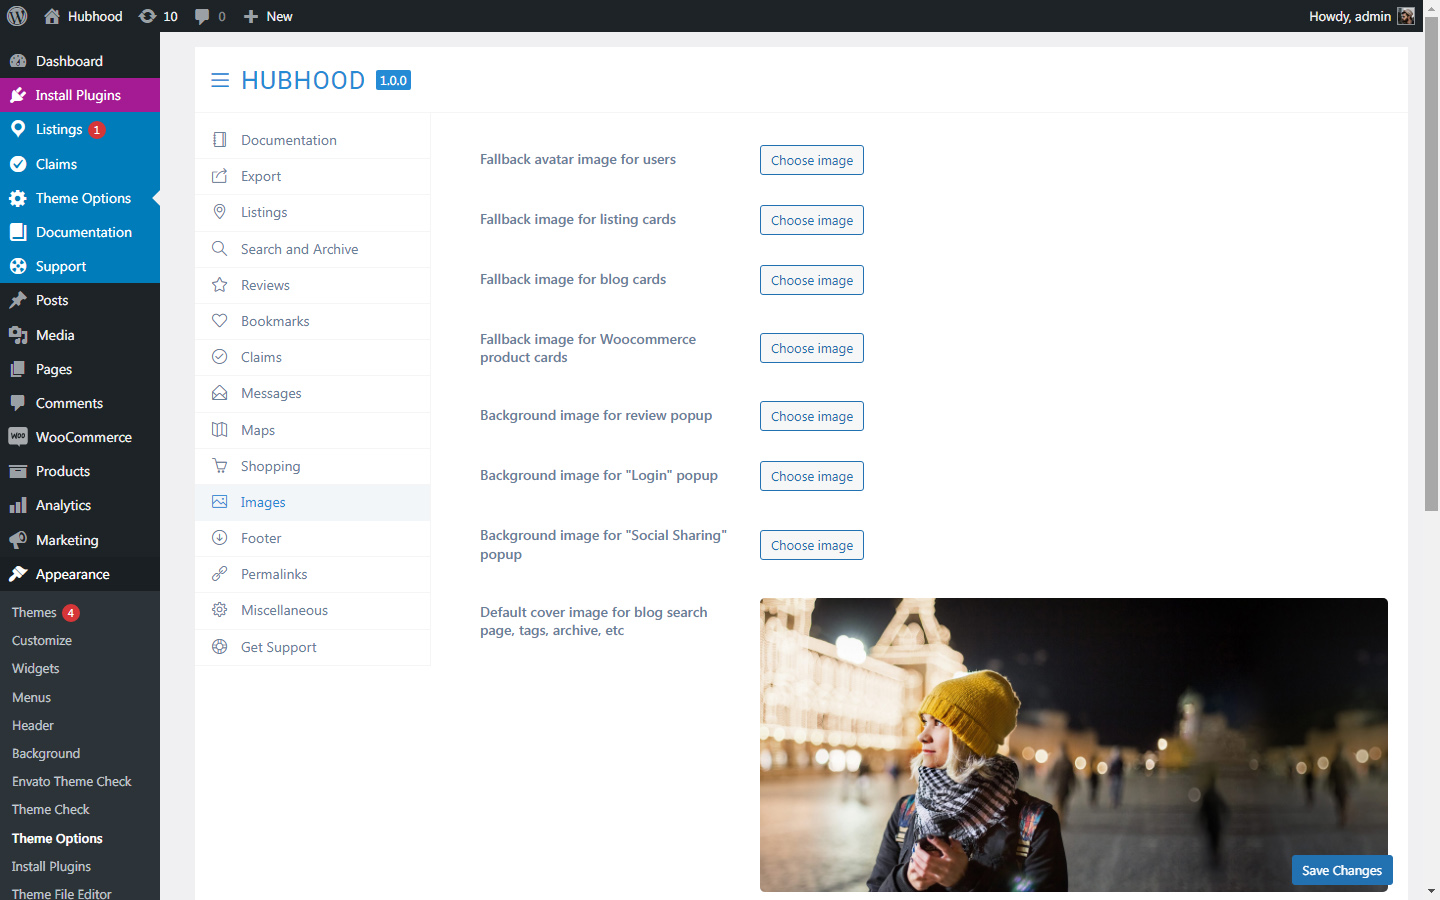
On ‘Appearance / Theme Options / Images’, you can set different background images for certain sections of your site. Here are some examples:
- Fallback Image for Listing, Blog and Woocommerce product cards
- Background image for Review popup
- Background image for Login popup
- Social Sharing popup
- Cover image to blog search page, tags, archive, etc
- Cover image to 404 page
Please notice that you can also set a background/cover image when editing:
- Pages (Featured Image)
- Posts (Featured Image)
- Single Listings (Featured Image or Listing Gallery)
- Blog Categories
- Listing Categories and Listing Regions
And also set a fallback Header Image via WordPress Customizer.
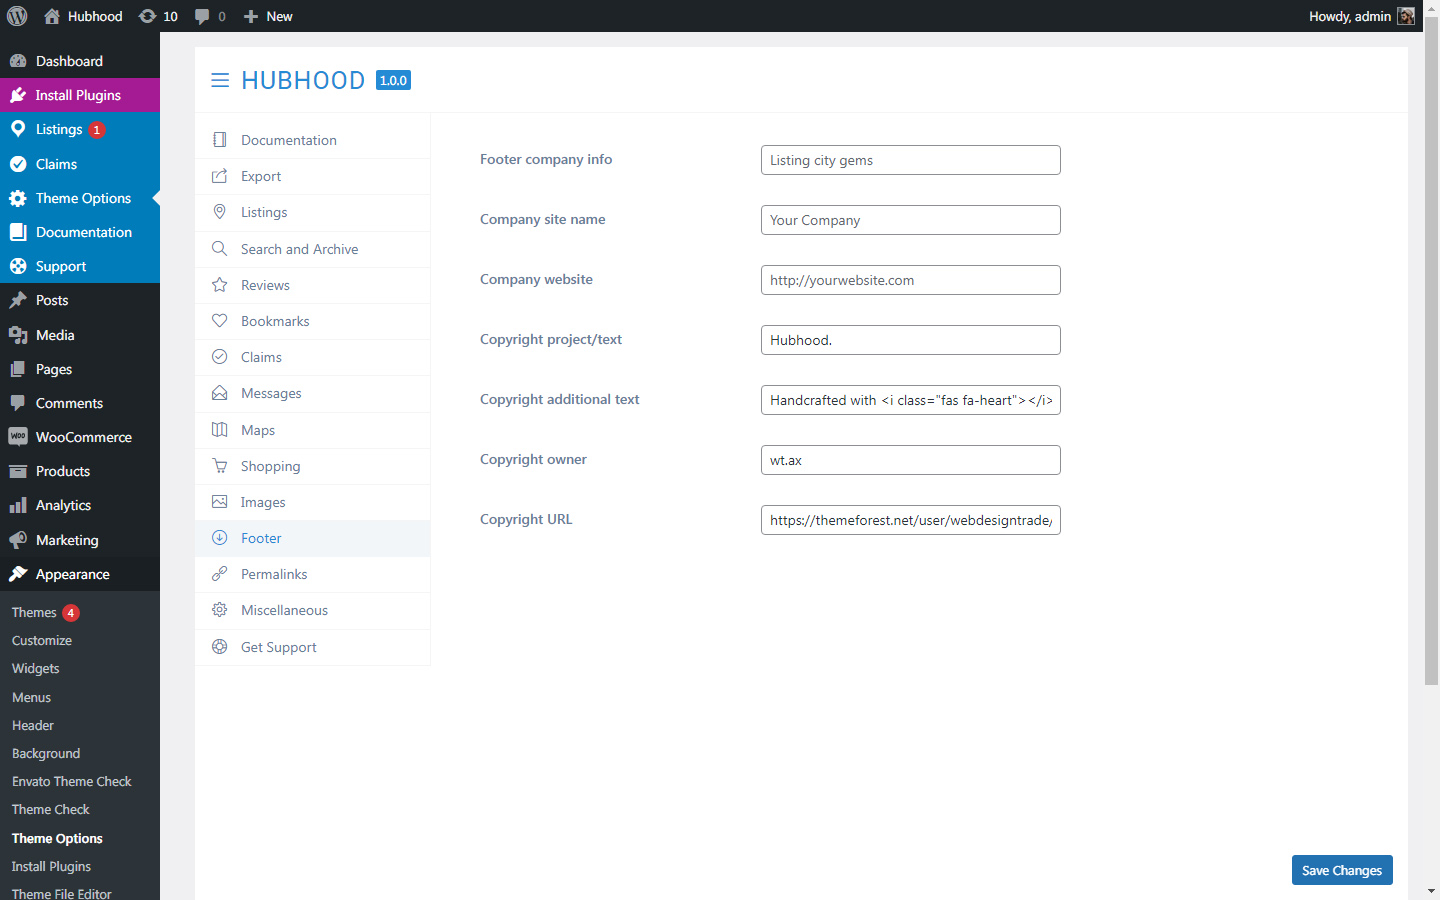
Footer
Theme Options for Footer
These are the options available to the footer of the site, notice that the fields are self explanatory:
Listings and Woocommerce
Intro
Hubhood is integrated with WP Job Manager and Woocommerce. On this chapter we’ll cover the directory management, listing settings in general and how you can make profits with your new directory site.
Notice: you need to properly configure your Woocommerce payment methods to sell listing packages or any Woocommerce product. Check the Woocommerce official documentation for detailed info.
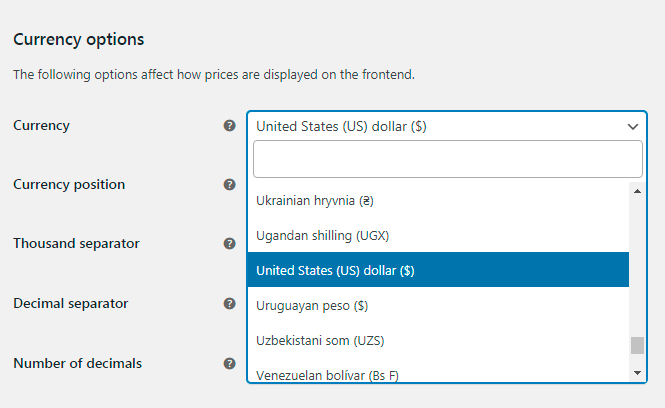
Change Currency
To change currency, go to WordPress dashboard / Woocommerce / Settings / General tab. Scroll down the page to see the “Currency options” section:
Geocoding Providers
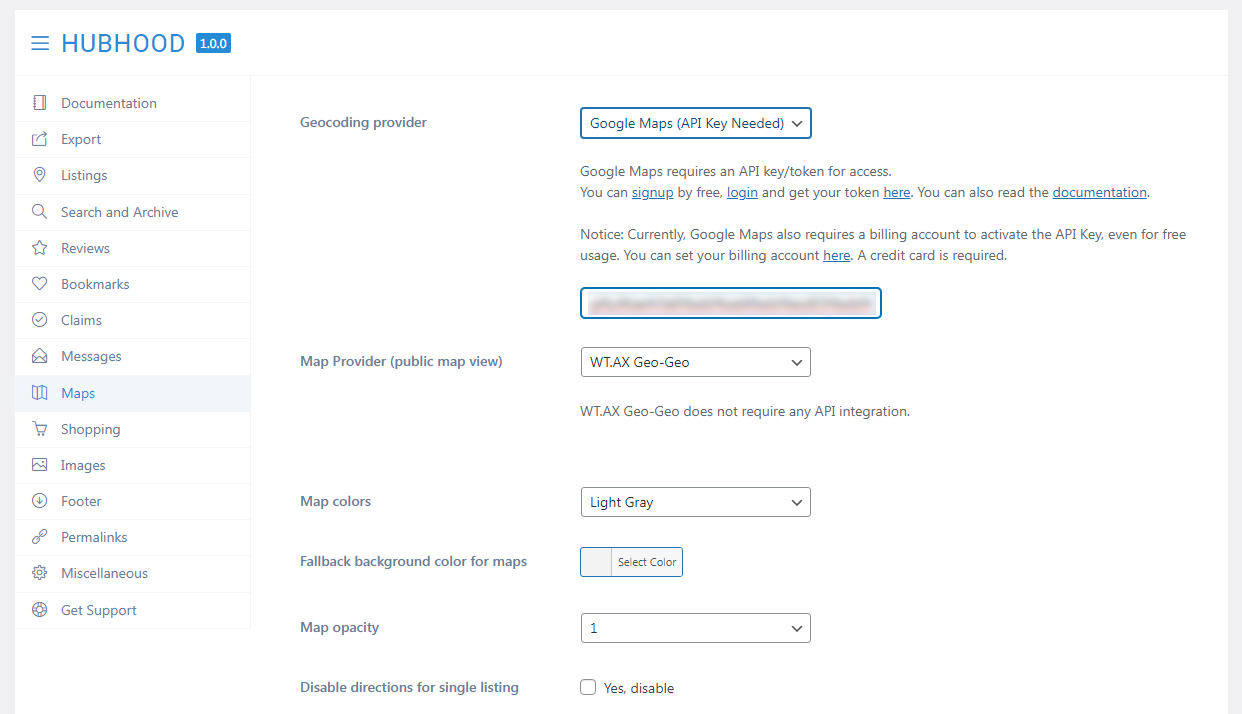
After install the theme, go to Theme Options / Maps. You will find that the default geocoding provider for Hubhood Directory is WT.AX Geo-Geo:
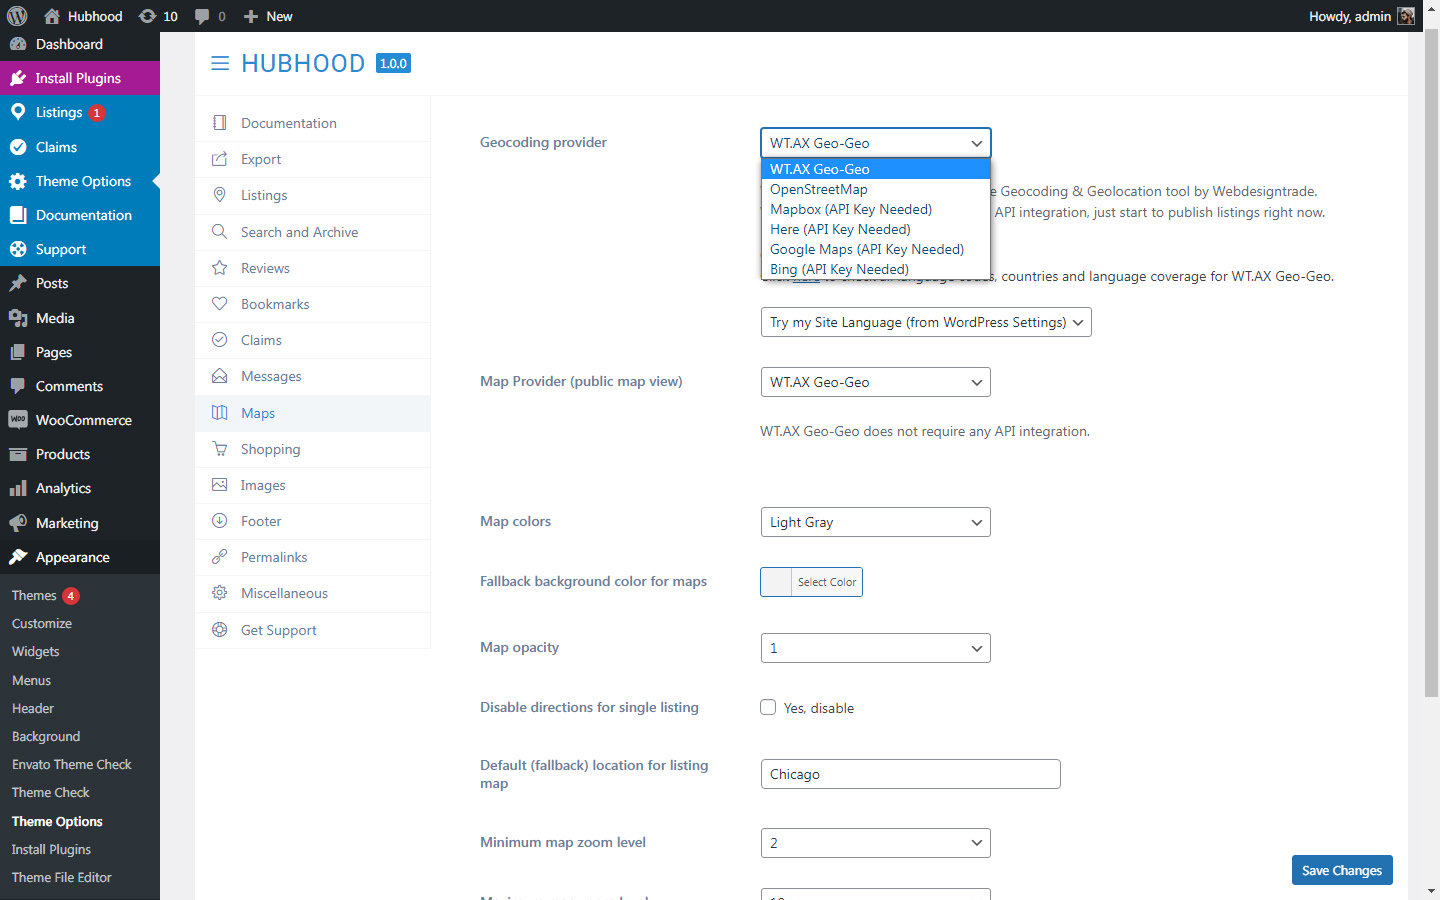
WT.AX Geo-Geo by Webdesigntrade is a Geolocation and Geocoder (reverse) provider exclusively developed for Hubhood directory. It does not require any API integration or advanced configurations, just start to publish your listings.
Optionally, if you are used to work with other geocoding provider, Hubhood Directory is compatible with these services:
- OpenStreetMap
- Mapbox
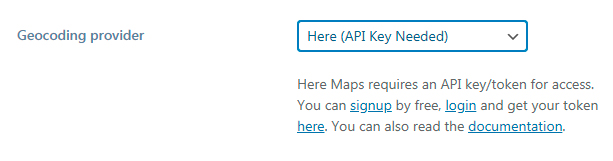
- Here
- Google Maps
- Bing
Excepting OpenStreetMap (and WT.AX Geo-Geo), all other geocoders of this list requires API integration. If you decide to use any of them, select it on the “Geocoding provider” list to see the related instructions:
On the next chapter, check an example of third party API configuration for maps (Google Maps).
Google Maps API Key – Example
As explained before, WT.AX Geo-Geo is the default built-in geocoding/geolocation provider for Hubhood Directory and there is no need to any map API integration. This step by step is just a example of integration with third party API services.
Google offers an absolutely very huge limit for Google Maps API usage, most site owners will set the API key and forget about limits. Here are additional info before create your API key.
In resume, Google demands that everybody create a billing account before make use a Google Maps API key.
Why don’t you need to worry about?
Google Maps API is only requested by Hubhood directory when a listing is published or modified, meaning you can edit/publish 100,000 listings on first month (by free) and 40,000 listings (every following month, by free as well).
Yes, we said it was very huge, right?
This applyes for all directory themes?
The answer is YES!
Conclusion:
You won’t pay anything for Google, but it is required to create a billing account even so. You will need a credit card for that.
Google Maps API Key – How To
Google keeps modifying/improving the following screens. Please send an email to [email protected] if you find this step by step isn’t fair to Google Maps API pages anymore.
Before start to create listings, you need to get a Google Maps API Key. You can follow this ‘step by step’ about the process, please understand that the screens and texts may change to non English users. If you need more detailed help on this task, get in touch with us. You need the ‘WP Job Manger’ plugin active before proceed.
1 – Access the Google Developer console and do login if needed.
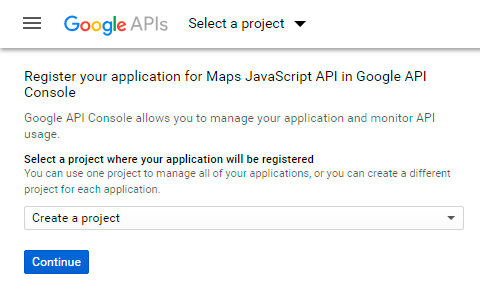
2 – Create a new project. Click on ‘Continue’ and wait some seconds, you will be redirected to a new screen.
3 – Your next screen should be like that:
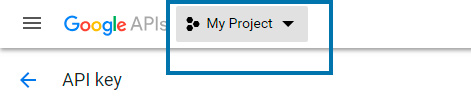
If not, access the menu of projects on the top bar:
On the ‘Select a project’ modal opened, click on the project name:
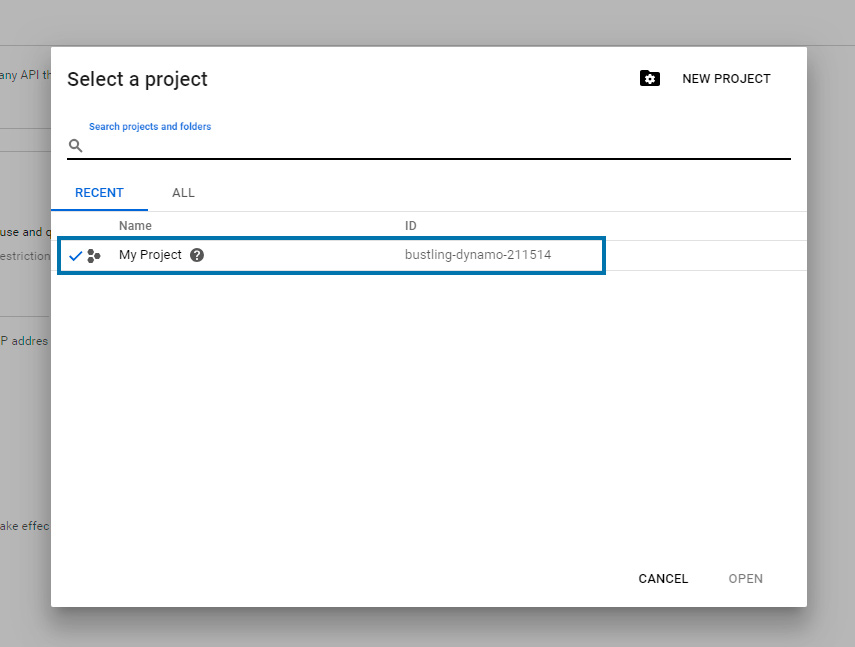
You don’t need to set any API restriction by now, just click on ‘Create’ button. If you want to apply restrictions, you can return and do it later.
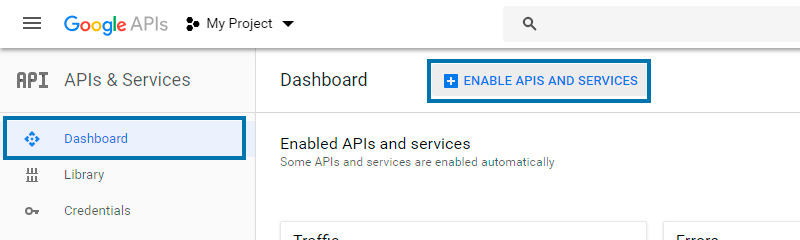
4 – On next screen, click on ‘Dashboard’ tab and ‘Enable APIs And Services’.
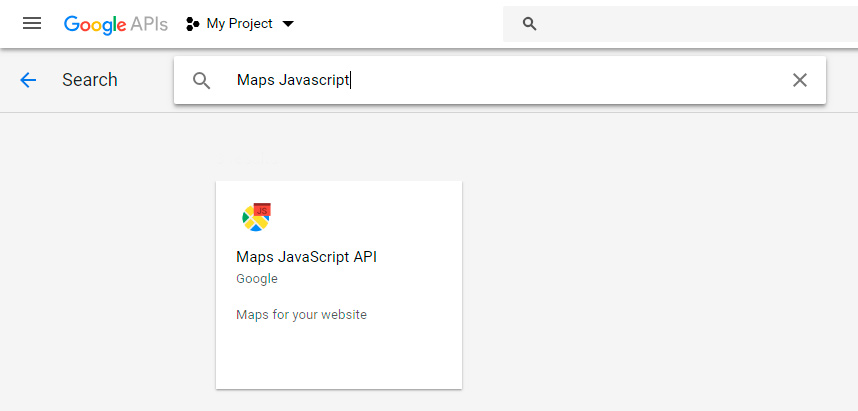
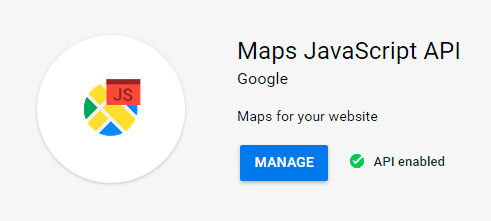
5 – On next screen, search and Enable the following API services:
- Maps Javascript API
- Geocoding API
- Geolocation API
- Places API
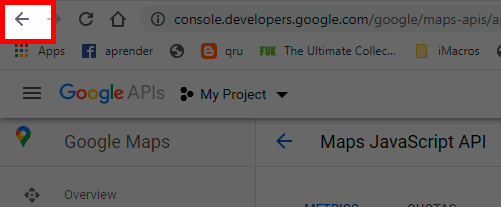
Browsing tip: After activate an API, you will be redirected to a page for management of this API. Example:
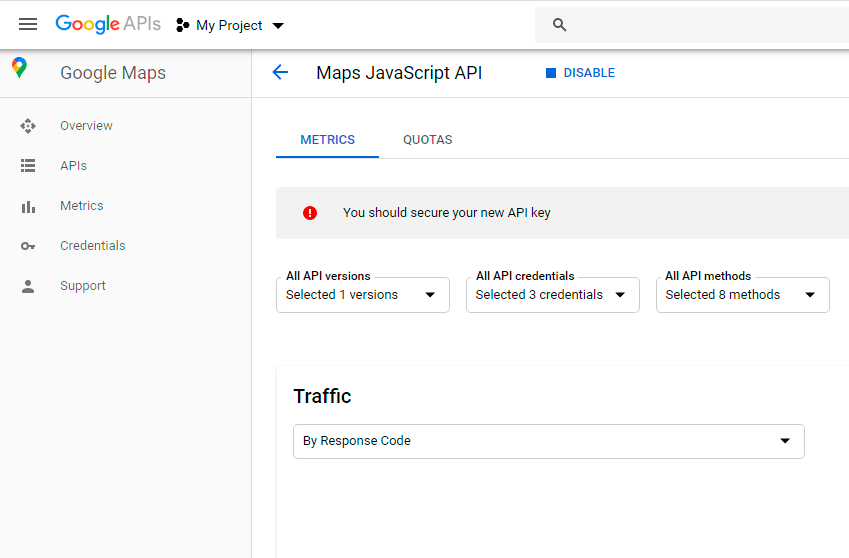
You don’ need to do nothing on these pages, just use the “Go back” arrow (except for the last API) from your browser to return to the API search page. You’ll mostly need to “Go Back” three times:
Notice: Currently, not all of these APIs are supported by Hubhood, but keep them active by now, so you won’t need to modify your Google API settings if we launch updates that can require these APIs.
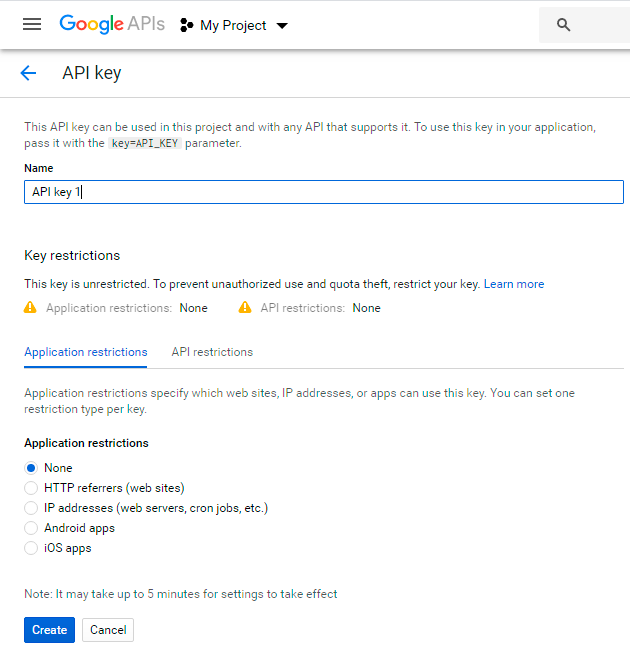
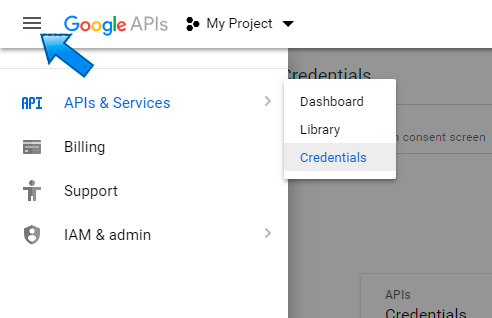
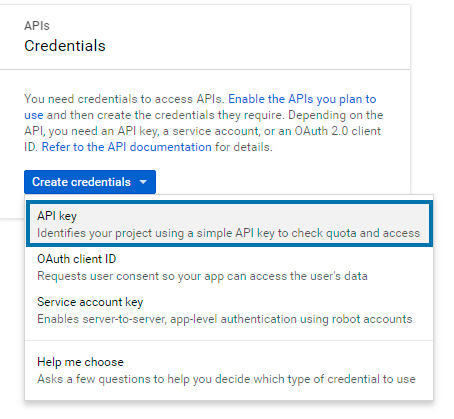
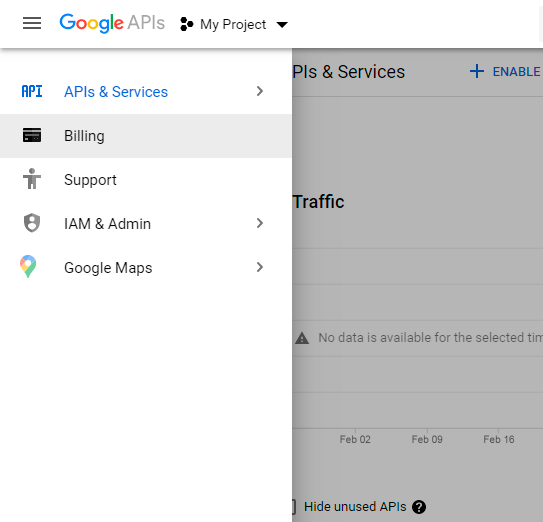
6 – After install the last API (Places API), you don’t need to return (Go Back) to last page. Click on the main navigation menu, ‘APIs & Services / Credentials’:
7 – Click on the ‘Create credentials’ button and choose ‘API Key’:
8 – Copy the API key generated:
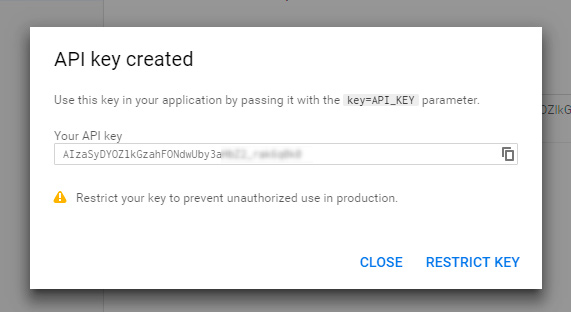
Get back to WordPress admin dashboard, access the ‘Theme Options / Maps’ menu. For “Geocoding Provider“, choose ‘Google Maps’, paste the copied key and ‘Save Changes’.
Because of new rules from Google, your Google Maps API key probably isn’t working yet. You need to proceed for next chapter (Billing) to fix that.
Google Maps API Key – Billing
As stated before, Google Maps API Keys mostly won’t work until you set your billing account. Despite of that, click here to understand why you don’t need to care about.
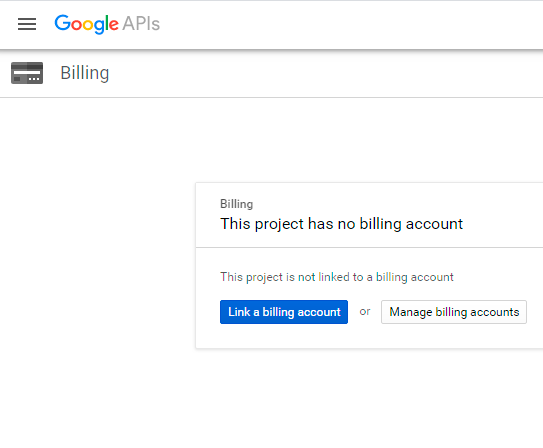
Go to main navigation menu and click on Billing:
Click on Link a billing account:
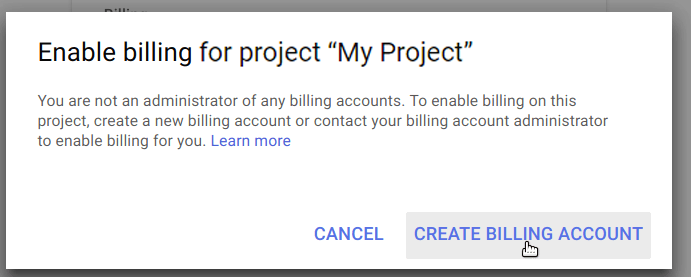
Click on CREATE BILLING ACCOUNT:
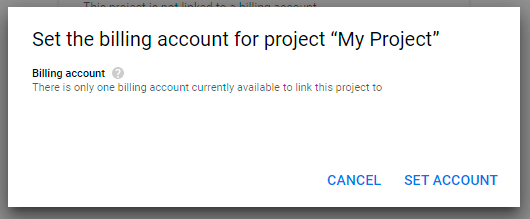
Notice: If you already have your data configured for a billing account, the screen bellow will be displayed instead. If this is your case, just click on “Set Account”:
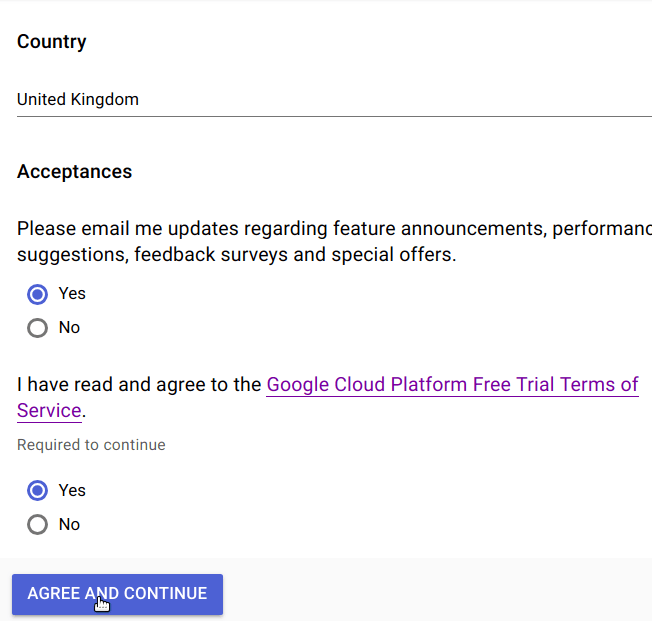
On the next page, click on both Yes radio buttons and click AGREE AND CONTINUE:
On the next page, enter your customer information:
- Your account type.
- Your tax information.
- Your name and address.
- Your card details.
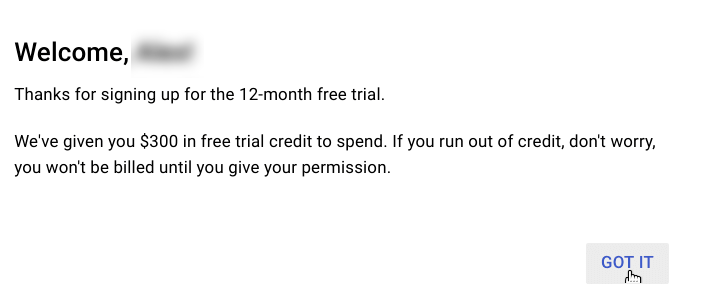
Submit your details.
Everything being well, you should see the Thanks for signing up for the 12-month free trial box.
Click GOT IT to close it:
Good job!
Your site is now all set to work with Google APIs.
Google Maps API Key – Testing
Now that you have set your Google Maps API key on ‘WP Job Manager’ settings and has set a billing account on Google, your site should be totally integrated with the Google Maps API. Every time a listing be created/edited (and if it contains data on the ‘Location’ field), all map data will be automatically recovered from Google Maps, that is, you don’t need to create custom fields (latitude, longitude, geolocation, etc), they will be created by WP Job Manager.
Notice: new Google Maps API Keys can take 5-10 minutes to propagate and take effect. If you are having problems: right after create a new API key and configure it on ‘Listings / Settings’, please consider to wait about 10 minutes before publish your first listing.
Testing the Google Maps API
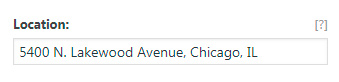
On the WordPress admin dashboard, access the ‘Listings / Add Listing’ menu. Create a listing for test, just remind to fill the ‘Location’ field:
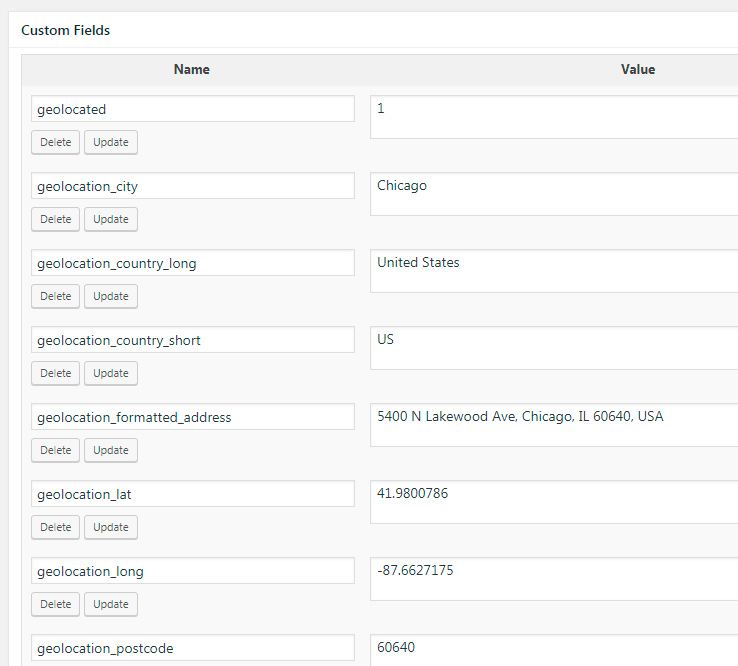
After publish the listing, scroll the page and check the ‘Custom fields’. If it have several ‘geolocation’ fields, and if the ‘geolocated’ field contains ‘1’ as value, the Google Maps API is working fine .
If all configuration above is not working, try to generate a new Google Maps API Key, wait about 5 minutes (key propagation) and repeat the tests. If not fixed, please contact us and we will try our best.
Notice: by using Hubhood Map Plus geocoder, you can skip all this configuration and start publishing your listings.
Required Listing Pages
There are two required pages to work with ‘WP Job Manger’ plugin:
1 – The ‘Add Listing’ Page
This page is required to publicly display the listing submission form on your site. Create a page, insert any title and use the following shortcode as page content:
[submit_job_form]
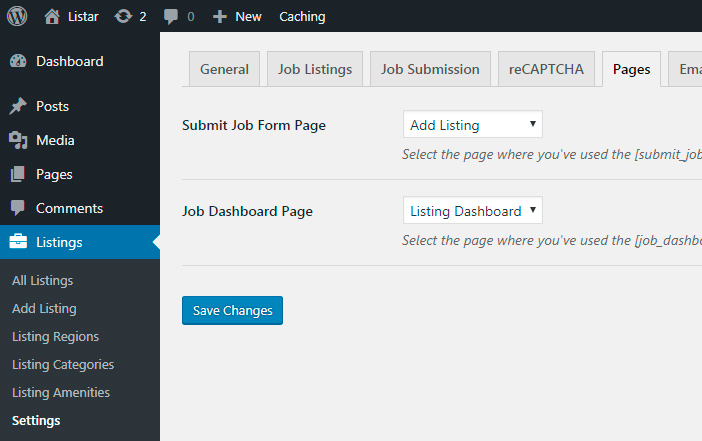
Access the ‘Listings / Settings’ menu, go to the ‘Pages’ tab, select the created page to ‘Submit Job Form Page’ and click on ‘Save Changes’ button.
2 – The ‘Listing Dashboard’ Page
This page displays the private list of submitted listings to logged users. Create a page, insert any title and use the following shortcode as page content:
[job_dashboard]
Access the ‘Listings / Settings’ menu, go to the ‘Pages’ tab, select the created page to ‘Job Dashboard Page’ and click on ‘Save Changes’ button.
At end, your configurations will look like this:
Listing Regions
You need activate the ‘Regions for WP Job Manager’ plugin to work with regions.
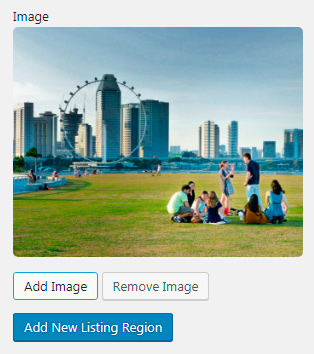
On the admin dashboard menu, go to ‘Listings / Listing Regions’. Insert a name to the new listing region. Notice that you have a image field, so you can set a background image to the region if you wish:
You can also set a color to the new listing region:
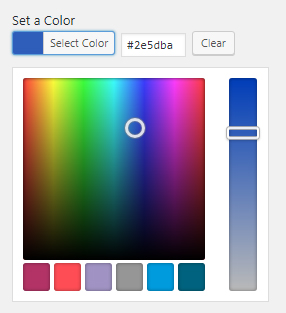
If no color is set, it will keep the current theme color set on ‘Appearance / Customize / Colors / Theme Color’. You can also click on the “Clear” button for transparent color.
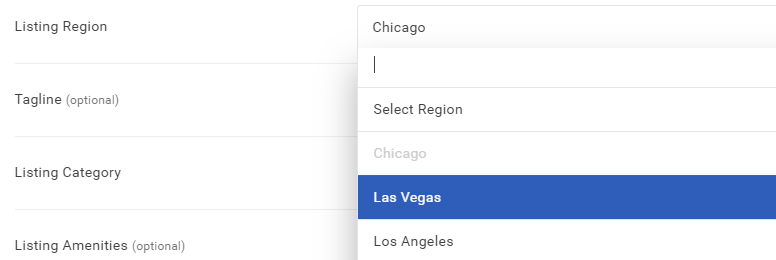
Finish by clicking on ‘Add New Listing Region’ button. Now, your customers can append Regions to their listings (Add Listing):
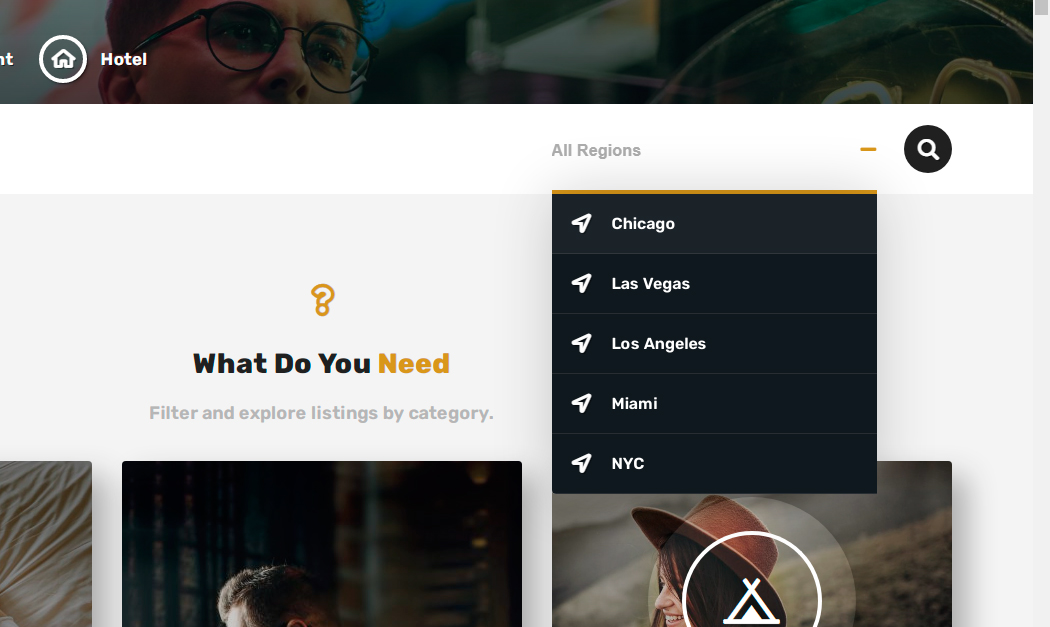
Regions currently being used by listings are available as filter to listing search:
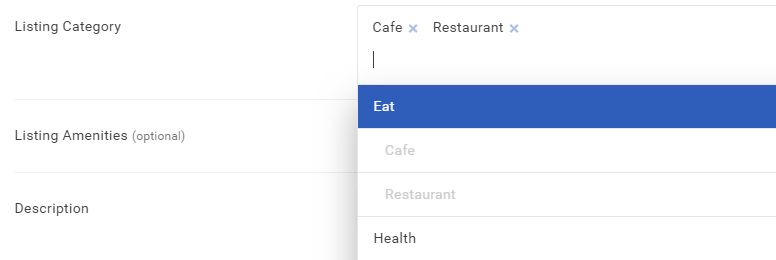
Listing Categories
Listing Categories are available via ‘WP Job Manager’ plugin.
On the admin dashboard menu, go to ‘Listings / Listing Categories’. Insert a name to the new listing category. Notice that you have both image and icon fields, so you can set a background image and a icon to the category if you wish:
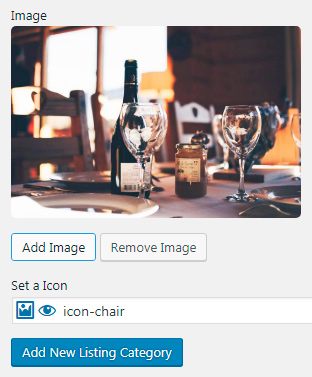
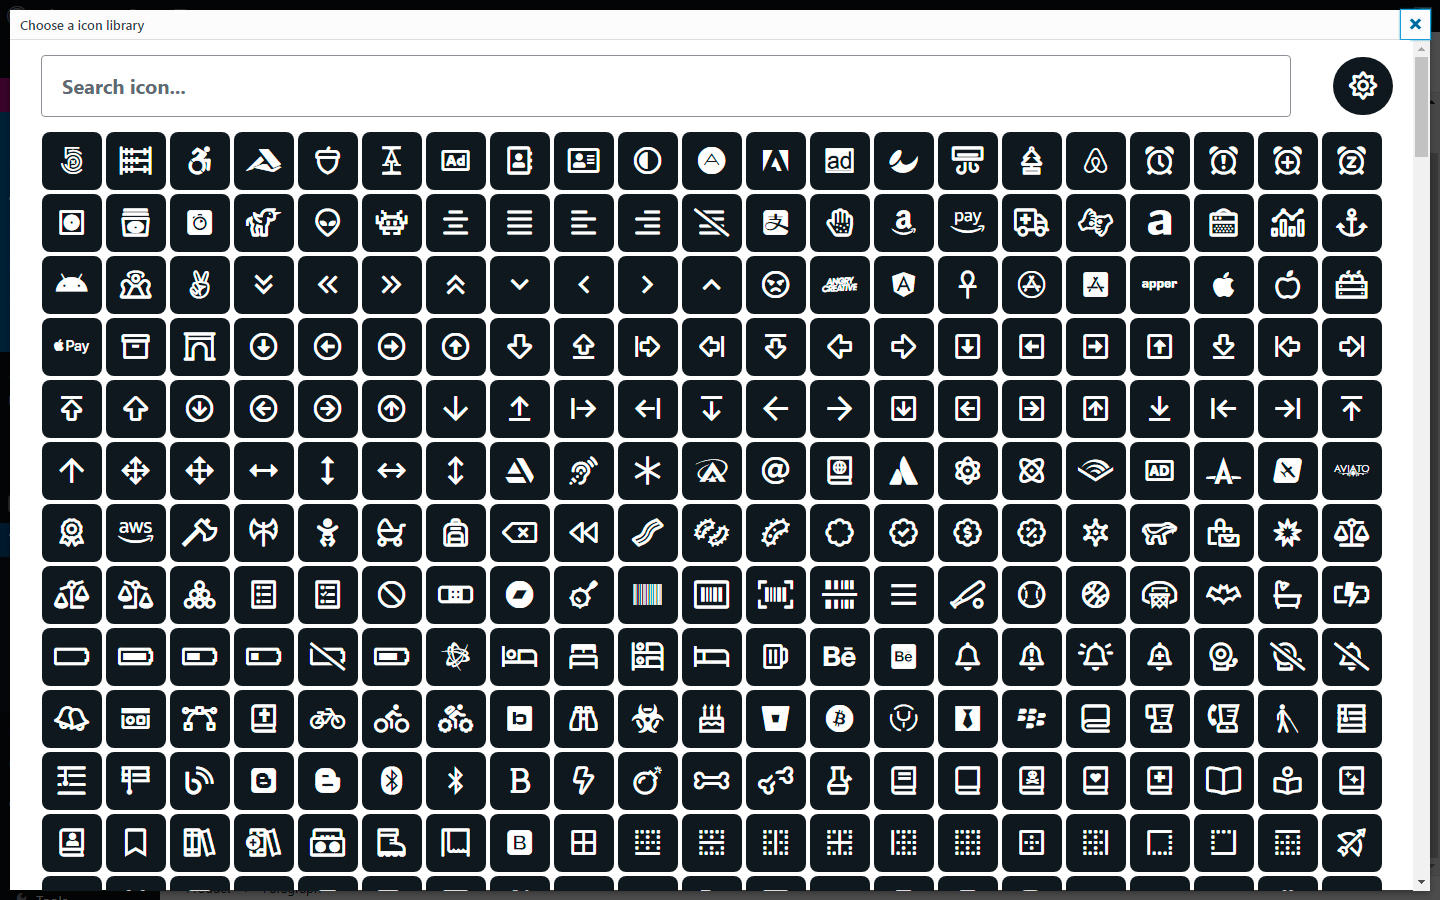
You can choose a predefined icon from the icon galleries (click on the eye button).
You can also set a color to the new listing category:
If no color is set, it will keep the current theme color set on ‘Appearance / Customize / Colors / Theme Color’. You can also click on the “Clear” button for transparent color.
Finish by clicking on ‘Add New Listing Category’ button. Now, your customers can append Categories to their listings (Add Listing):
Listing Amenities
You need activate the ‘Hubhood Add-ons’ plugin to work with amenities.
On the admin dashboard menu, go to ‘Listings / Listing Amenities’. Insert a name to the new listing amenity. Notice that you have a icon field, so you can set a icon if you wish:
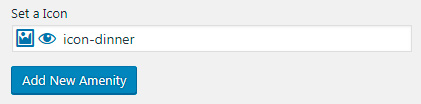
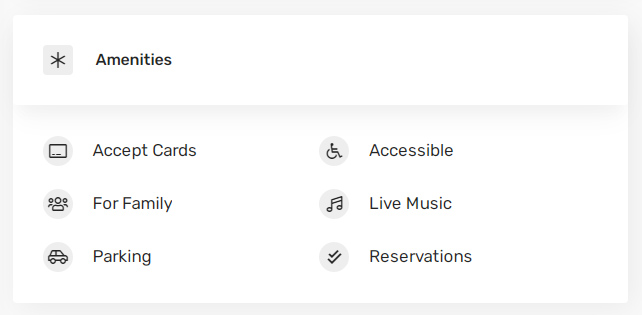
Finish by clicking on ‘Add New Amenity’ button. Now, your customers can append Amenities to their listings (Add Listing):
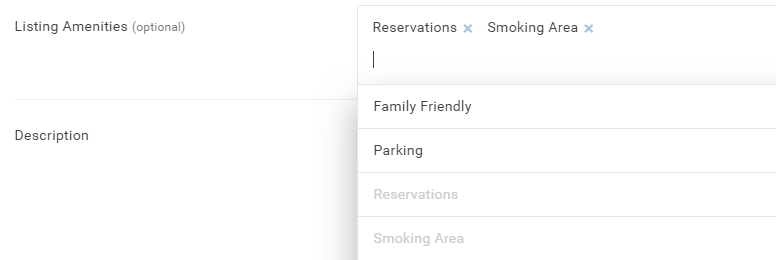
The Amenities chosen to a listing are shown on the description of the listing page:
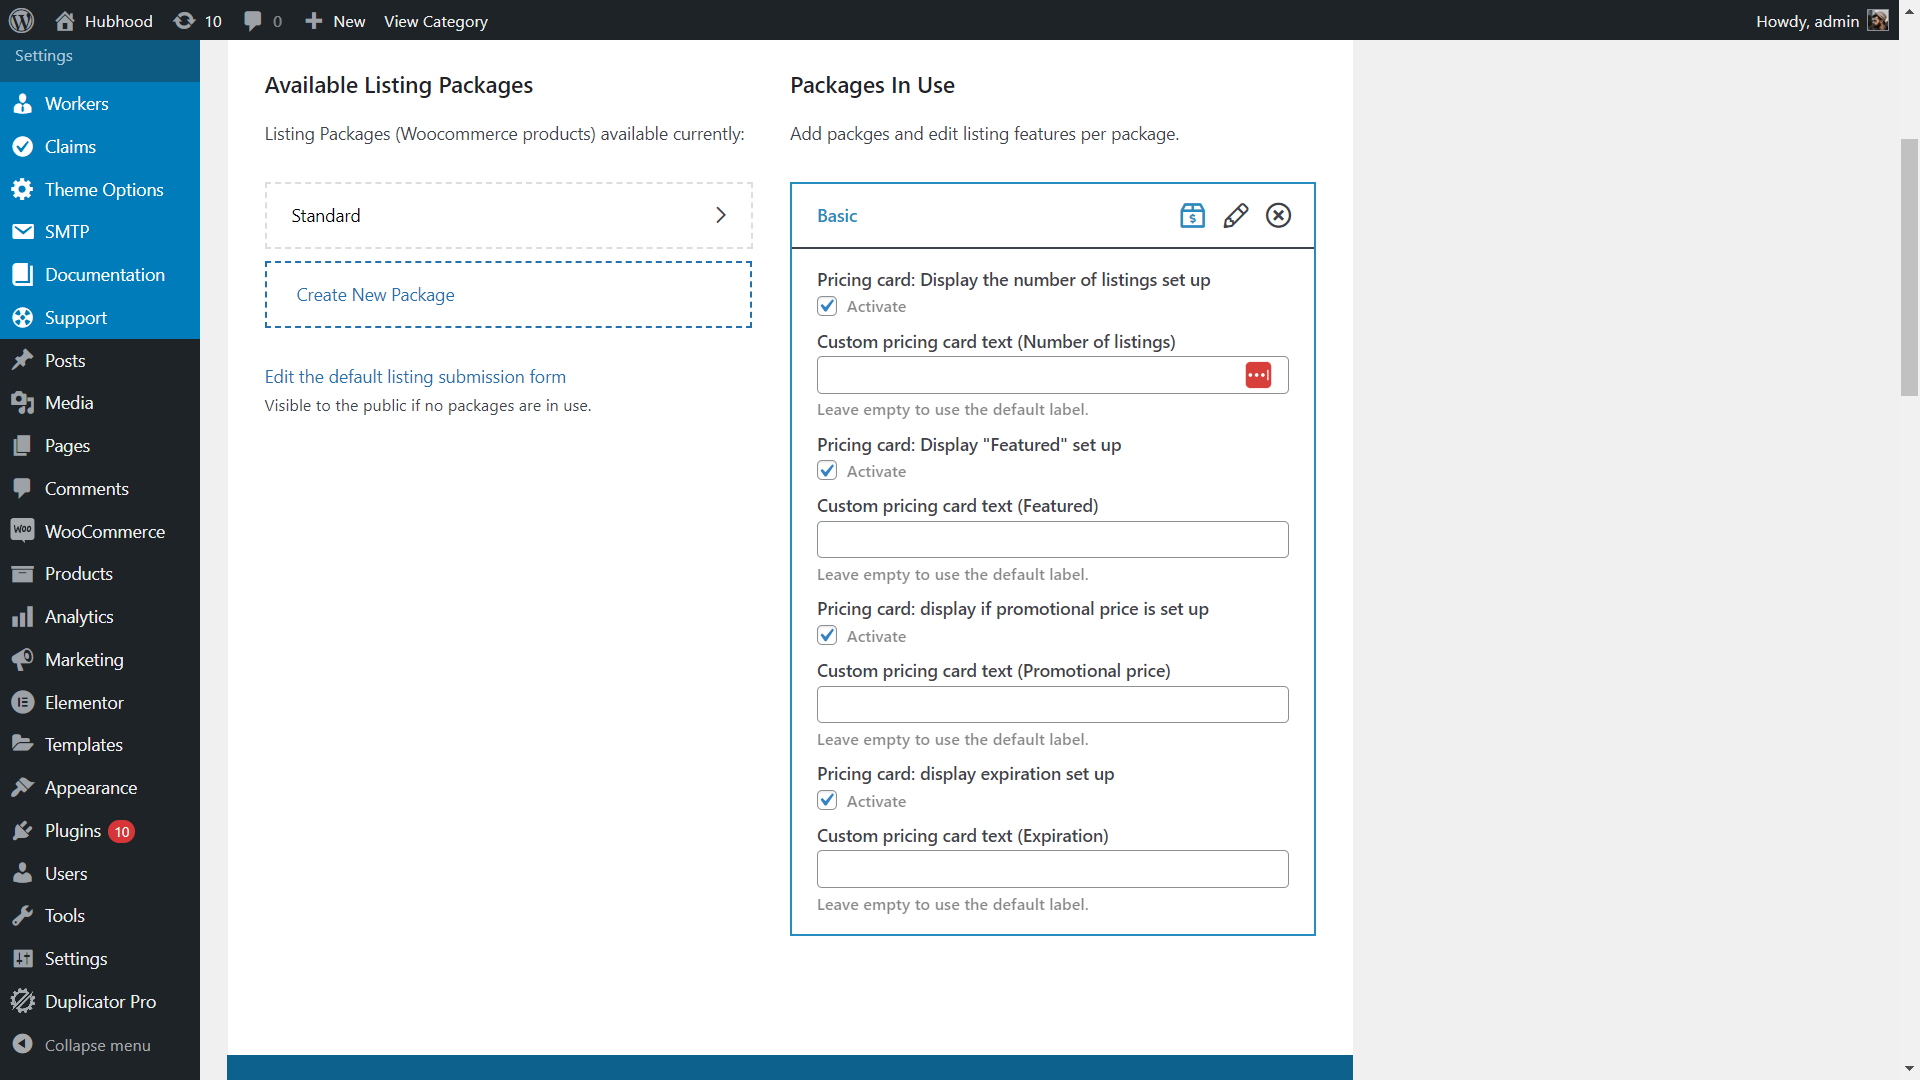
Listing Packages
To make profit with listings you need to install ‘Woocommerce’. After install and activate all recommended plugins, you’ll be able to create listing packages and offer pricing plans.
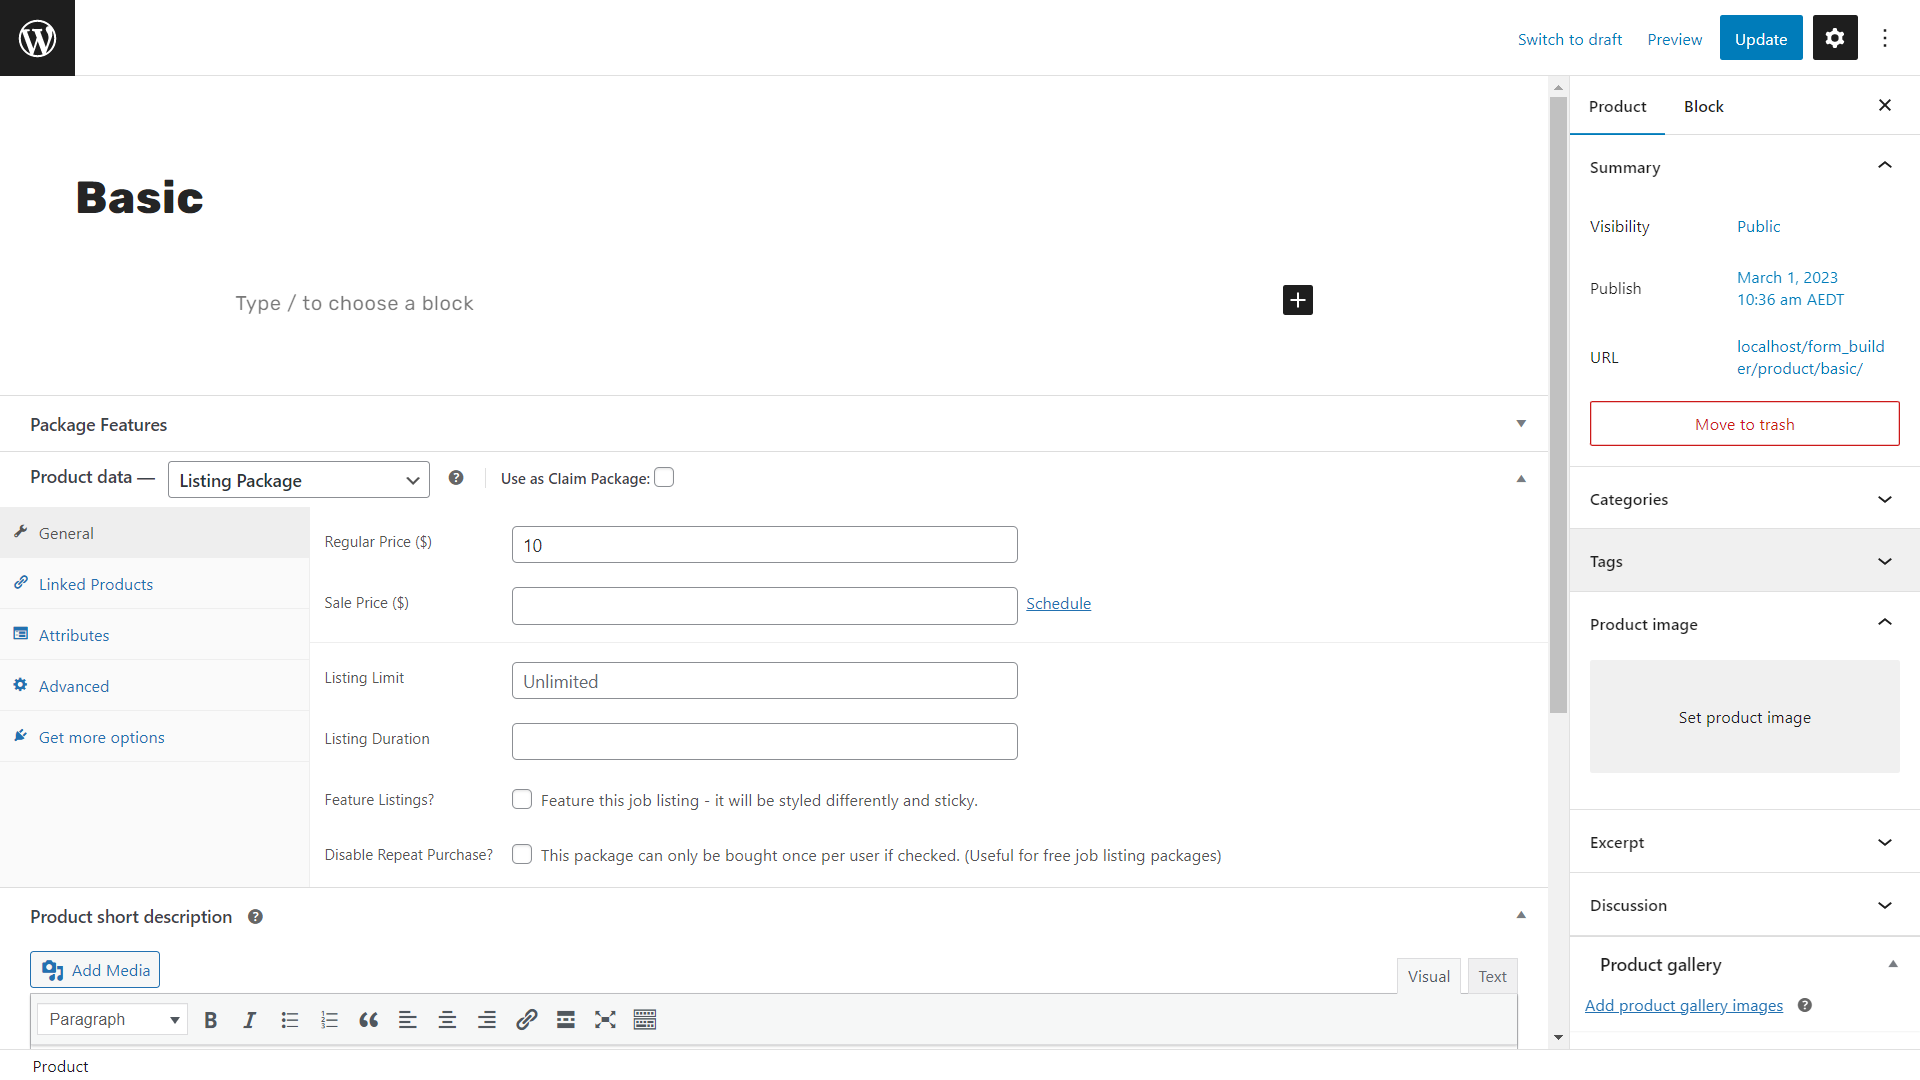
On the WordPress admin dashboard, go to ‘Products / Add New’ to create a new Woocommerce product:
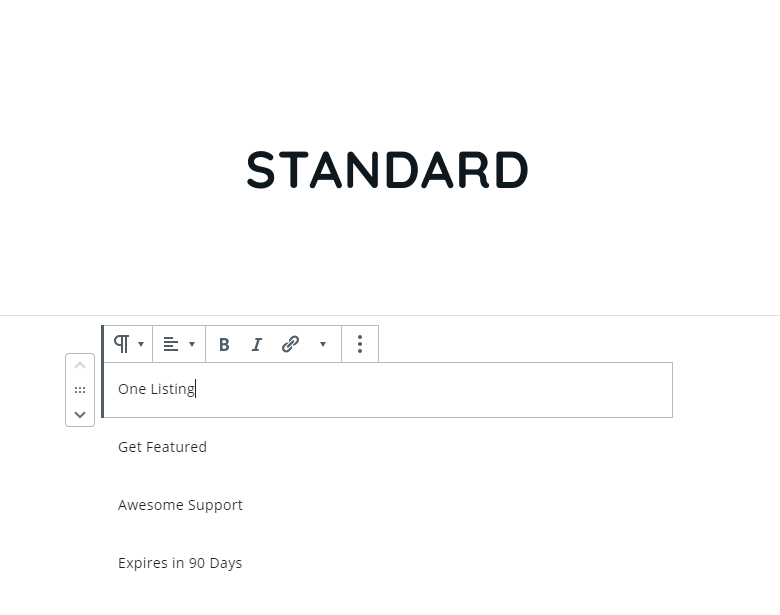
Add a title to your new package, example: Standard.
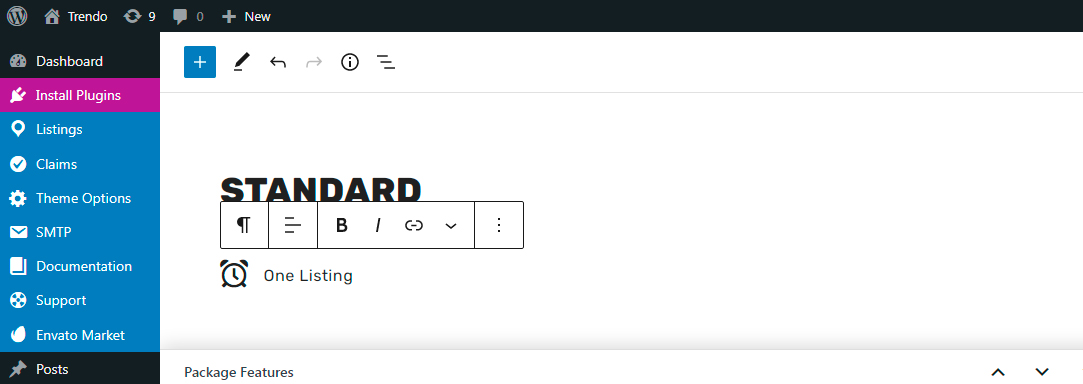
On the description box, you can optionally use one “Paragraph” block to mention add custom texts to the listing package features, displayed on the listing package card (pricing card). Example:

Or any other test you wish, but always using one “Paragraph” block per line:
Paid No
One Listing
No Featured
Limited Support
Expiration 30 Days
Trial 30 Days
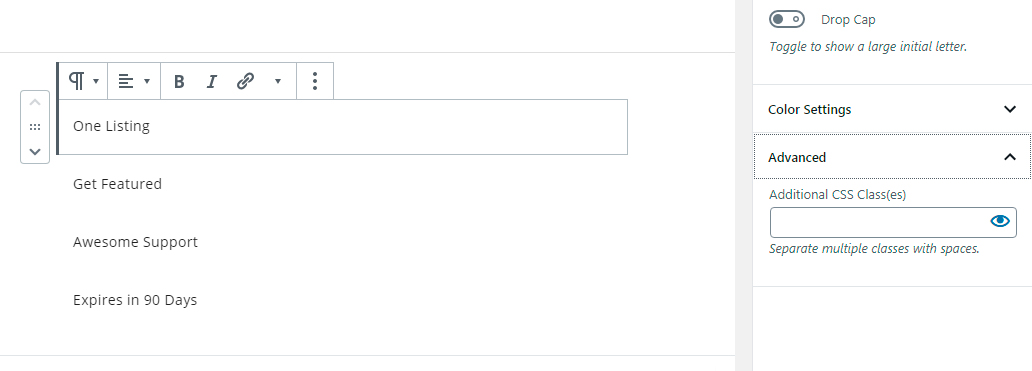
If you want to add icons for every line or your description, click on any paragraph block of your description and make sure the cursor is blinking, this way:
Click on “Advanced” panel, on the right side of the screen, it is generally the last panel:
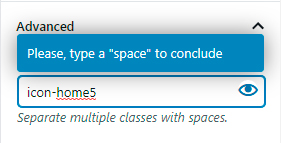
Click on the “eye” icon to choose an icon:
After choose an icon, type a space to finish:
Now you have an icon attributed to your paragraph block:
Scroll down the page and ad a short description to your product (package), example: Starting PRO
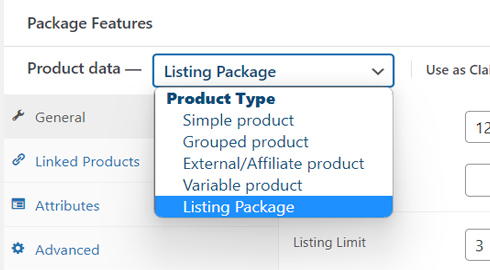
On “Product data” selector, choose ‘Listing Package’:
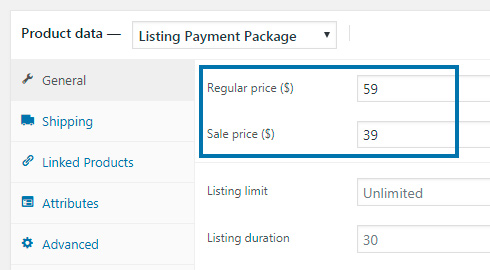
Insert the price on “Regular price” field. If the package is free, insert 0.
Considering it is a paid package, if you want to configure a discount to the package, fill the “Sale price” field with a lower value.
On the “Listing limit” field, you can set the number of listings that your customers can publish after purchase this plan.
The “Listing duration” field allows to configure the number of days that the listing will remain published.
Check “Feature Listings?” if you want that all listings created with this package be featured/highlighted.
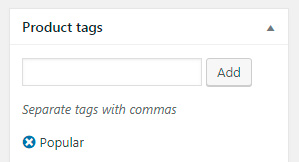
If you want this package be featured on the pricing page, go to “Product tags” box and add any tag you want, example: Popular.
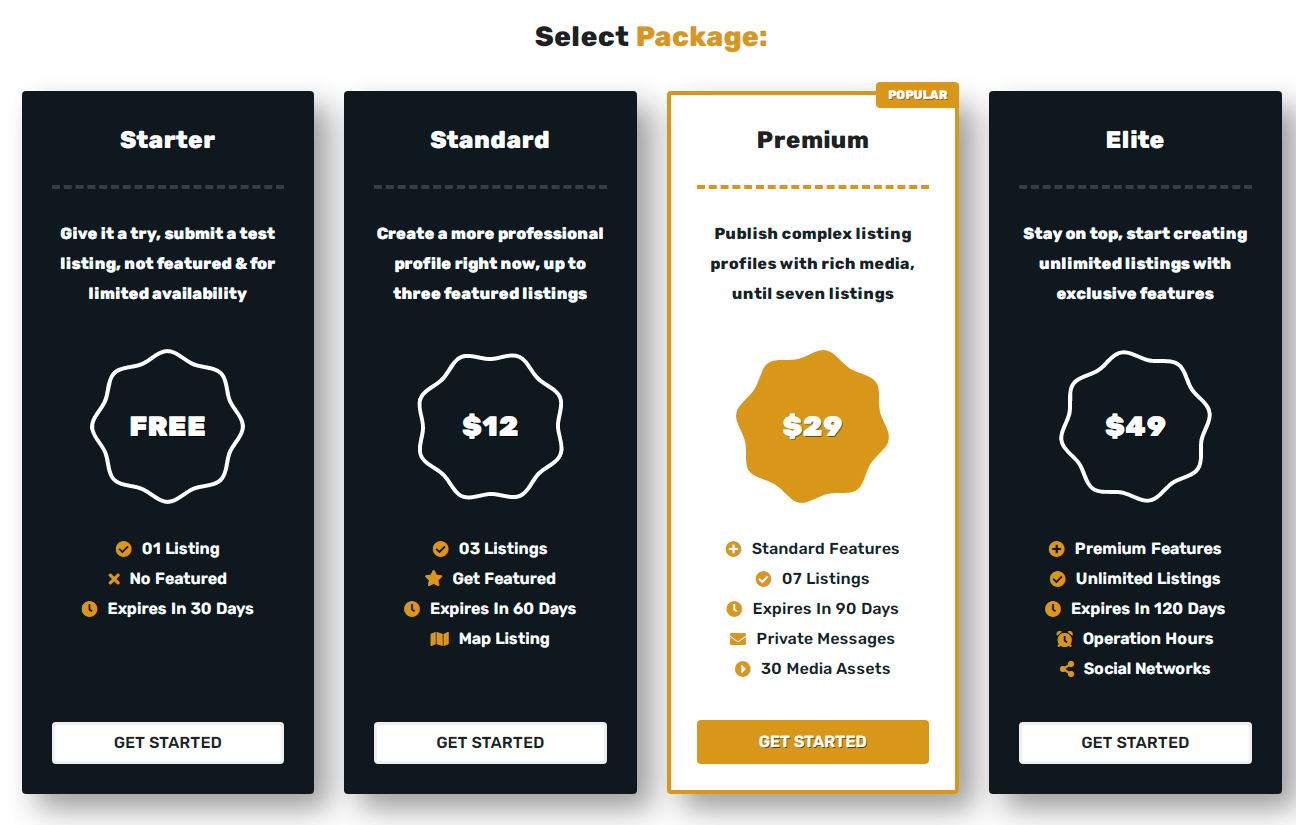
No more configuration is required to this basic pricing plan. After publish all listing packages, they will be shown on the pricing page. Example:
Now customers can purchase this package via Woocommerce and pay it via the payment methods you have activated on ‘Woocomerce / Settings / Payments’.
Listing Subscription Packages
You can also create Listing Subscription Packages. Install and activate Woocommerce Subscriptions plugin for that.
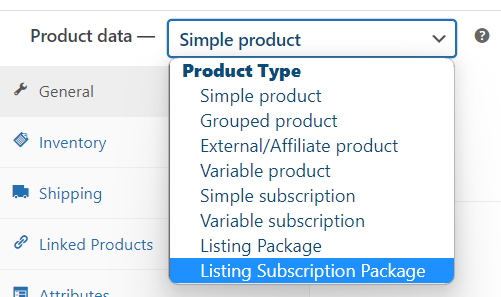
After activate Woocommerce Subscriptions, you can go to Products / Add New Product and, instead of choosing Listing Package as product type, choose Listing Subscription Package.
Configure the Subscription Price and other details:
Publish the product.
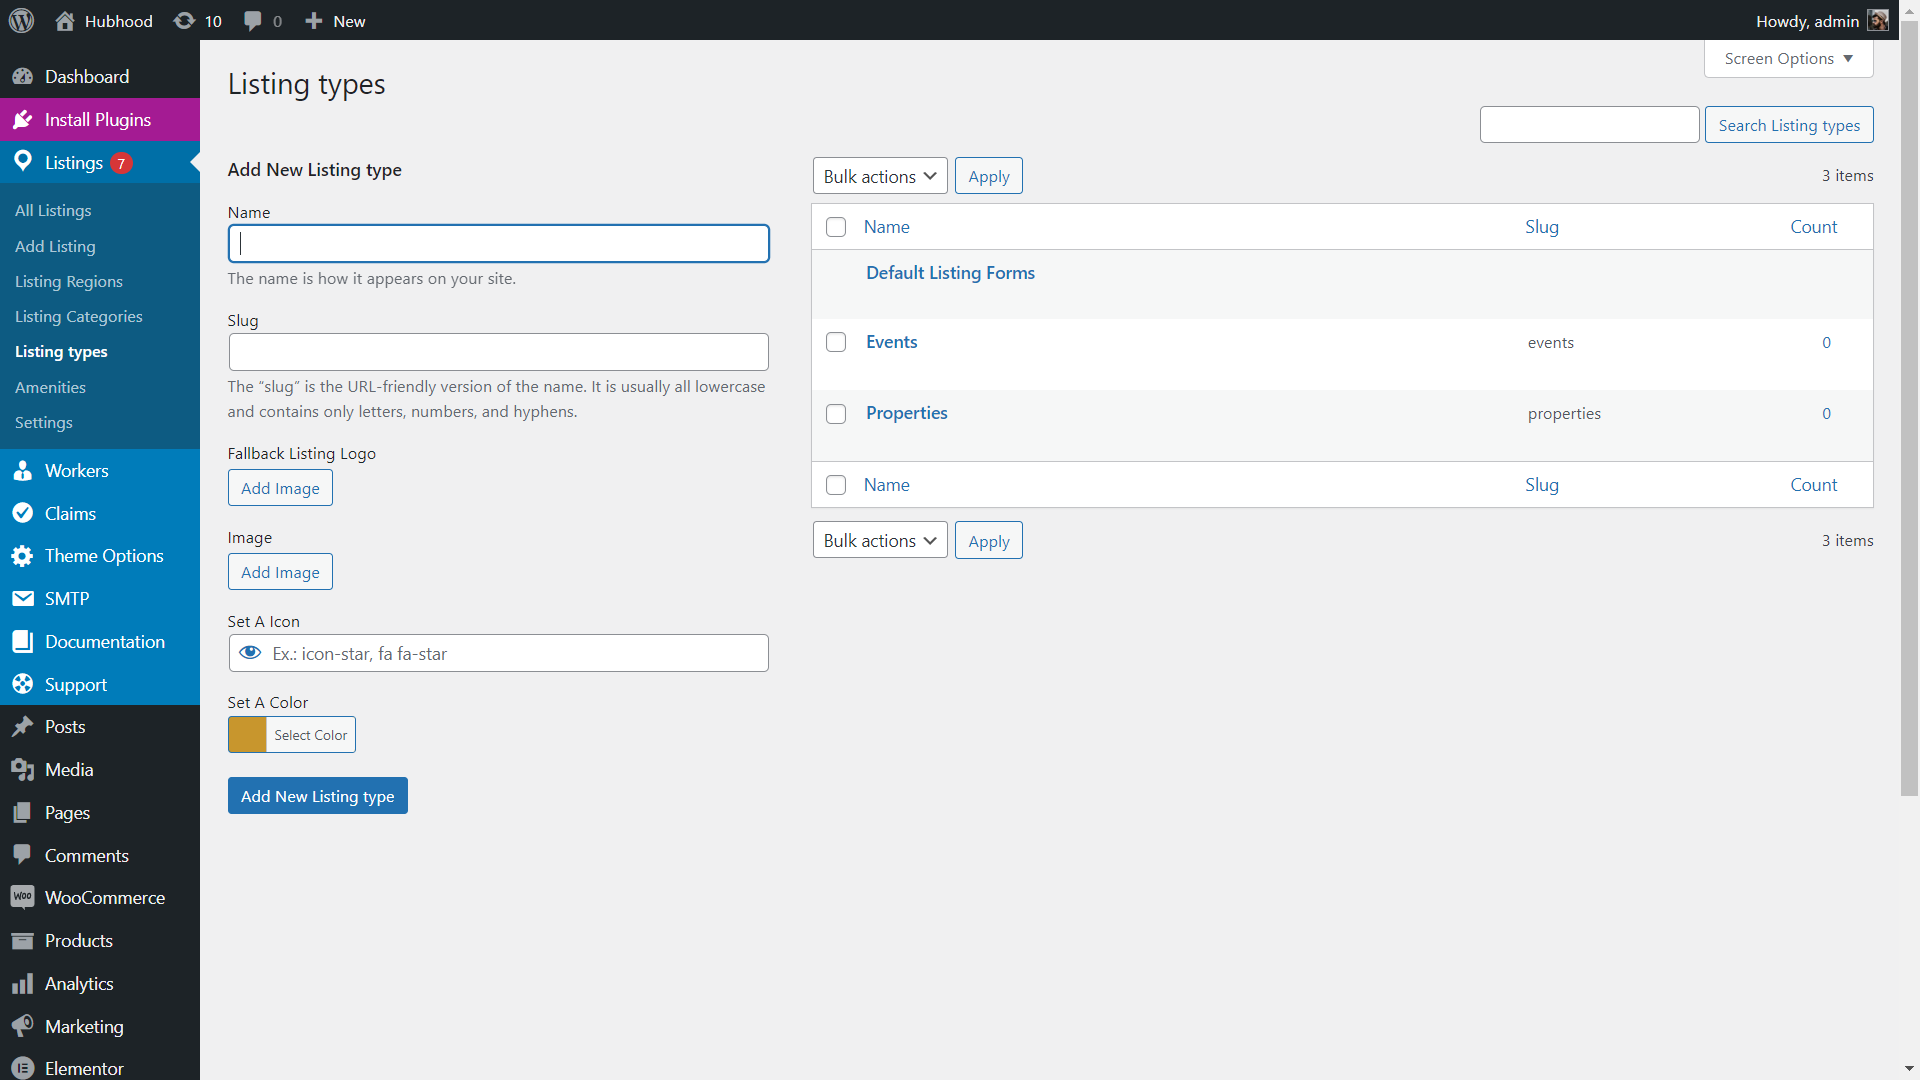
Now you need to add this Listing Subscription Package to your current Listing Types. Go to Listings / Listing Types. If you are not using Listing Types, only the “Default Listing Forms” will be available. You can add the same package for all post types, in case the field forms are exactly the same for all your current listing types. Or, you can create one Listing Subscription Package for every listing type. For example: if you have Restaurants and Real Estate as listing types, you will probably need to create different Listing Subscription Packages (Woocommerce Products) and add them to the respective listing types.
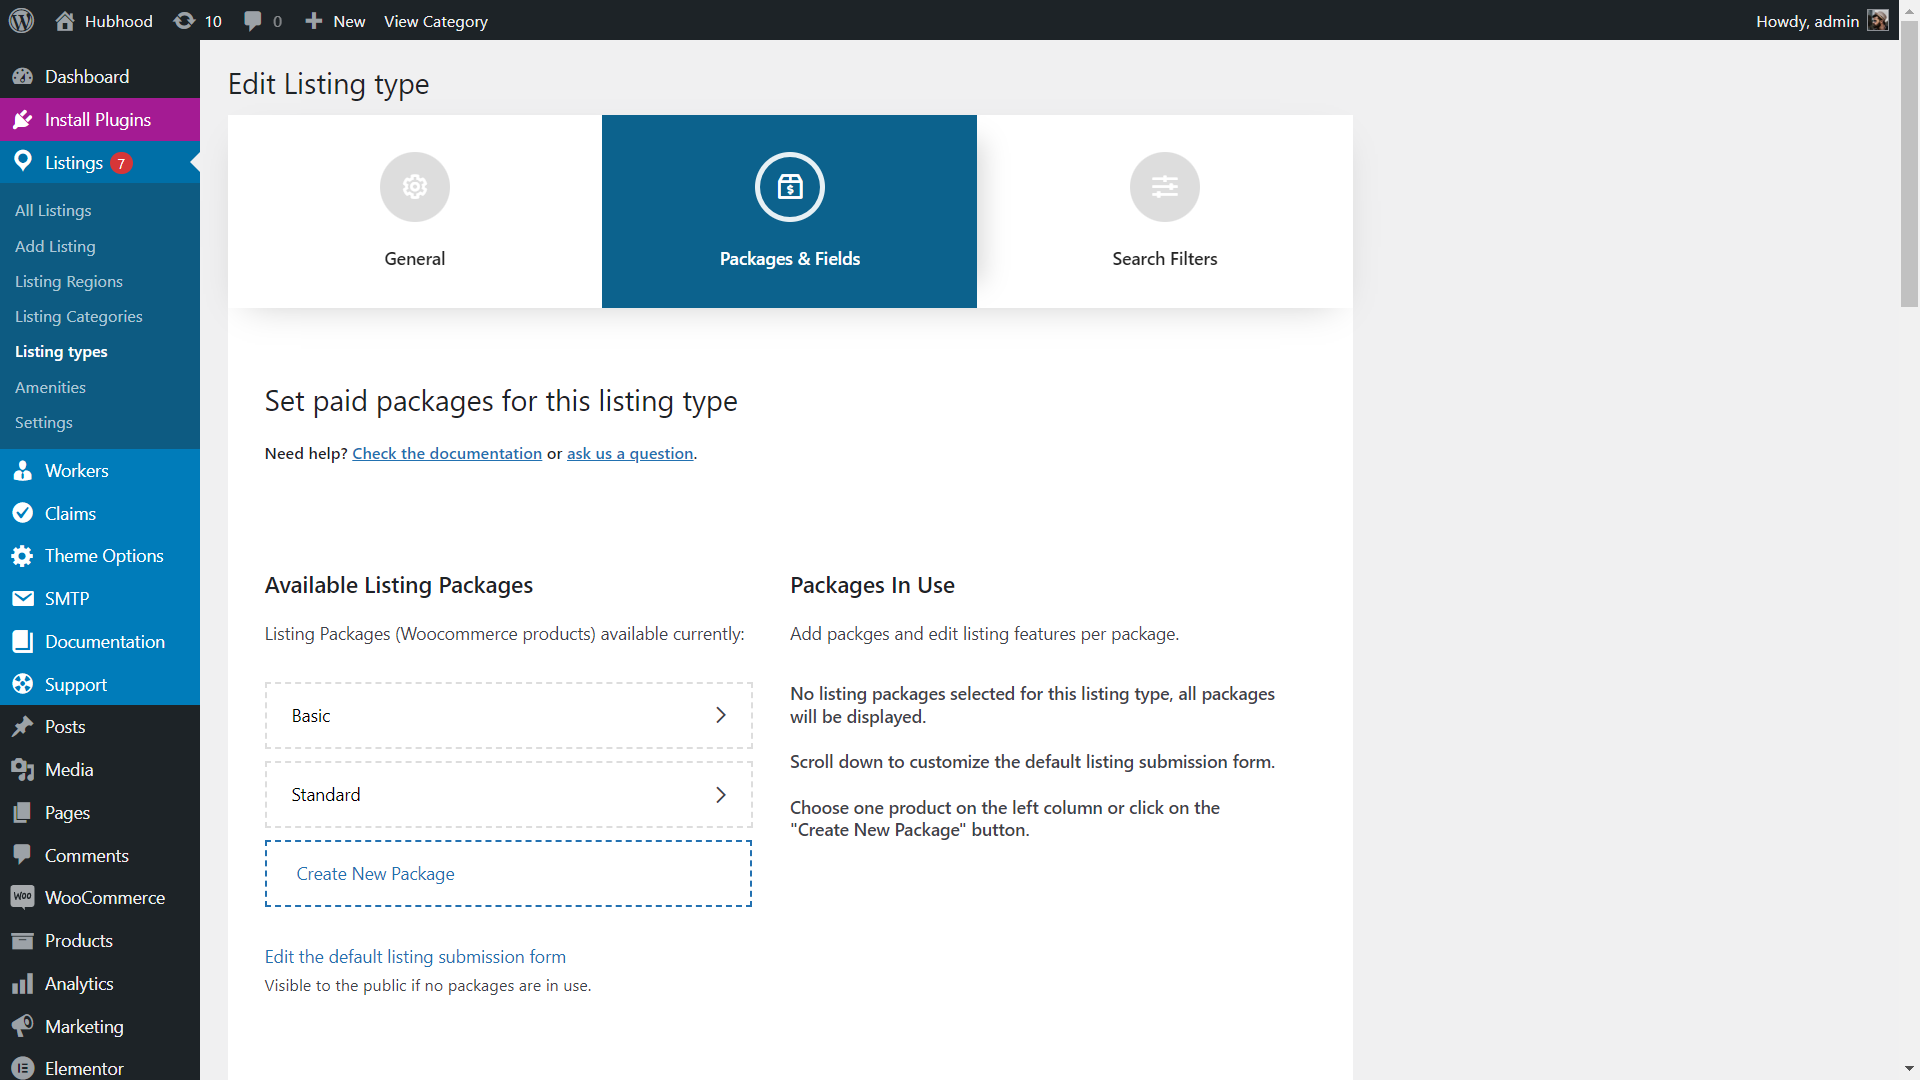
After choosing a listing type to edit, go to Packages & Fields:
On the left column, you will see the Available Listing Packages:
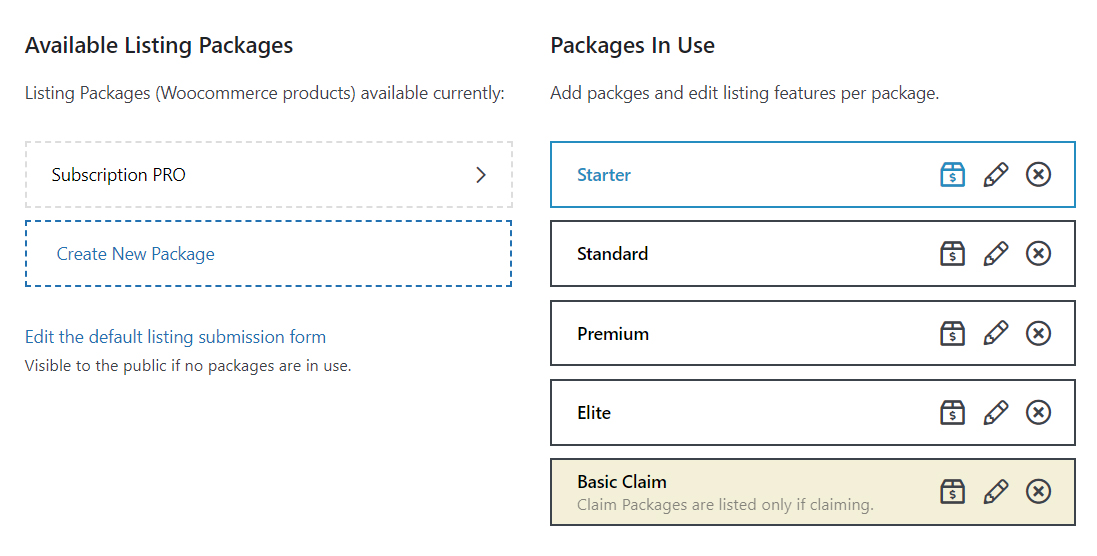
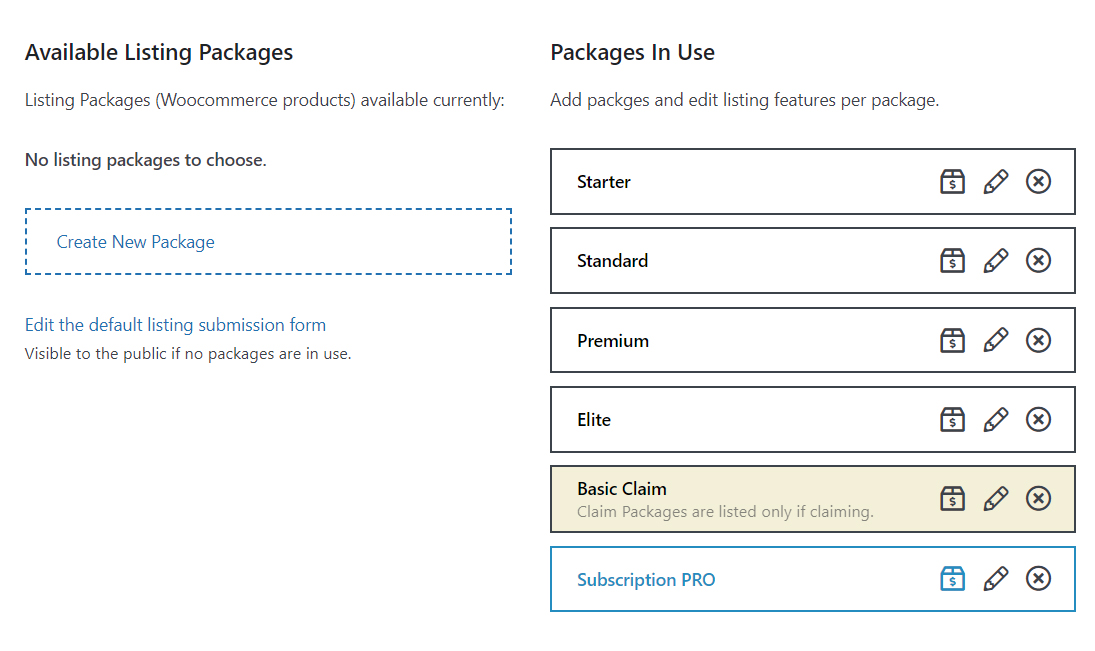
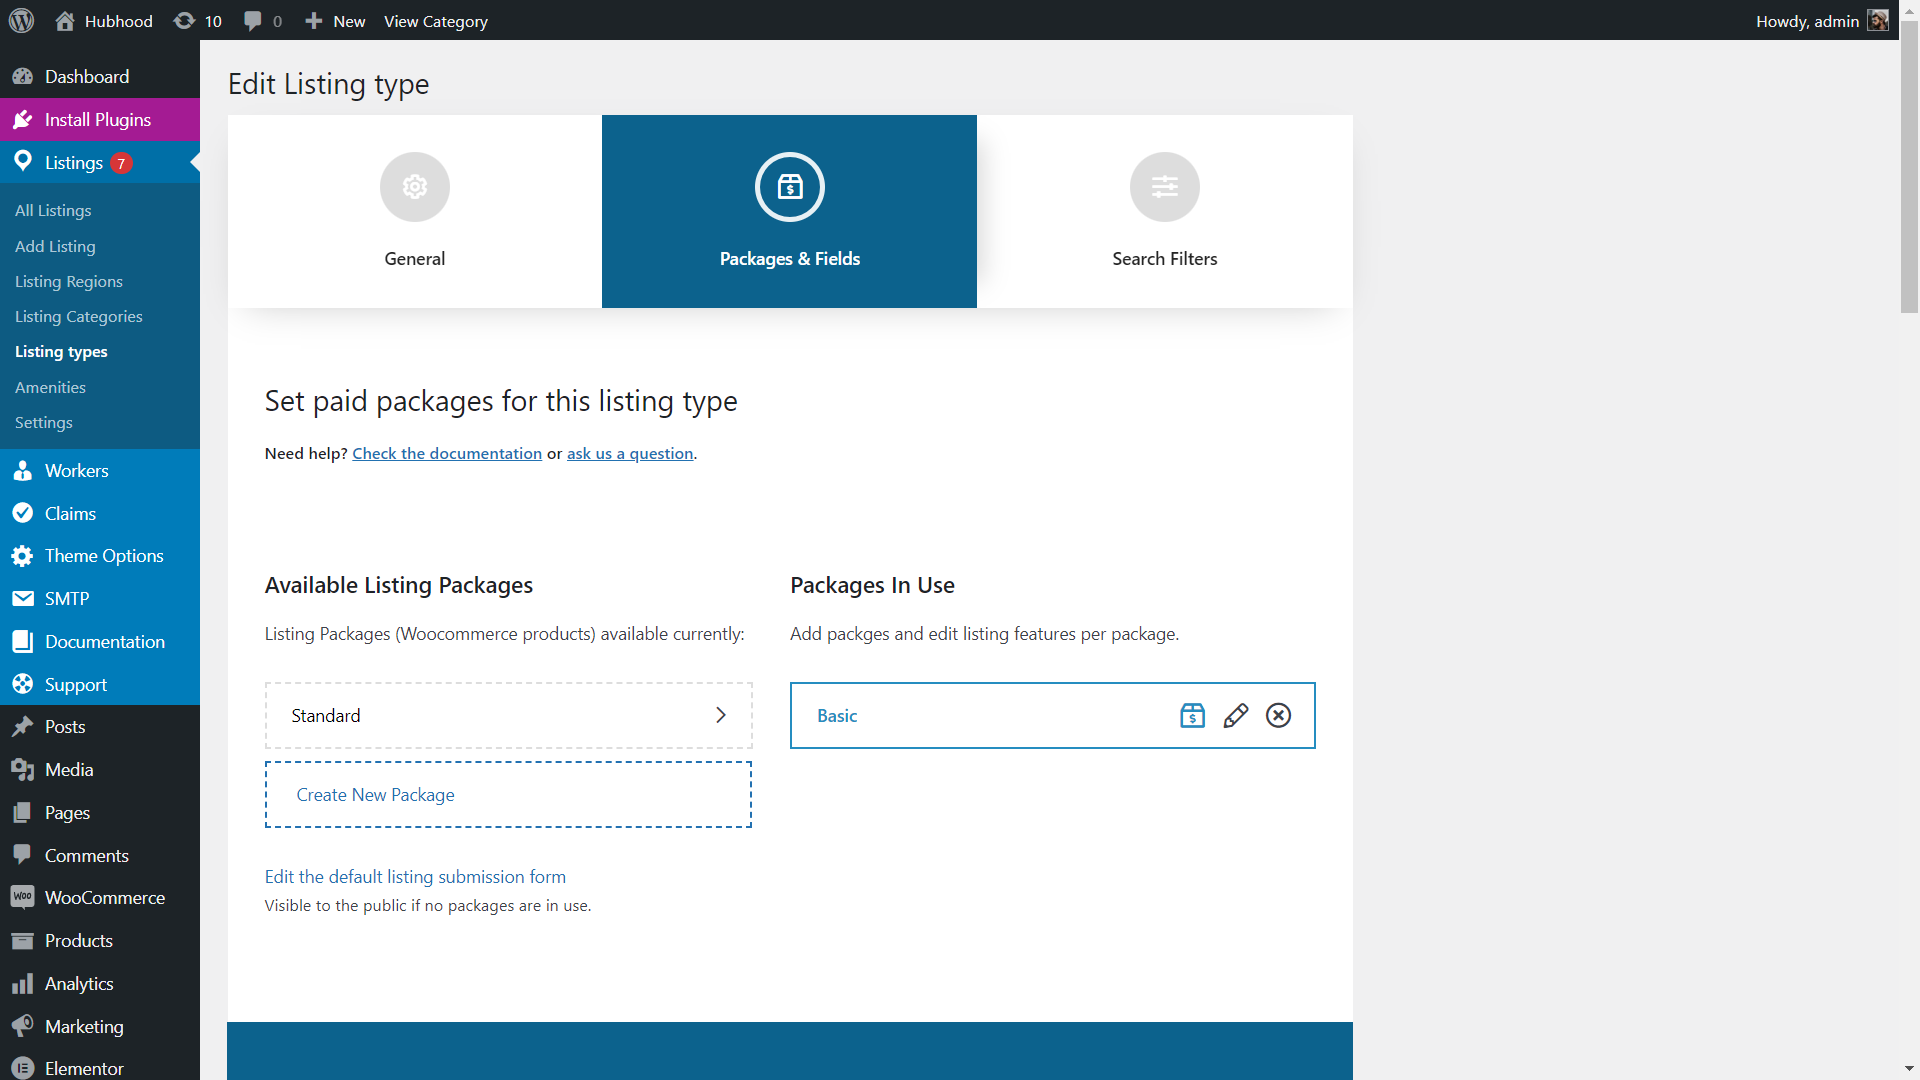
Click on the package you just created to add it to the Packages In Use column:
You can edit package details normally, like already demonstrated for default Listing Packages, just click on the box or pencil icons.
After conclude the changes, scroll until the end of the screen and click on the Update button to save.
At this point, the new Listing Subscription Package is available for purchase. On the front end of your site go to Add Listing. If you have created listing types, choose the Listing Type you have added the package. On the next screen, the available listing packages will be displayed, including the Listing Subscription Package:
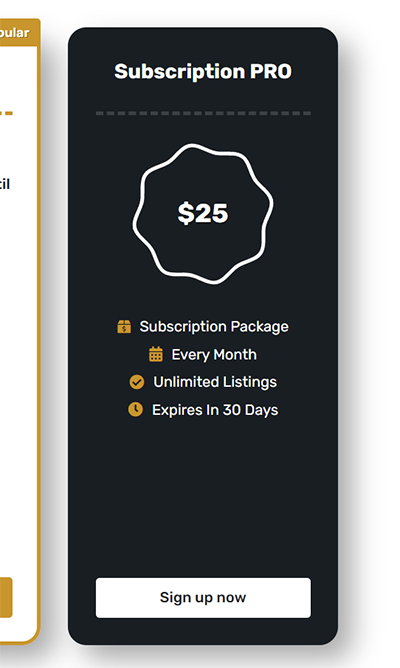
On the button, you can read “Sign Up Now” . Choose it for a test.
Add a title to your listing, only the required fields and click on the Submit Listing button.
The next screen is the Checkout page. Scroll down to see the details of what you are purchasing:
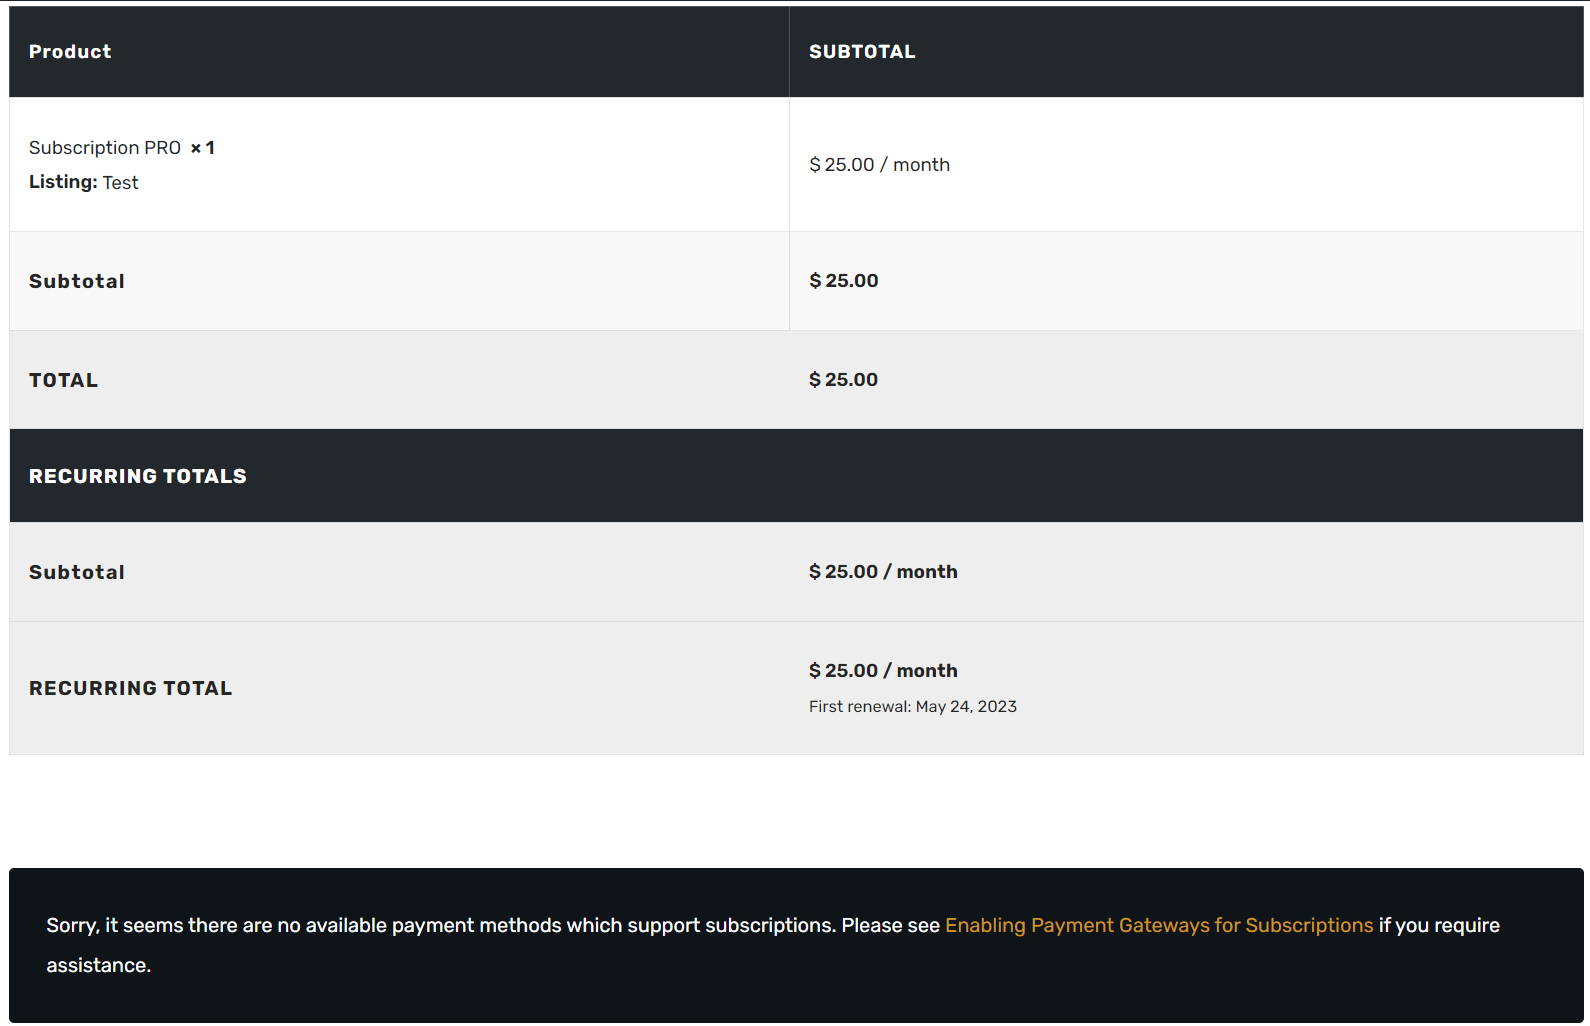
At the bottom, you can read the warning:
“Sorry, it seems there are no available payment methods which support subscriptions. Please see Enabling Payment Gateways for Subscriptions if you require assistance.”
That means that the product is read for purchase, but you don’t have any Payment Gateway supporting subscriptions. Follow up to the next chapter to configure Paypal or other Payment Gateways for subscriptions.
Setting Up Paypal For Subscriptions
The following instructions and screens can vary depending on your country.
On this chapter we will instruct you how to configure Paypal to accept subscription sales. We will use:
WooCommerce PayPal Payments plugin.
This plugin is currently recommended to install with the theme. If you don’t want or can’t use Paypal, you can try:
WooCommerce Stripe Payment Gateway
WooCommerce Payments
Or any other Payment Gateway that supports subscription and is compatible with Woocommerce Subscriptions plugin.
Click here to see a full list of gateways/plugins compatible
Configuring Paypal
After activating Woocommerce Paypal Payments plugin, go to Woocommerce / Settings / Payments. Scroll down to see the Paypal option and click the “Finish set up” button (this is not the enable/toggle button).

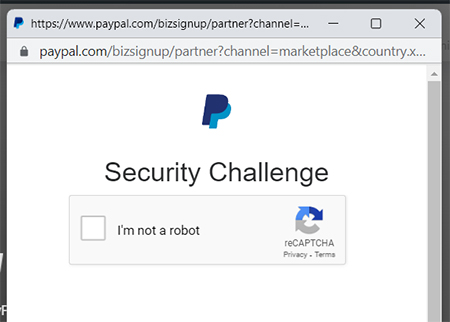
On the next screen, click on the “Activate Paypal” button. A popup will be launched, possibly with a Captcha challenge.
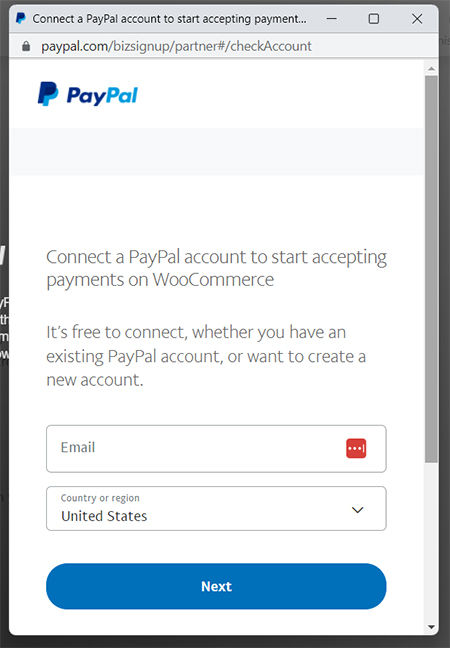
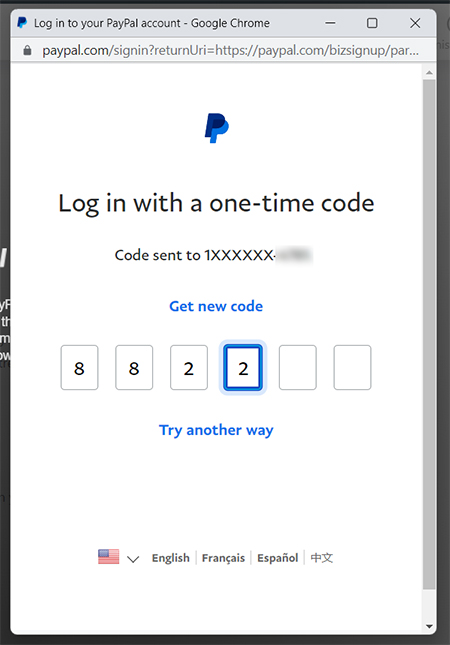
Procceed and insert your Paypal credentials to connect:
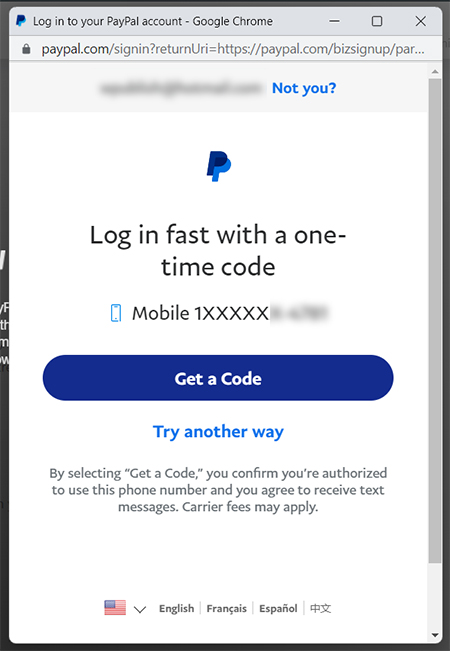
Pass the security check if needed (get the security code via SMS and insert on the required field):
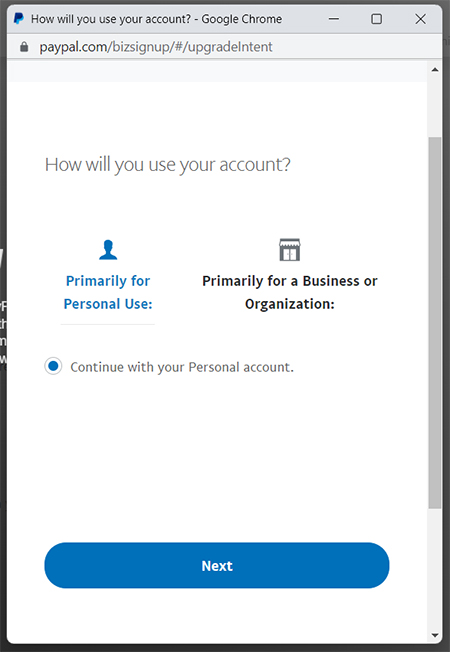
Choose how to use the account:
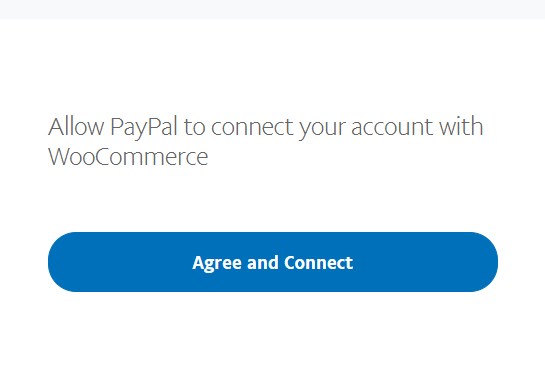
And agree with the connection:
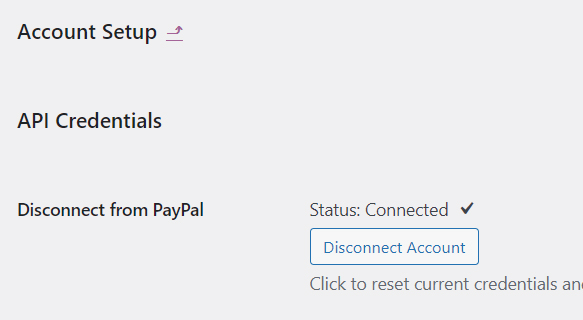
Click Go Back to Woocommerce button and a page refresh will happen. If everything worked fine, you will see the “Connected” status:
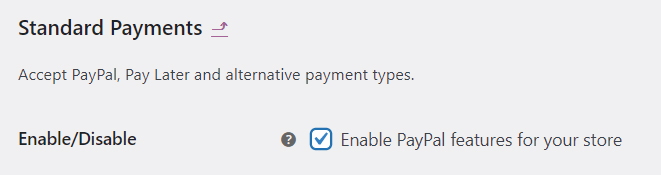
Now, go to the “Standard Payments” tab:
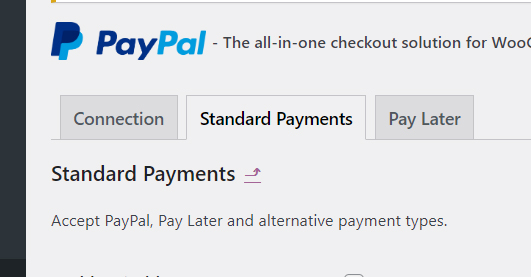
Enable Paypal for payments:
Scroll down and check the “Vaulting” option:

Scroll down and Save changes.
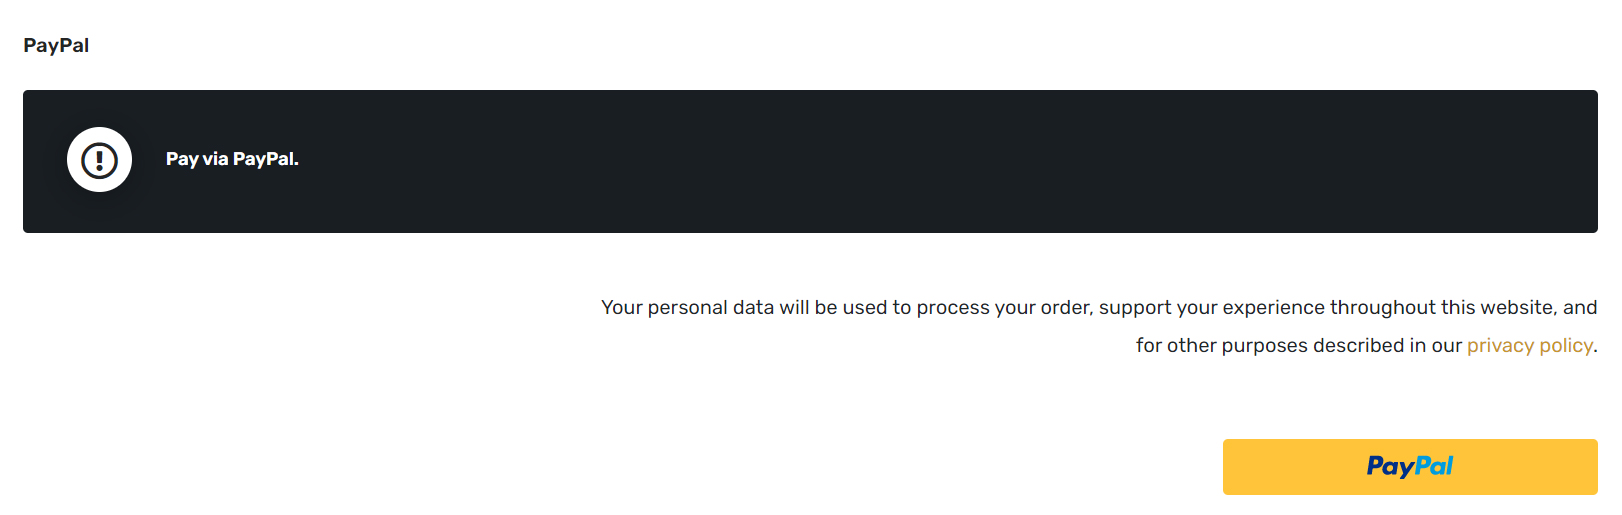
Paypal gateway for subscriptions was successfully enabled. Now you can refresh your Checkout page (or go to Add Listing / Choose a Listing Subscription Package, procceed until the Checkout page).
Scroll down until the end to see the Payment options available for this Listing Subscription Package, and Paypal must be there:
How the theme handles subscriptions for listings?
The theme doesn’t handle that. Subscriptions are totally handled by Woocommerce subscriptions and WP Job Manager automatically.
Add Listing
Users that aren’t logged in will see a “Add Spot” button on top bar:

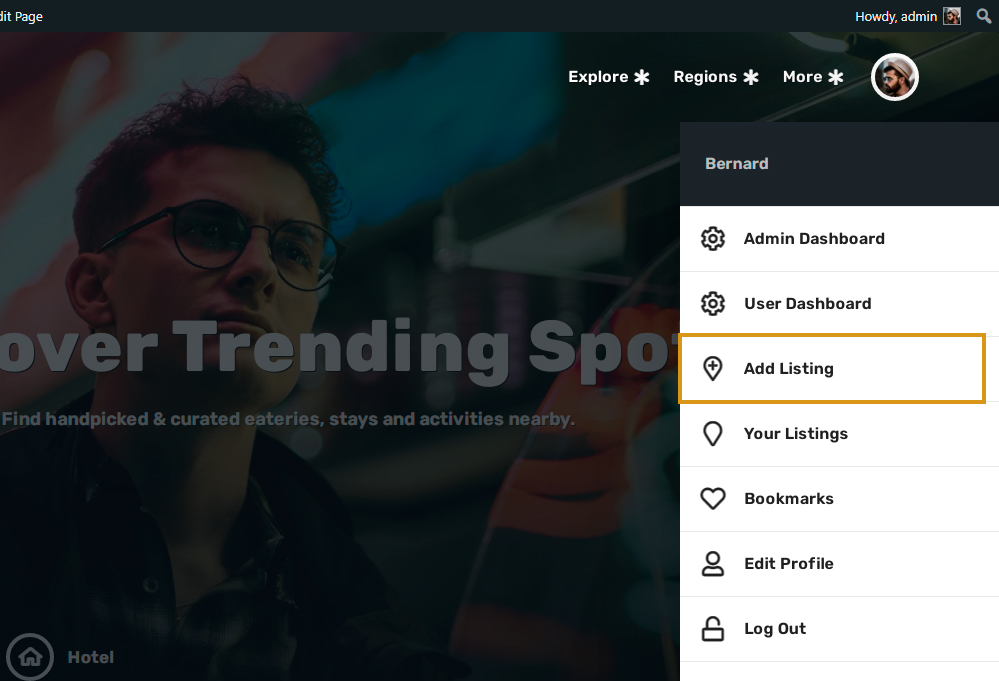
Users logged in can start adding listings by accessing the logged user menu and “Add Listing”:
After click on “Add Listing” button, if you have created listing packages as Woocommerce Products, the pricing page will be shown:
Choose the plan that best fits your new listing and the listing form will be displayed on next screen.
If no paid packages were created, the listing submission form will be shown right after click on ‘Add Listing’ button.
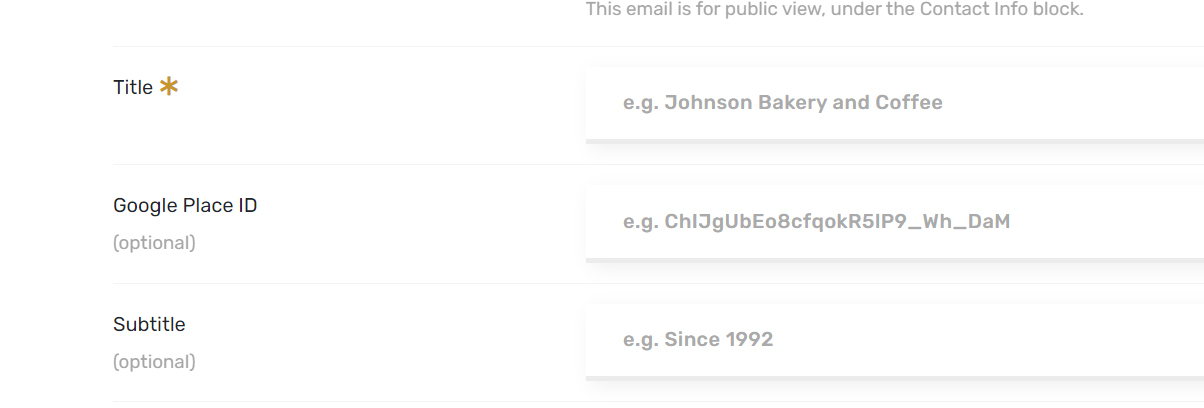
Fill all relevant fields in details. On this example, the “Listing Title” field was configured to be a “required” field.
If a paid plan was chosen, you’ll need to pay the plan to get the listing published. You can also create listings by going to WordPress admin dashboard menu and ‘Listings / Add Listing’.
Also on the WordPress admin dashboard, you can see all listings published or approve submitted listings on ‘Listings’ menu.
Notice: fill the “Location” field with a valid business address to get your listing automatically geolocated for maps.
Listing Reviews
The review of listings is a built-in free feature for Hubhood directory.
If Reviews are active via Theme Options (requires Hubhood Addons plugin), users will be able to leave commented reviews and ratings for listings. If not active, the default WordPress comments will be available by default. Just make sure that comments are active to your site, on ‘Settings / Discussion’.
You can access the ‘Comments’ menu on the WordPress admin dashboard to moderate submitted reviews.
On ‘Theme Options / Reviews’, you’ll find a list of configurations available.
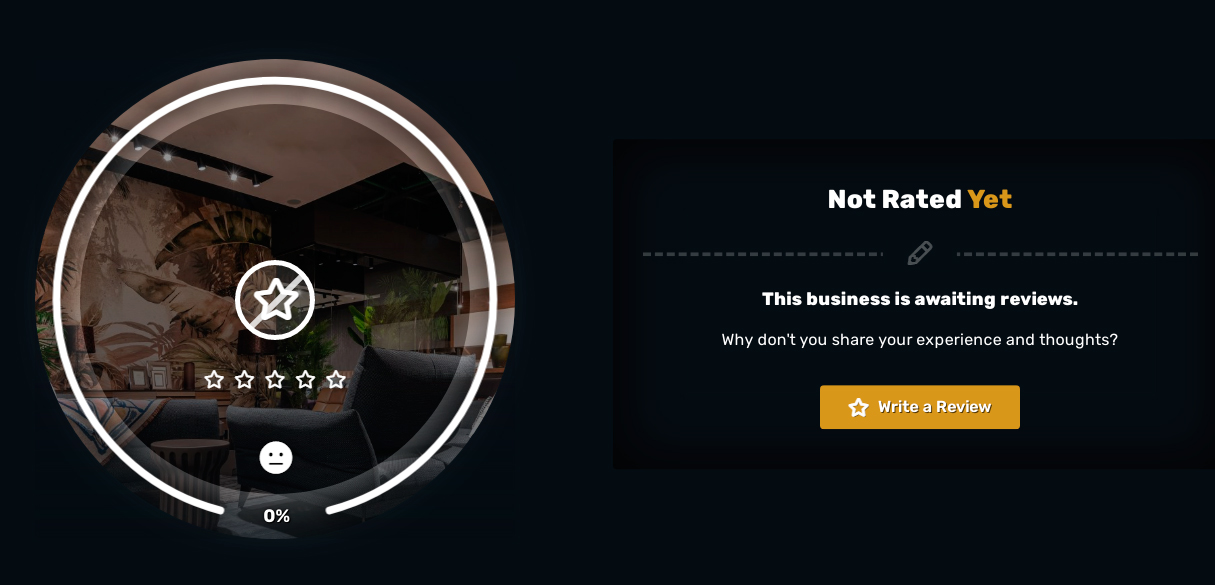
Listings with no reviews will show an empty star icon:
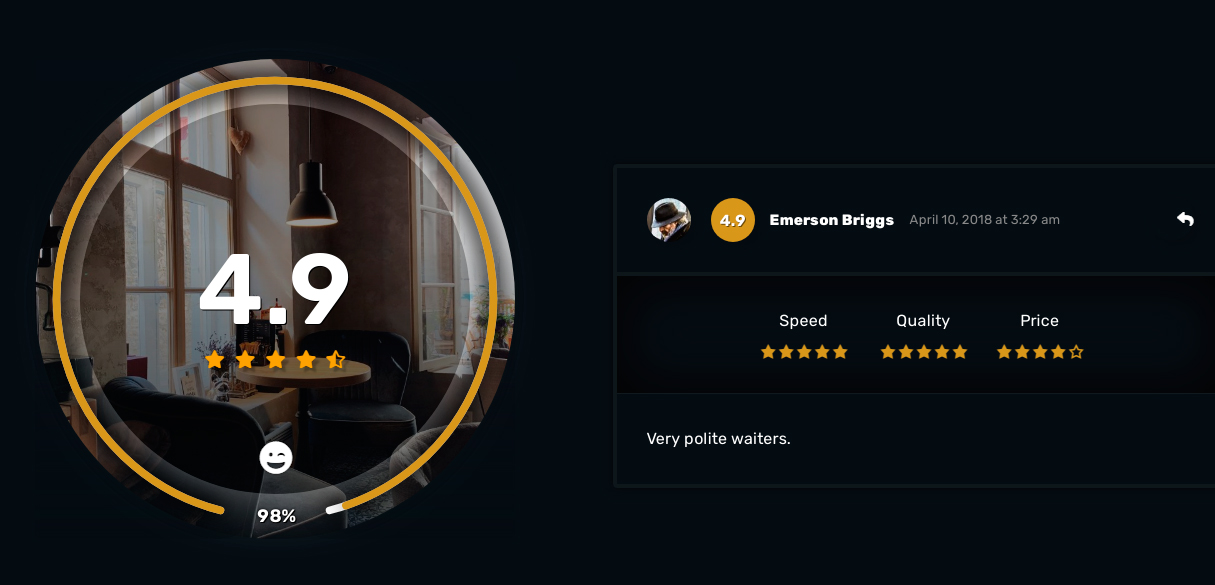
Reviewed listings will display the average rating calculated from received reviews:
Google Reviews
Google Reviews for listings is a built-in free feature but requires the activation of the following plugin:
This optional plugin is included on the list of recommended plugins for installation right after of activating the theme.
After activating the plugin, visit the following link (change it to your site domain):
https://yoursitedomainhere/wp-admin/admin.php?page=grw-support&grw_tab=fig#fig_api_key
Follow the instructions to get a Google API Key with Places API enabled.
To set your Google API Key, go to Google Reviews / Settings / Google and enter the Google API Key on the Google Places API key field and Save:

Now, go to Listing / Listing Types, choose a Listing Type that you want to enable Google Reviews (or edit Default Listing Forms, in case you don’t have any Listing Type) and go to Packages & Fields.
If you have created listing packages, choose one of the Package In Use to enable Google Reviews on it:
If you don’t have Listing Packages, just scroll down to see the Standard Fields to use:

Click on the Google Place ID field to add it to the list of Fields In Use. Drag/drop the new field for any desired position on the Listing Submission Form:
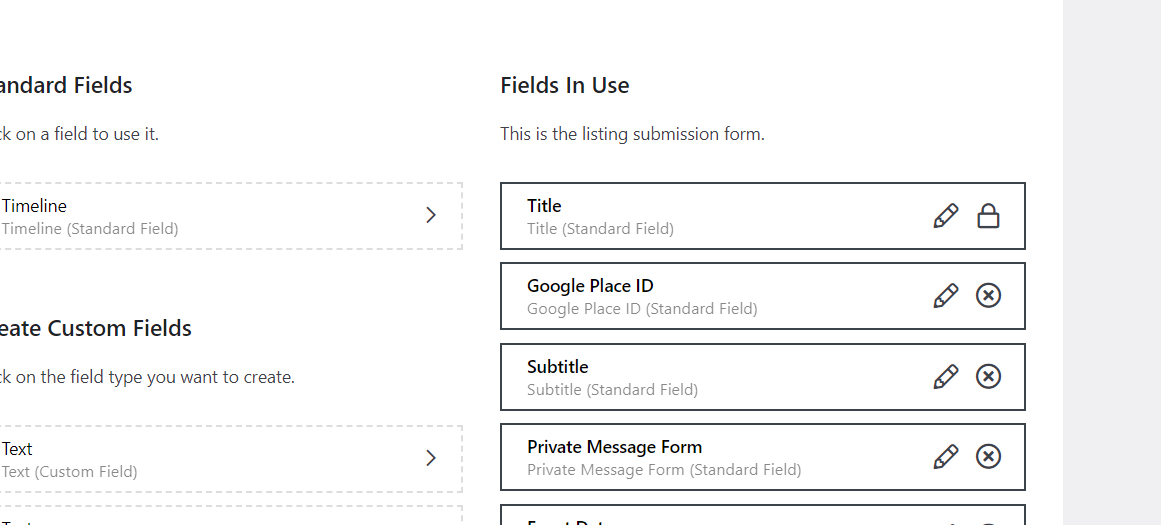
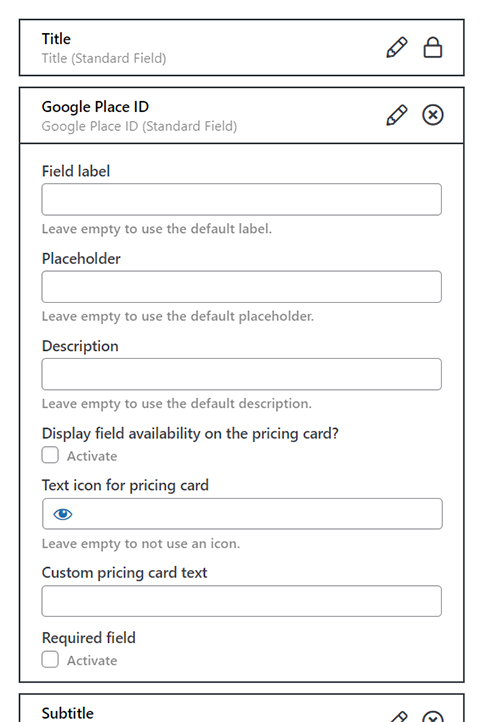
You can click on the pencil icon to edit the field if you want:
After finishing, click on the Update button to save the changes.
Now, the Google Places ID field is available for this listing submission form. Repeat the steps above for every Listing Type and for every Listing Package you want to enable Google Reviews.
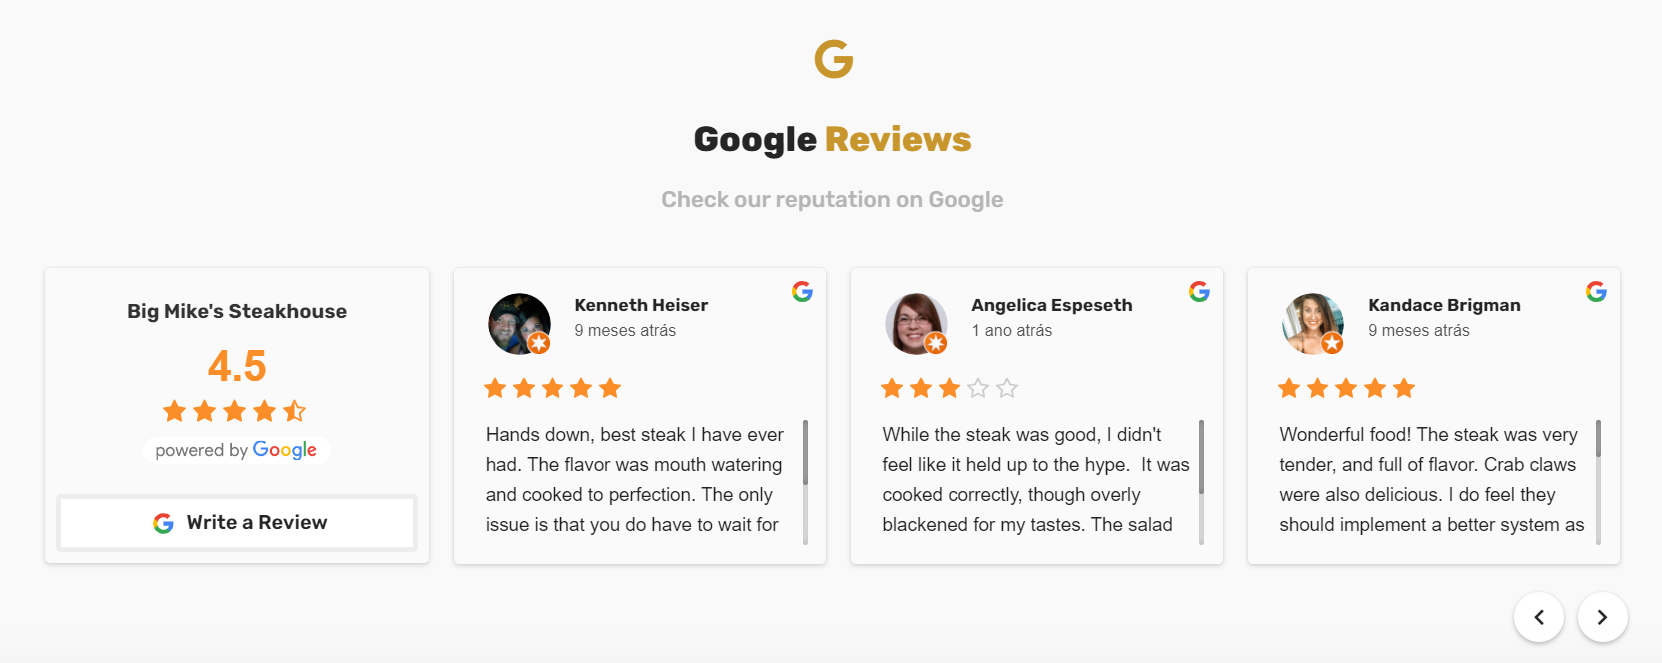
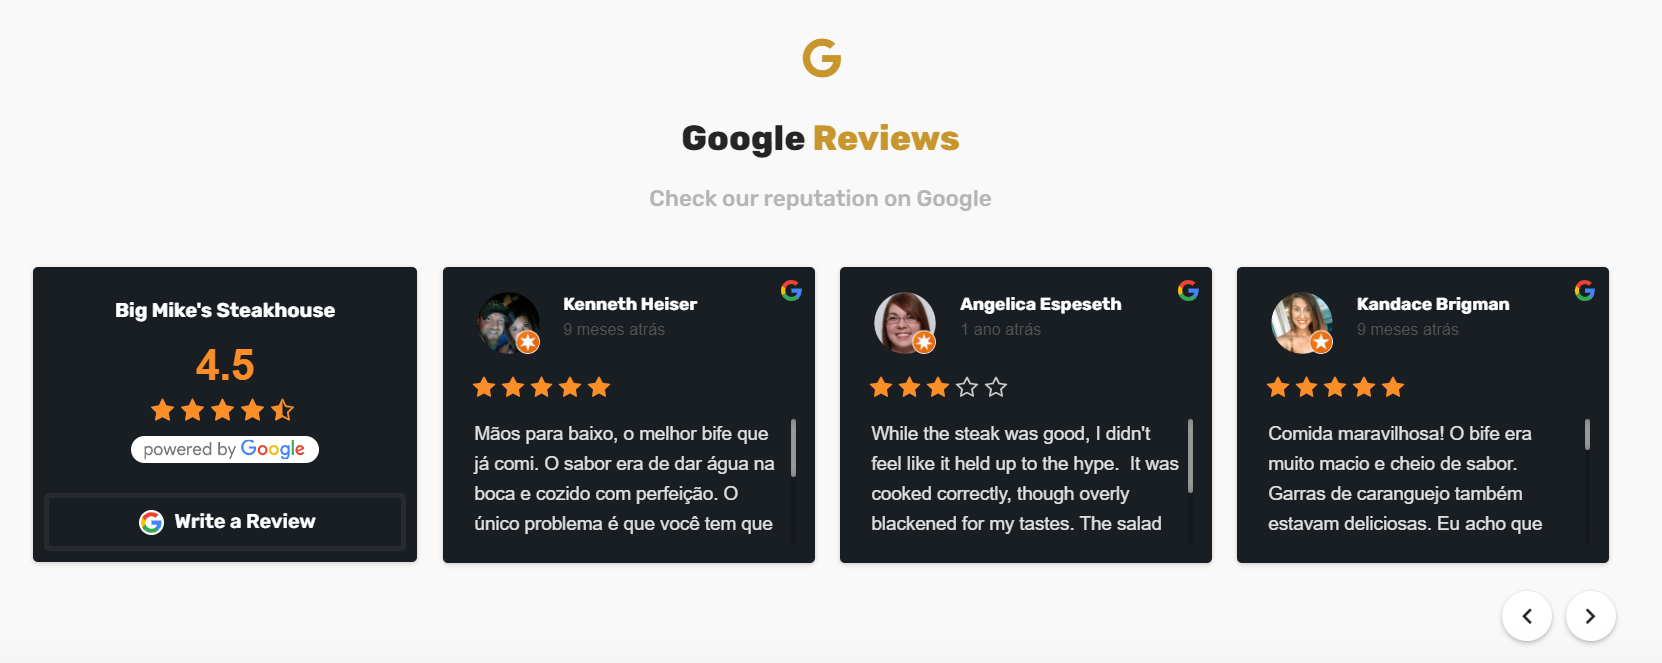
If a valid Google Place ID be inserted on this field, the Google Reviews of the business will be captured automatically in time. For the first capture, Google will only deliver 5 reviews. This is how the Google Reviews section will look on the Listing Page:
You can also go to Theme Options / Design / Background color for Google Reviews cards and enable the Dark design:
Listing Type Builder
Submission Form Builder
After create listing packages, you need to set the correct listing packages for every listing type (in case your directory is using listing types) or add the pricing packages to the standard listing form submission. To do that, go to Listings / Listing Types. Choose a listing type on which you want to add listing packages. For example, “Properties”:
Or, if you are not using listing types, choose “Default Listing Forms”.
Wait the page load and go to “Packages & Fields”:
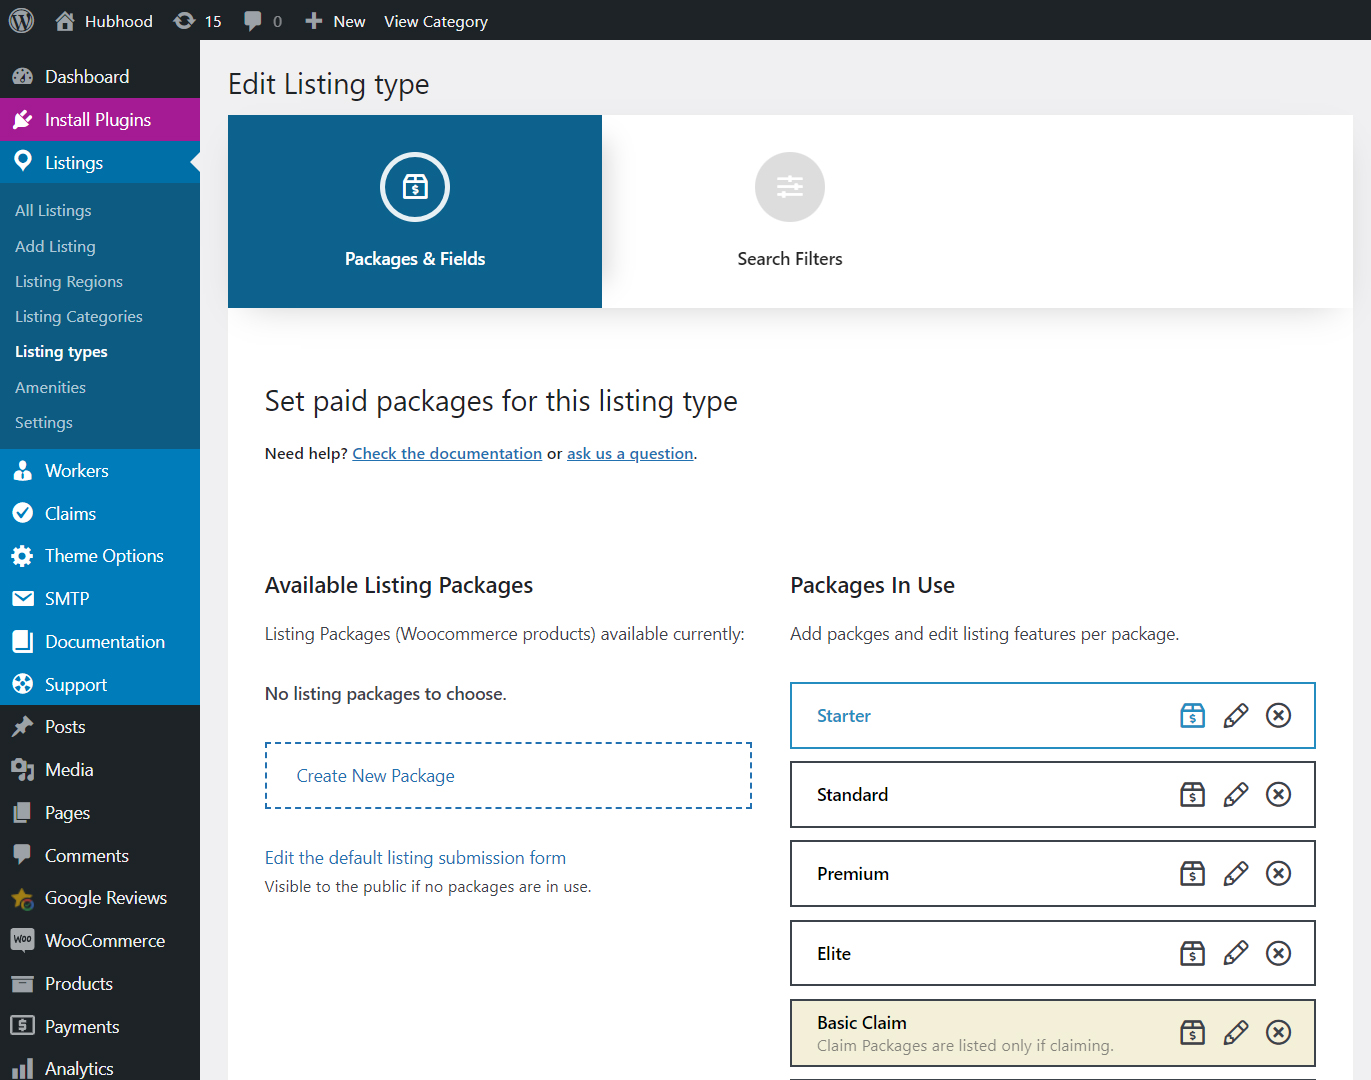
On the list of “Available Listing Packages” (left column), find the listing package you are currently editing and click to add it to the list of “Packages In Use” (if not added yet):
Click on the pencil button of the package to see generic options for the package. You can keep the defaults or customize it:
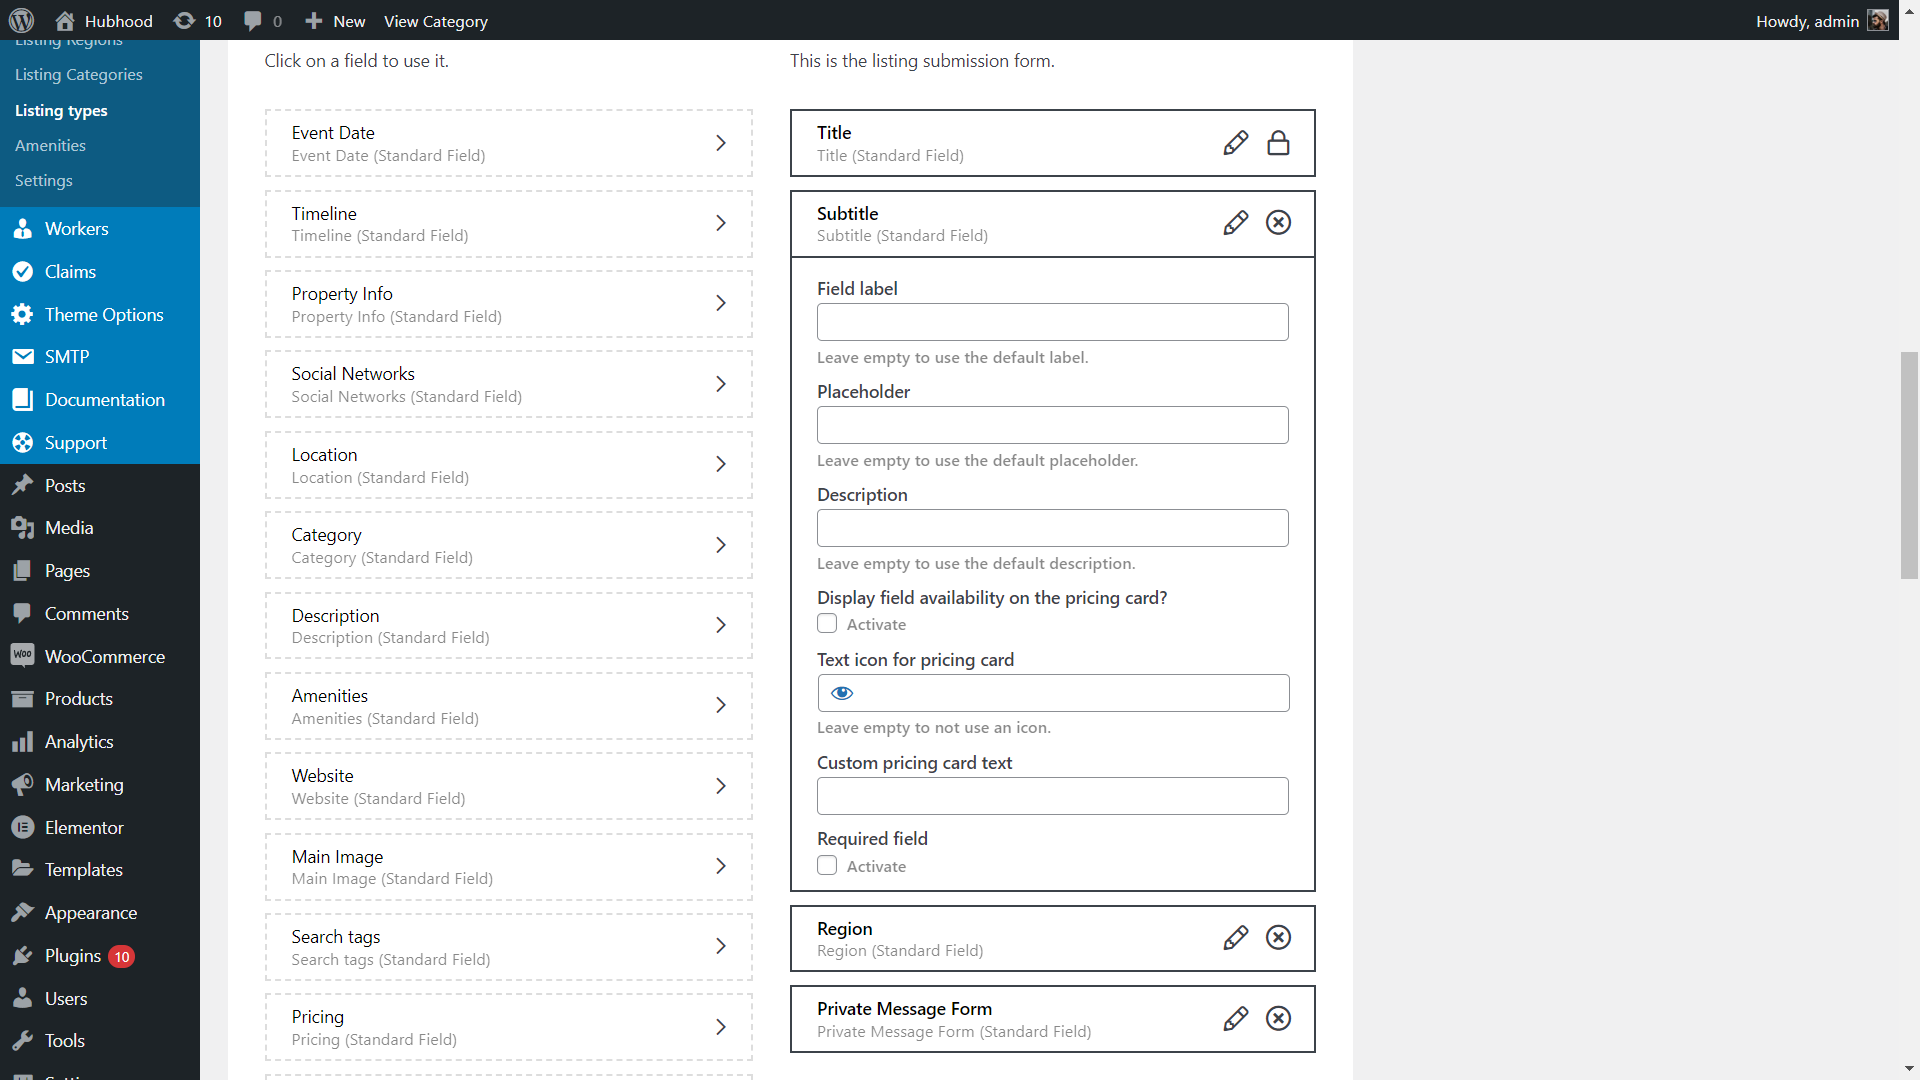
Creating Submission Forms
Now, you need to add form fields to the listing submission form of this listing package. Click on the package button:
The page will scroll down. You will see the “Standard Fields” and “Create Custom Fields” on the left column and “Fields In use” on the right column:
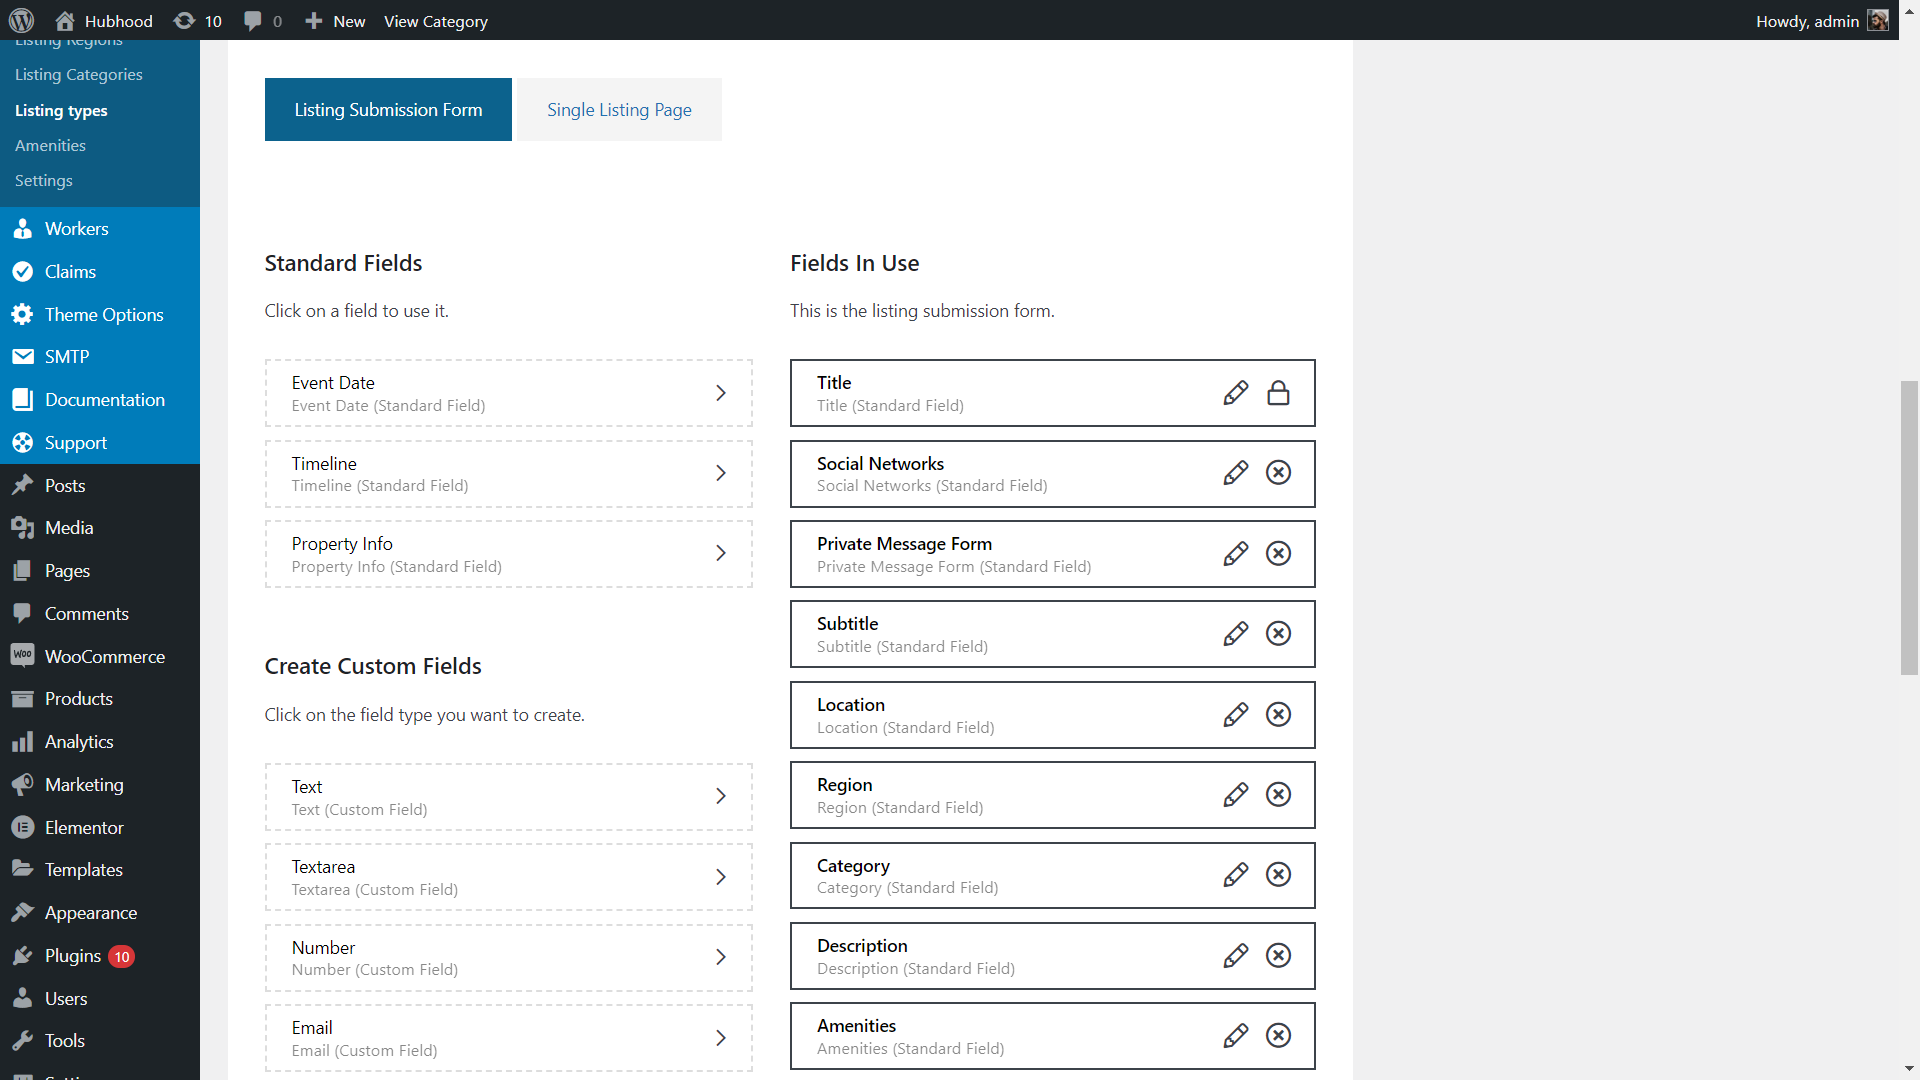
Standard Fields: you can add only once. these are the standard listing submission form fields with special functionalities.
Custom Fields: you can create and add unlimited fields. These are generic form fields, like checkboxes, text, select, etc.
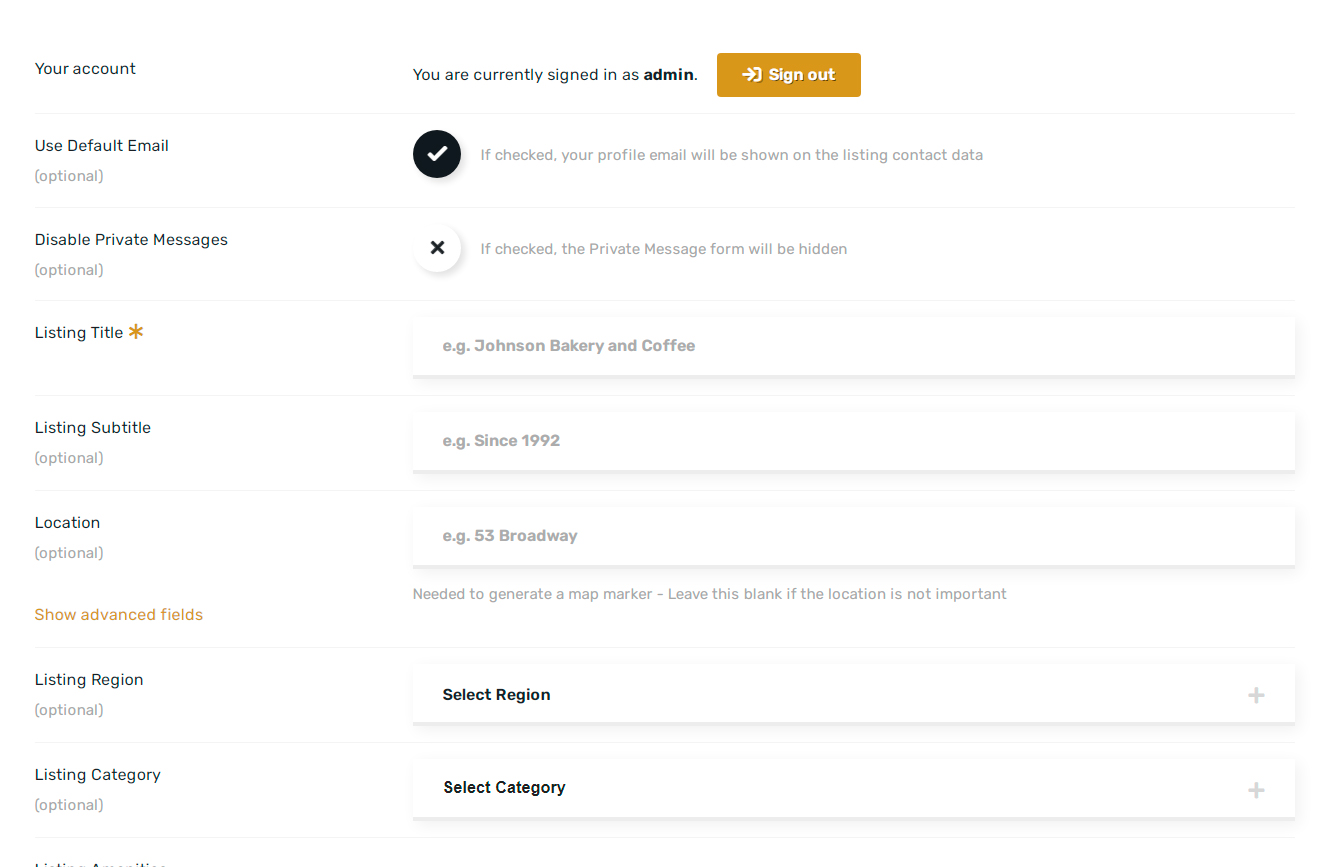
Start adding/removing fields for the listing form. For example: Subtitle, Regions, Description and Private Message. Add these fields, this way:
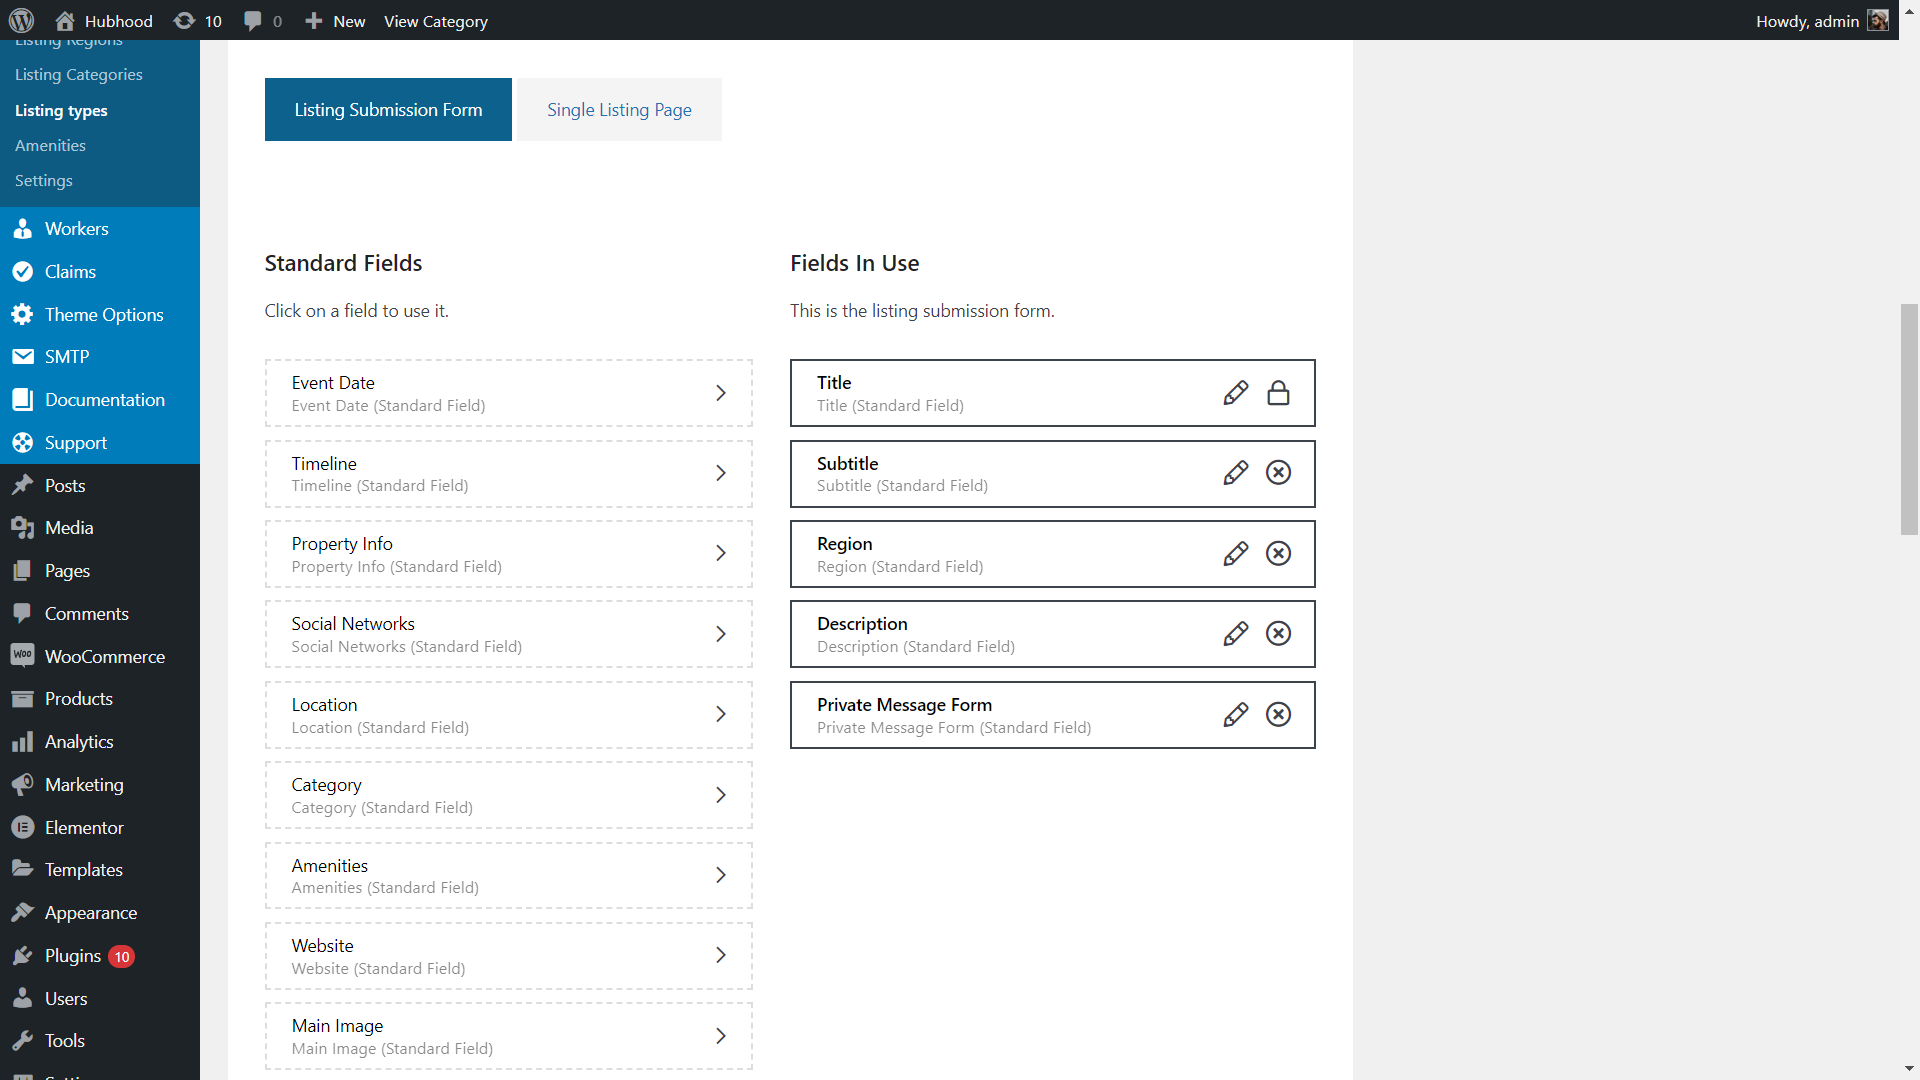
You can drag/drop the fields to reorder. This is de order that these fields will appear on the listing submission form for this listing package.
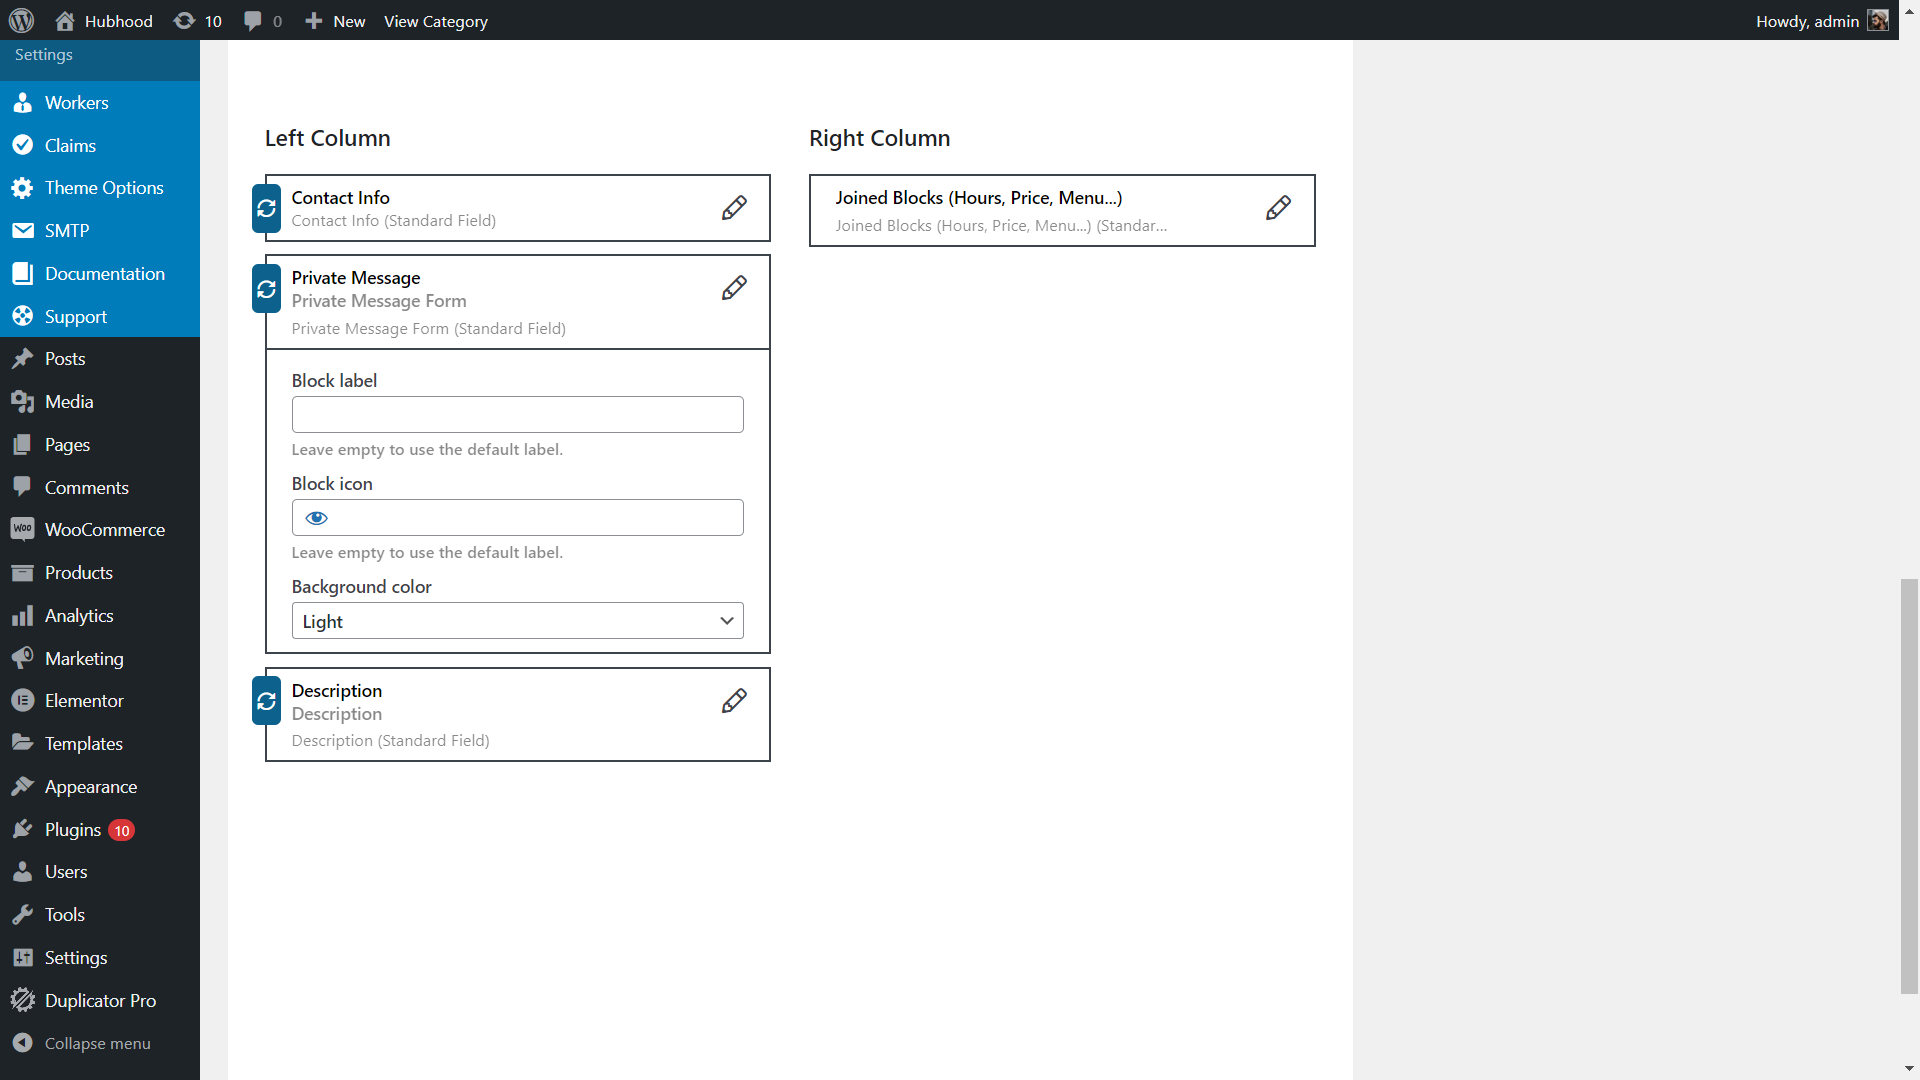
Click on the pencil button for every field to see the field options, in case you want to customize it:
Customize blocks for the single listing content
After add all fields you want to the form, click on the “Single Listing Page” button:
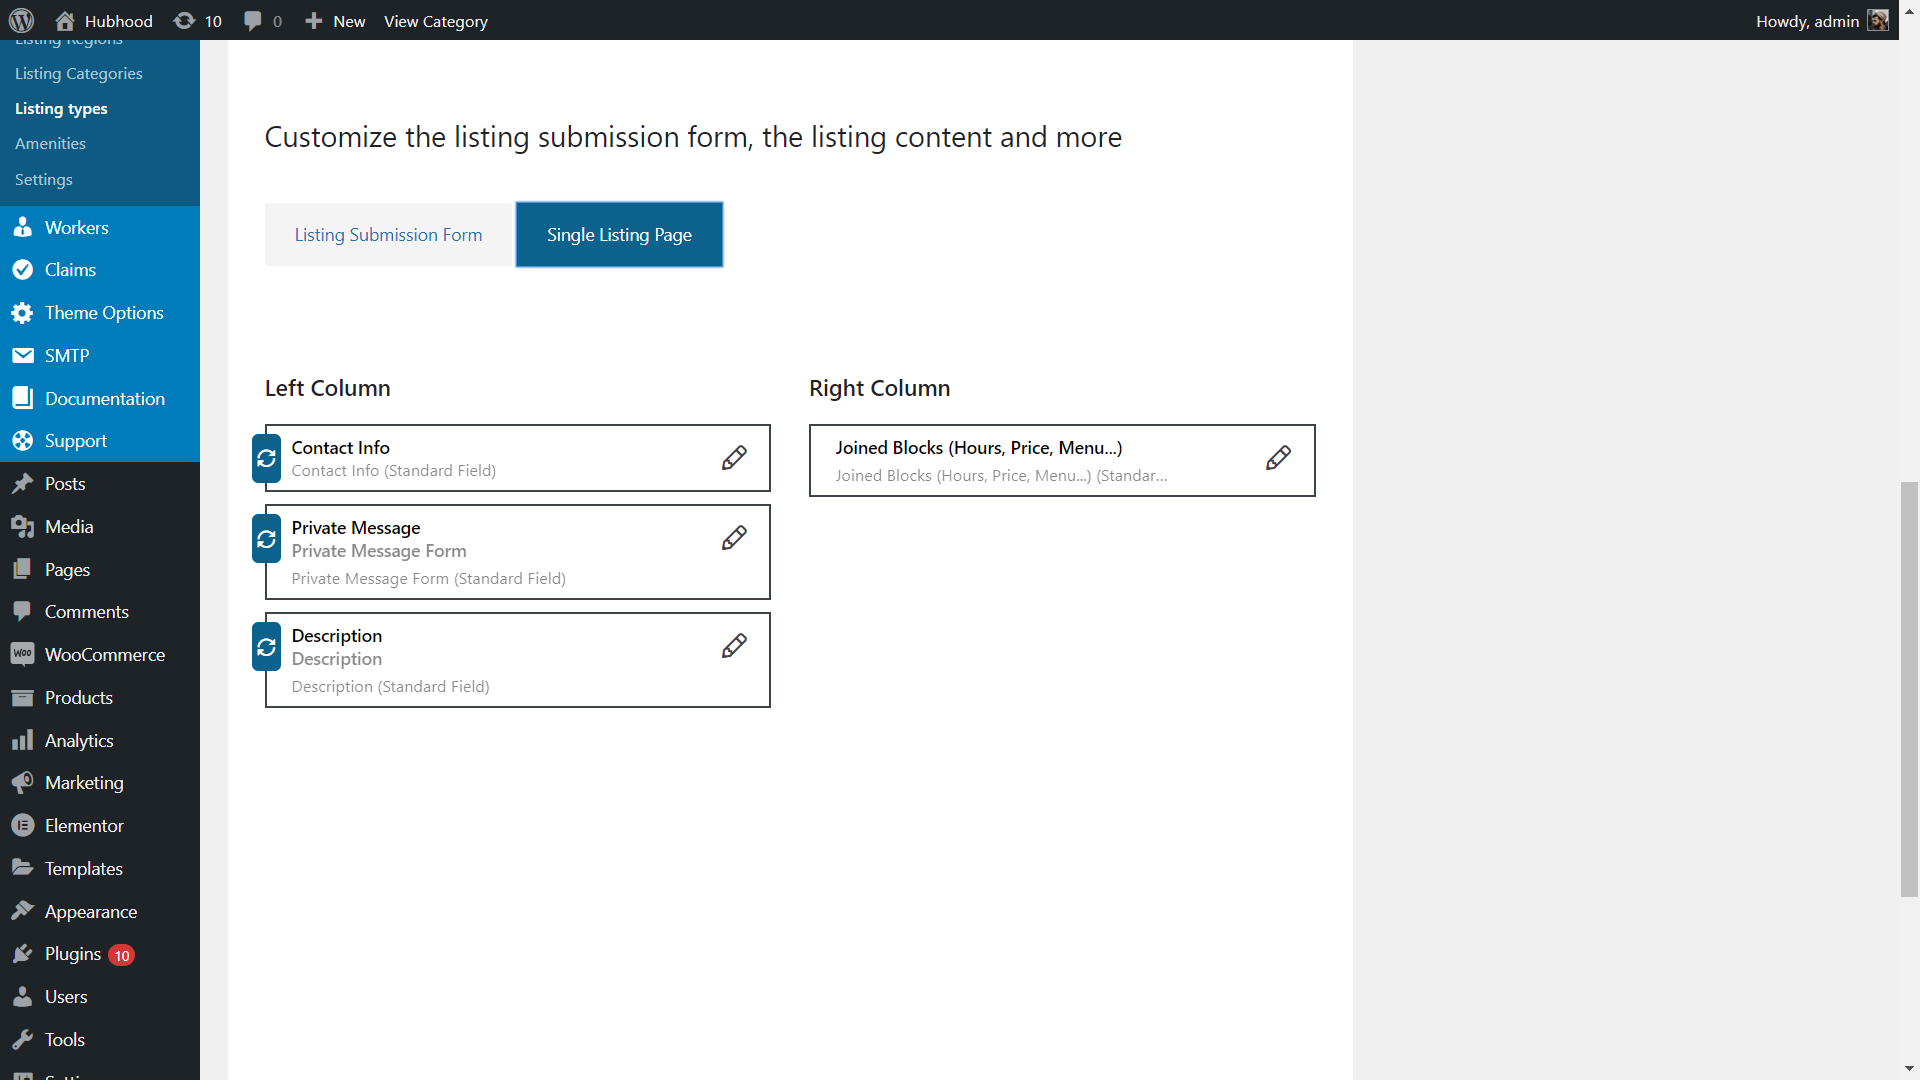
These are the blocks that will be displayed on the listing page, in case they have been filled by the listing author. Similarly, you can drag/drop to reorder and move fields to the left or right column.
Click on the pencil button of the block to see the options available:
After conclude the changes, for this listing package, you can continue adding and editing the packages for this listing type.
When you finish all changes for all packages, scroll down to the bottom of the page and click on the “Update” button to save the changes for this listing package.
And, if you have multiple listing types enabled, go to the next listing type and do the same process. In short:
- Add the listing packages for the listing type
- (Optional) Configure the generic options for every listing package
- Add form fields for every package and customize/reorder the fields as you wish
- Click on the Single Listing Button to configure the listing blocks that will appear on the listing page
- Click on the “Update” button to save the changes
All right, you have successfully created custom listing submission forms for different listing packages and listing types.
Upgrading Listing Packages
These instructions are for customers that have created listing packages, free or paid.
If you are upgrading Hubhood from 1.4.X versions (or earlier) to 1.5.0 (or higher), you will need to upgrade listing packages. This upgrade basically consists on replicate the Listing Package Features into the Listing Type Builder for listing types.
Firstly, go to the “Products” menu (Woocommerce products) and open one of your current listing packages:
Click on “Package Features” to see the current options set for this listing package.
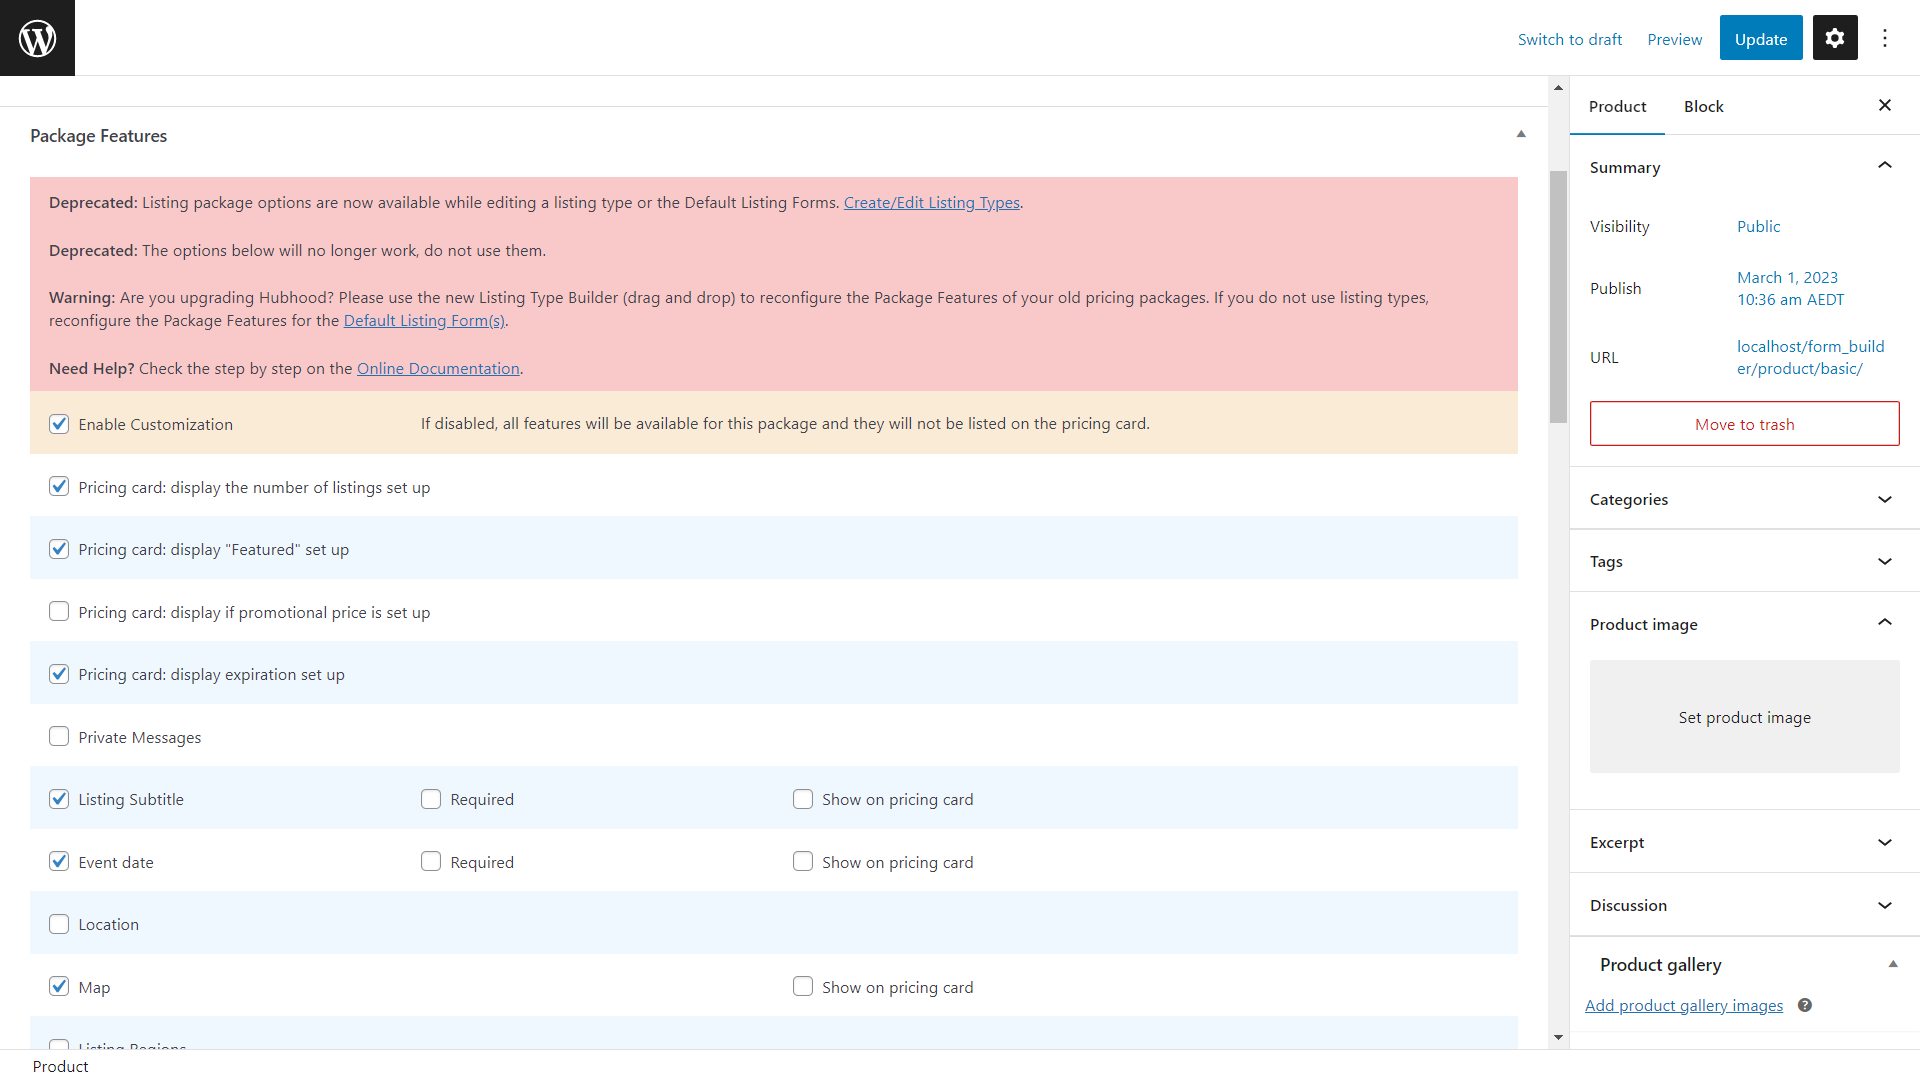
These are the options you will need to copy, keep this page open.
Go to Listings / Listing Types. Choose a listing type on which you want to use the current listing package.For example, “Properties”:
Or, if you are not using listing types, choose “Default Listing Forms”.
Wait the page load and go to “Packages & Fields”:
On the list of “Available Listing Packages” (left column), find the listing package you are currently editing and click to add it to the list of “Packages In Use” (if not added yet):
Click on the pencil button of the package to see generic options for the package. You can keep the defaults or customize it:
Creating Submission Forms
Now, you need to add form fields to the listing submission form of this listing package. Click on the package button:
The page will scroll down. You will see the “Standard Fields” and “Create Custom Fields” on the left column and “Fields In use” on the right column:
Standard Fields: you can add only once. these are the standard listing submission form fields with special functionalities.
Custom Fields: you can create and add unlimited fields. These are generic form fields, like checkboxes, text, select, etc.
Start adding/removing fields for the listing form based on the deprecated Package Features you have set for this listing package. For example, If you had Subtitle, Regions, Description and Private Message, add these fields, this way:
You can drag/drop the fields to reorder. This is de order that these fields will appear on the listing submission form for this listing package.
Click on the pencil button for every field to see the field options, in case you want to customize it:
Customize blocks for the single listing content
After add all fields you want to the form, click on the “Single Listing Page” button:
These are the blocks that will be displayed on the listing page, in case they have been filled by the listing author. Similarly, you can drag/drop to reorder and move fields to the left or right column.
Click on the pencil button of the block to see the options available:
After conclude the changes, for this listing package, you can continue adding and editing the packages for this listing type, in accord with the deprecated Package Features for every listing package.
When you finish all changes for all packages, scroll down to the bottom of the page and click on the “Update” button to save the changes for this listing package.
And, if you have multiple listing types enabled, go to the next listing type and do the same process. In short:
- Add the listing packages for the listing type
- (Optional) Configure the generic options for every listing package
- Add form fields for every package and customize/reorder the fields as you wish
- Click on the Single Listing Button to configure the listing blocks that will appear on the listing page
- Click on the “Update” button to save the changes
All right, you have successfully upgraded your listing packages.
Search Form Builder
With the Listing Type Builder, you can also set custom search fields for search forms for every listing type. Choose a listing type to edit and click on the “Search Filters” tab:
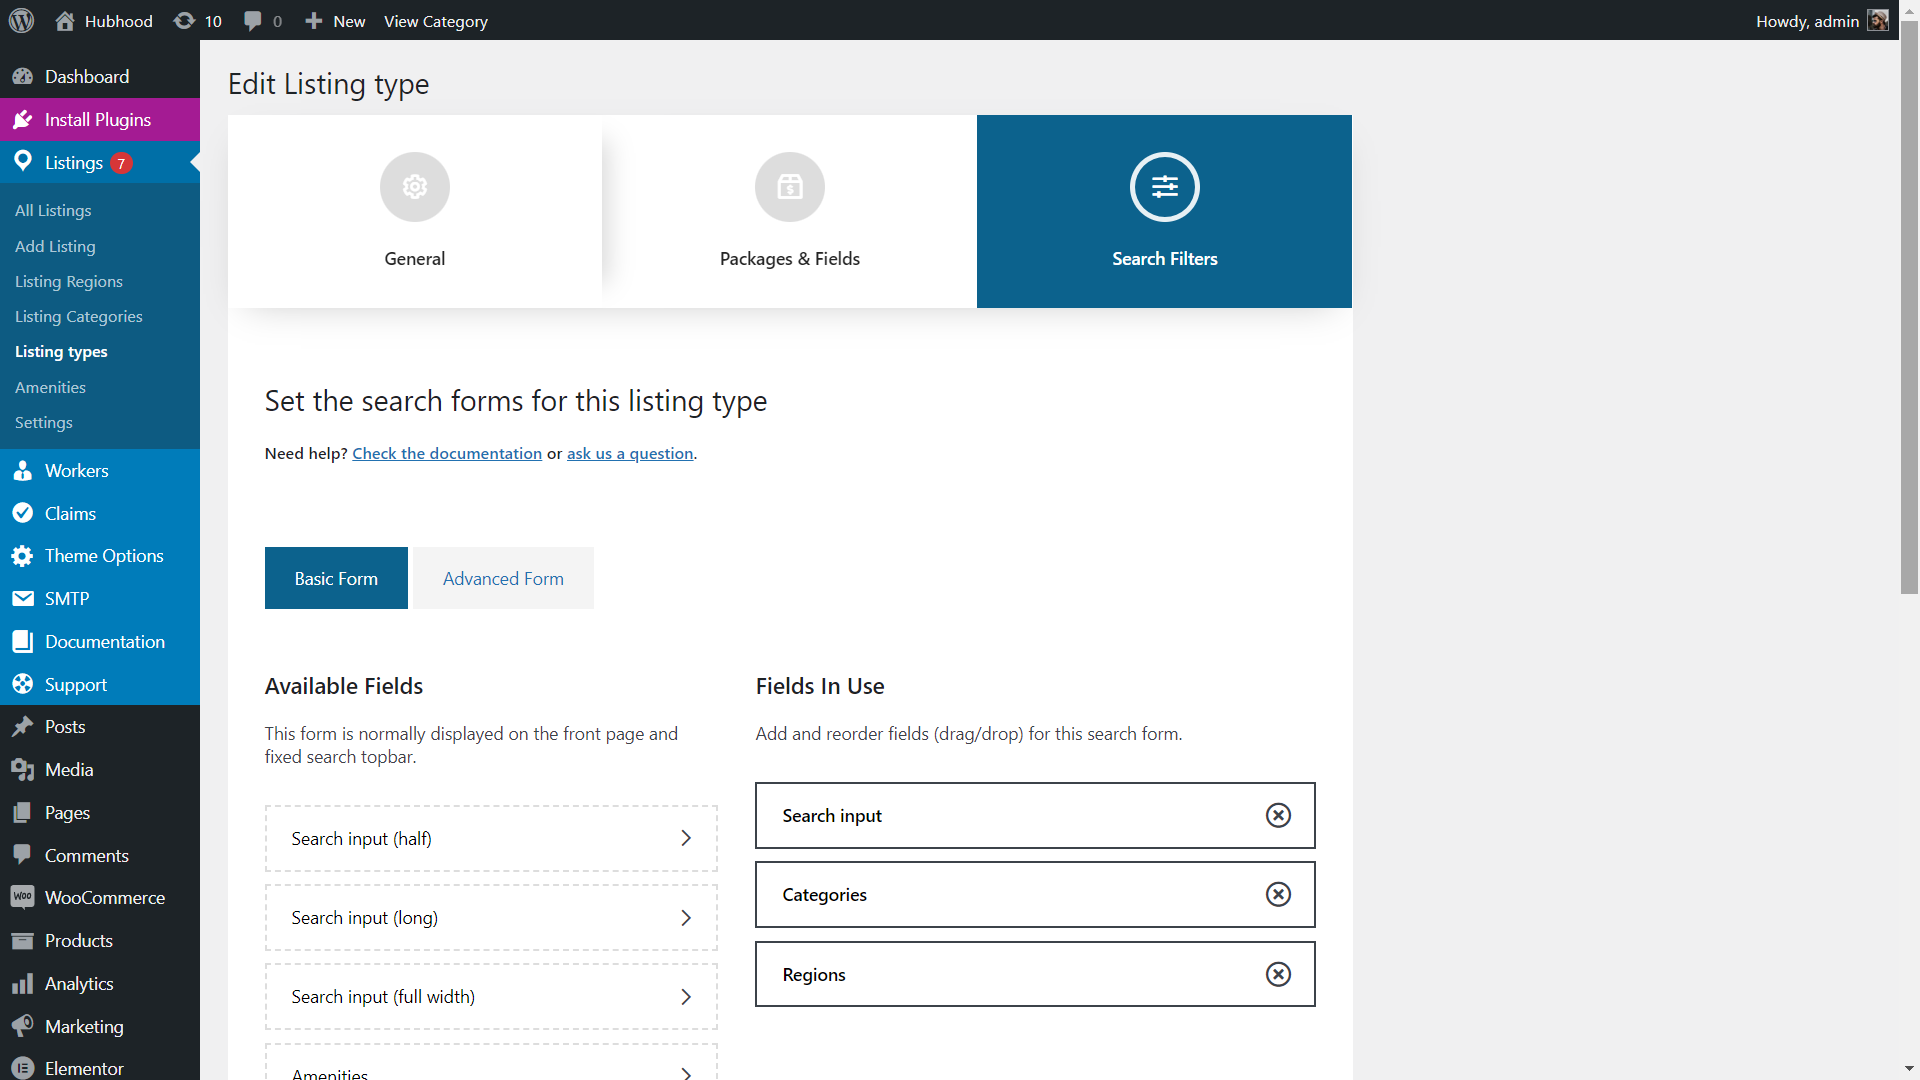
There is a list of predefined listing fields to choose. Add the search fields you want for both “Basic Form” and “Advanced Form”.
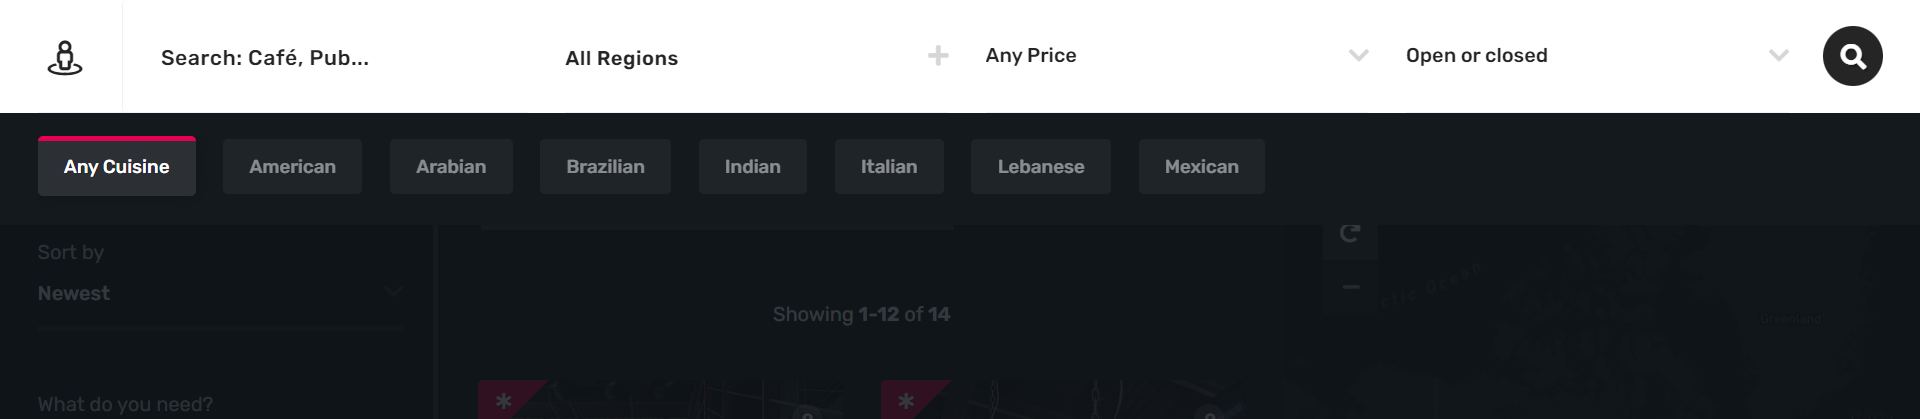
Basic Form: is normally shown on the front page header (except if disabled) and is launched as a popup after clicking on the search button of the top bar. This form is available to be launched for all pages:
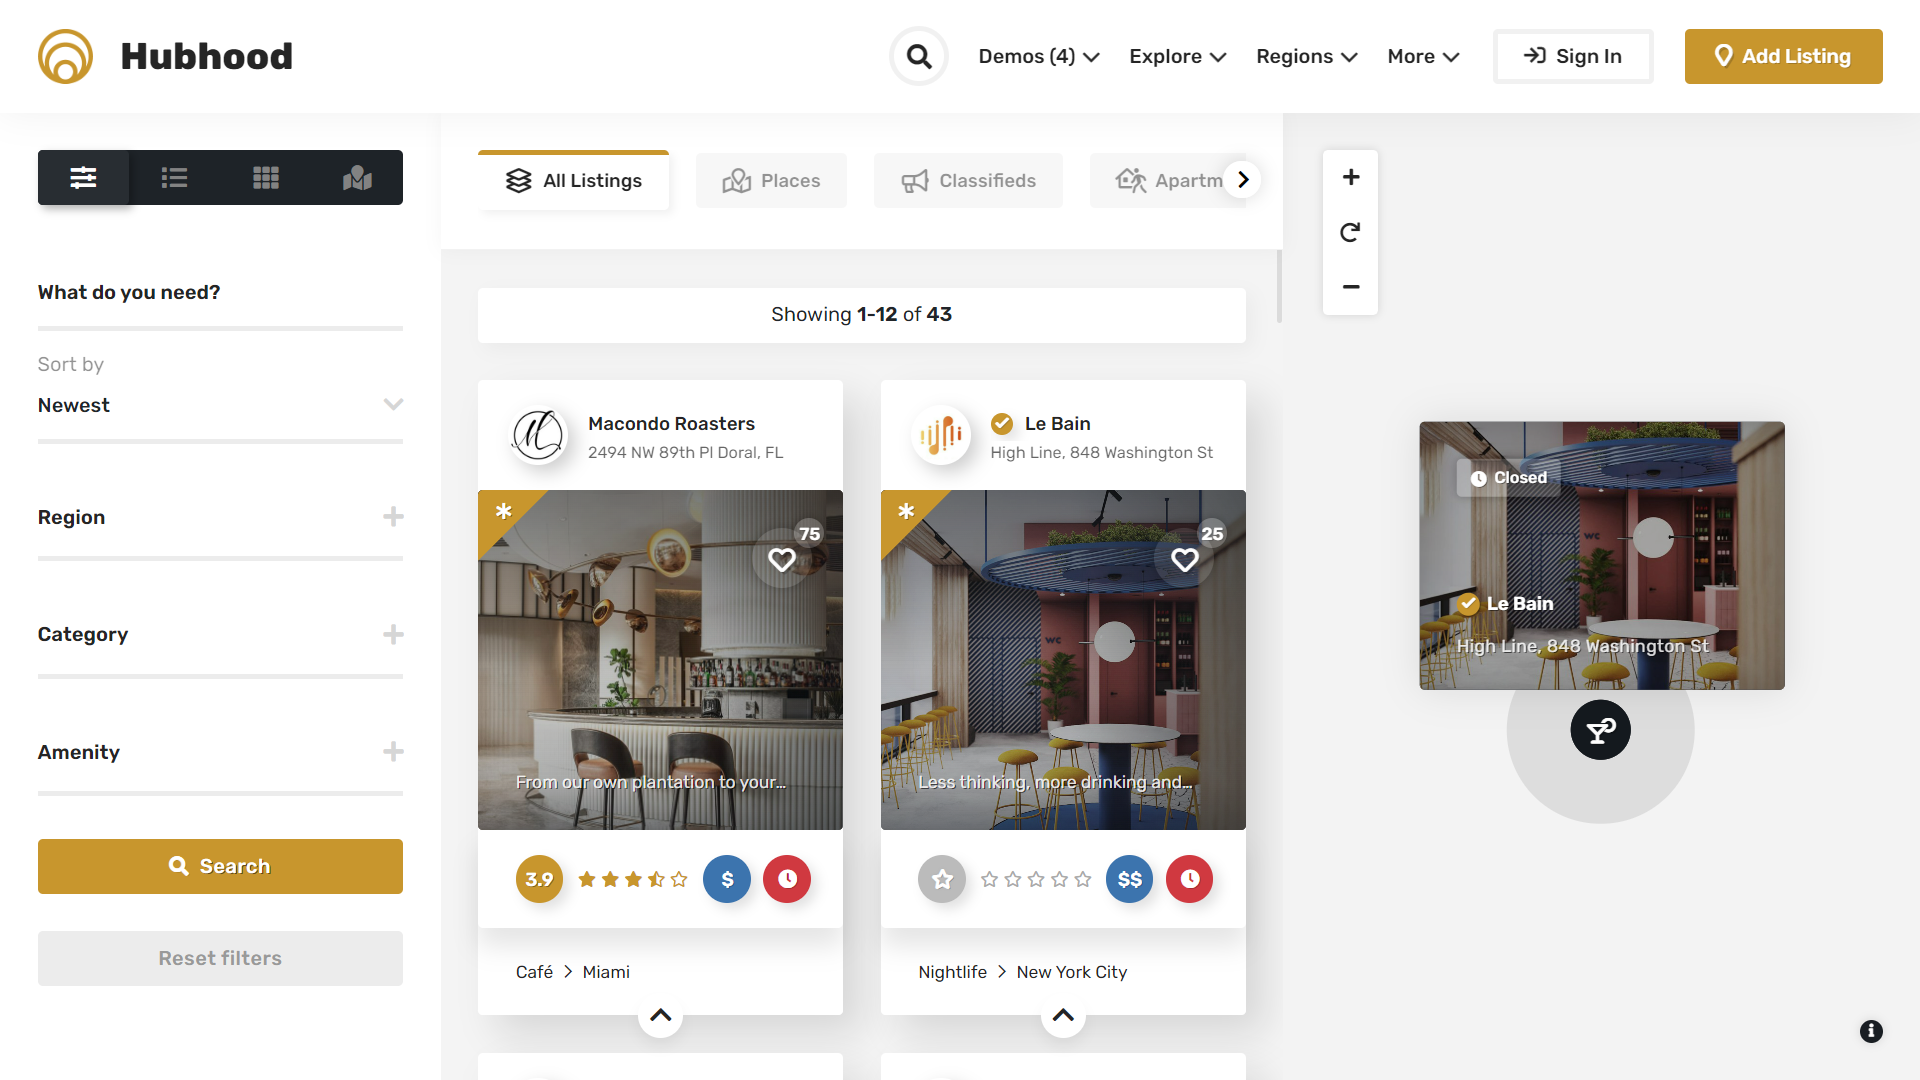
Advanced Form: is shown exclusivelly on archive and search pages for listings, on the left column:
User Account
User Account
Registered users have access to the ‘User Account’ menu when logged in. To turn it visible, click over the user avatar picture, located on the header bar (top bar). After all required/recommended plugins are installed and activated, the ‘User Account’ menu will look like this:
For administrators
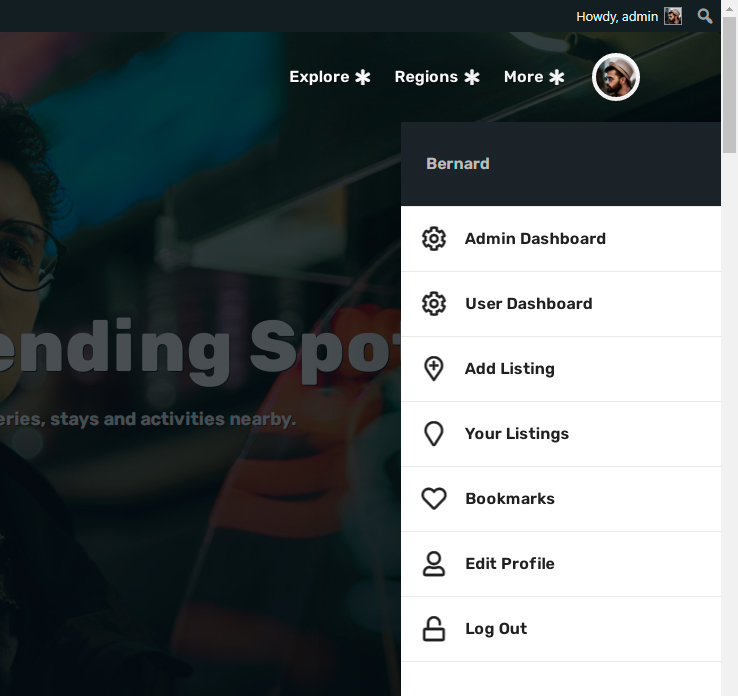
Subscribers
Subscribers just don’t have access to the ‘Admin Dashboard’ link, all other User Account links are the same.

Blog
Blog Page
To set a page as blog page, go to ‘Settings / Reading’, and on ‘Your homepage displays’ check ‘A static page’. On the ‘Posts page’ selector, choose a page:
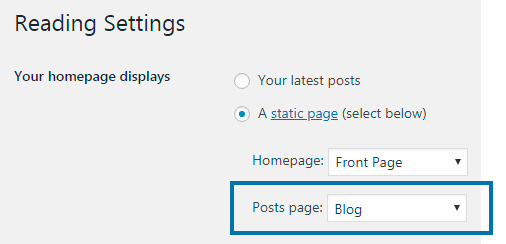
Click on ‘Save Changes’ button. Now, if you access this page it will display the most recent blog posts.
Categories
On the admin dashboard menu, go to ‘Posts / Categories’. Insert a name to the new category. Notice that you have a image field, so you can set a background image (cover) to the category if you wish:
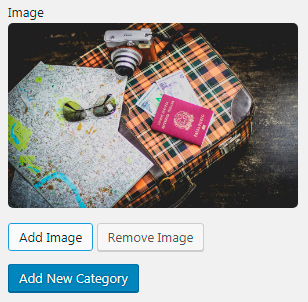
Finish by clicking on ‘Add New Category’ button.
Creating a Post
Notice: most of this generic explanation also fits to describe the creation of pages and listings (back end editor).
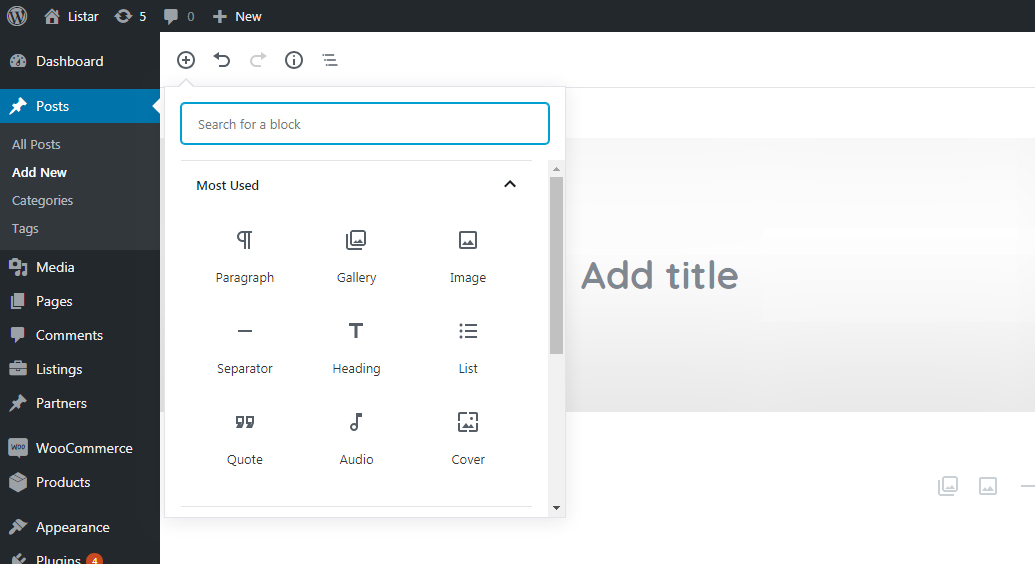
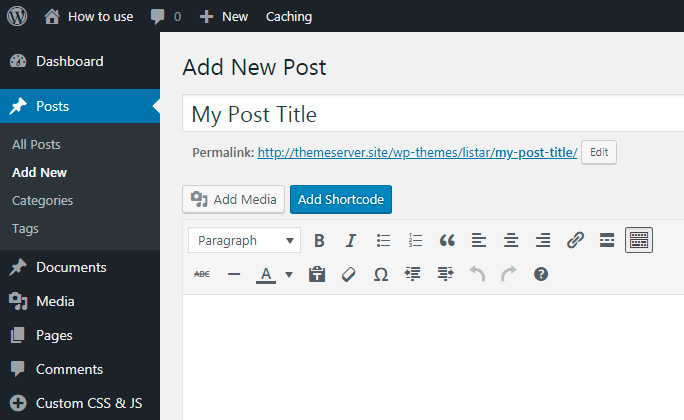
Go to ‘Posts / Add New’ to create a blog post.
Gutenberg Editor
WordPress 5.0+ comes with a new post editor called Gutenberg, featuring its interface based on ‘blocks’. Click on the ‘plus’ button to start adding blocks to the post content area:
After “build” the content of your post with these blocks, and configure every block, you can select one or more ‘Categories’ and add ‘Tags’:
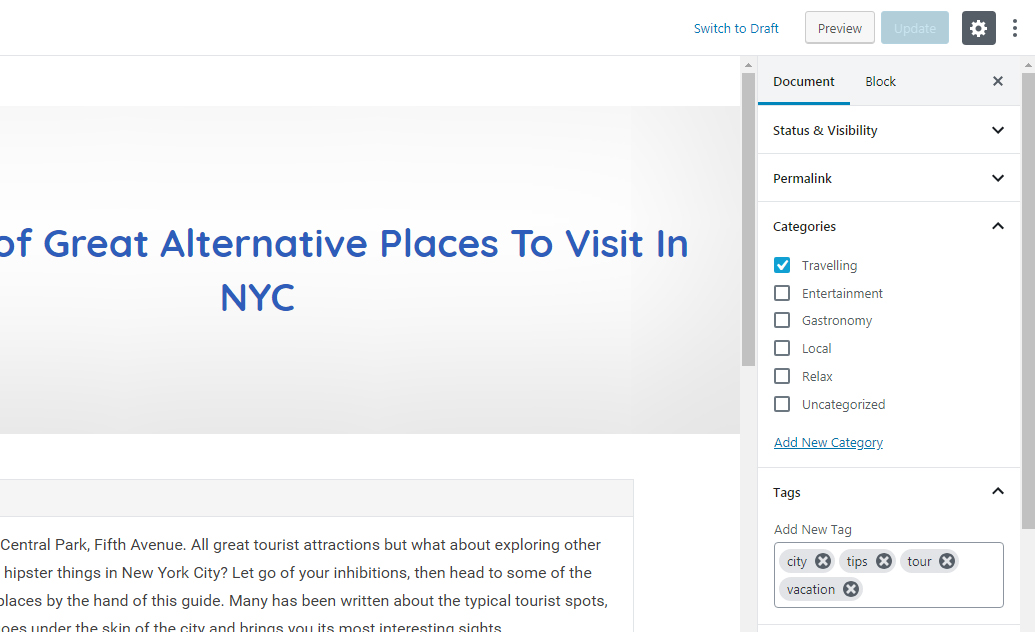
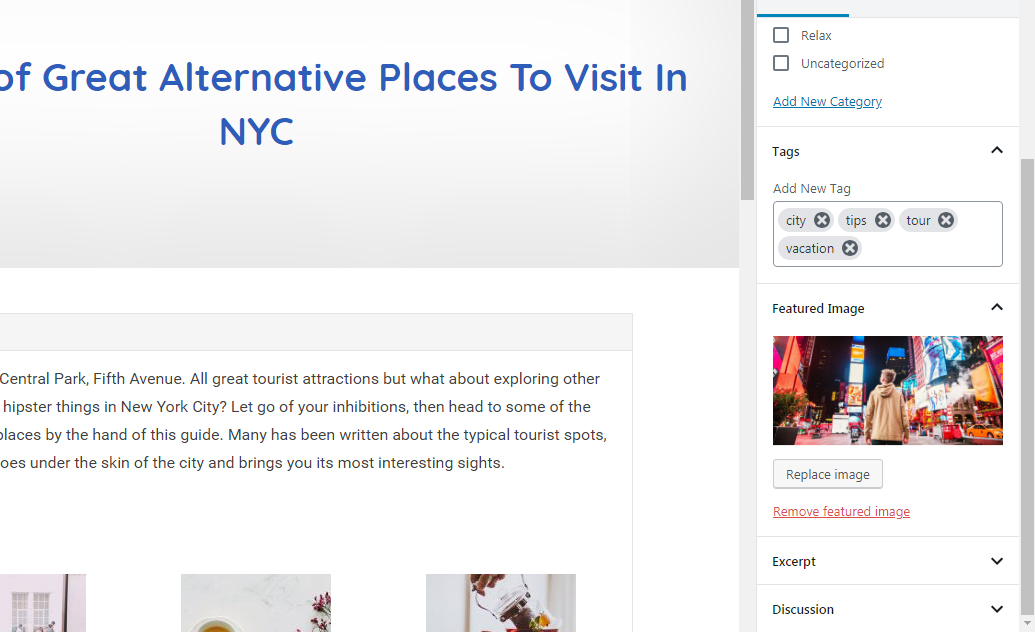
And set a ‘Featured Image’:
‘Publish’ your new post after conclude all changes.
If you need more detailed instructions about the usage of every Gutenberg block, there is a lot of video tutorials available on Youtube, like this one.
Classic WordPress Editor
For WordPress 4.8 and lower versions:
Insert a title, description and add images, a gallery or other media by clicking on ‘Add Media’ button.
You can format the content of your post with the formatting buttons.

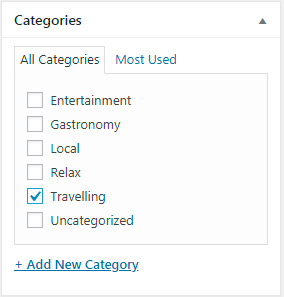
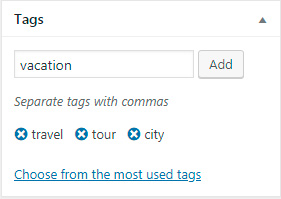
For better organization, choose one or more categories for this new publication or ‘Add New Category’.
Create and append tags related to your post if you wish.
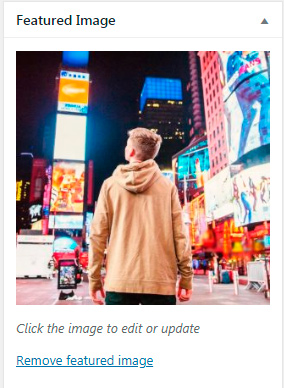
Set a ‘Featured Image’. This image will be displayed as cover image and also as background image to the post on archive pages.
‘Publish’ your new post after conclude all changes.
Blog Sidebar
You can go to on ‘Appearance / Widgets’ and freely drag/drop widgets into the ‘Blog Sidebar’.
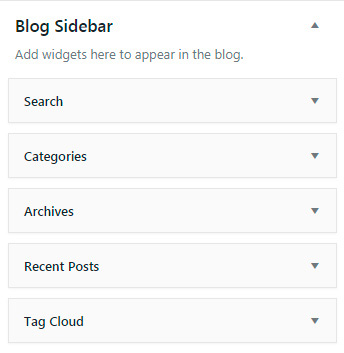
These widgets will be shown on all blog pages, including blog search and single blog posts.
Partners
Adding Partners
After activate the ‘Hubhood Add-ons’ plugin, go to ‘Partners / Add New’ menu to add a partner:
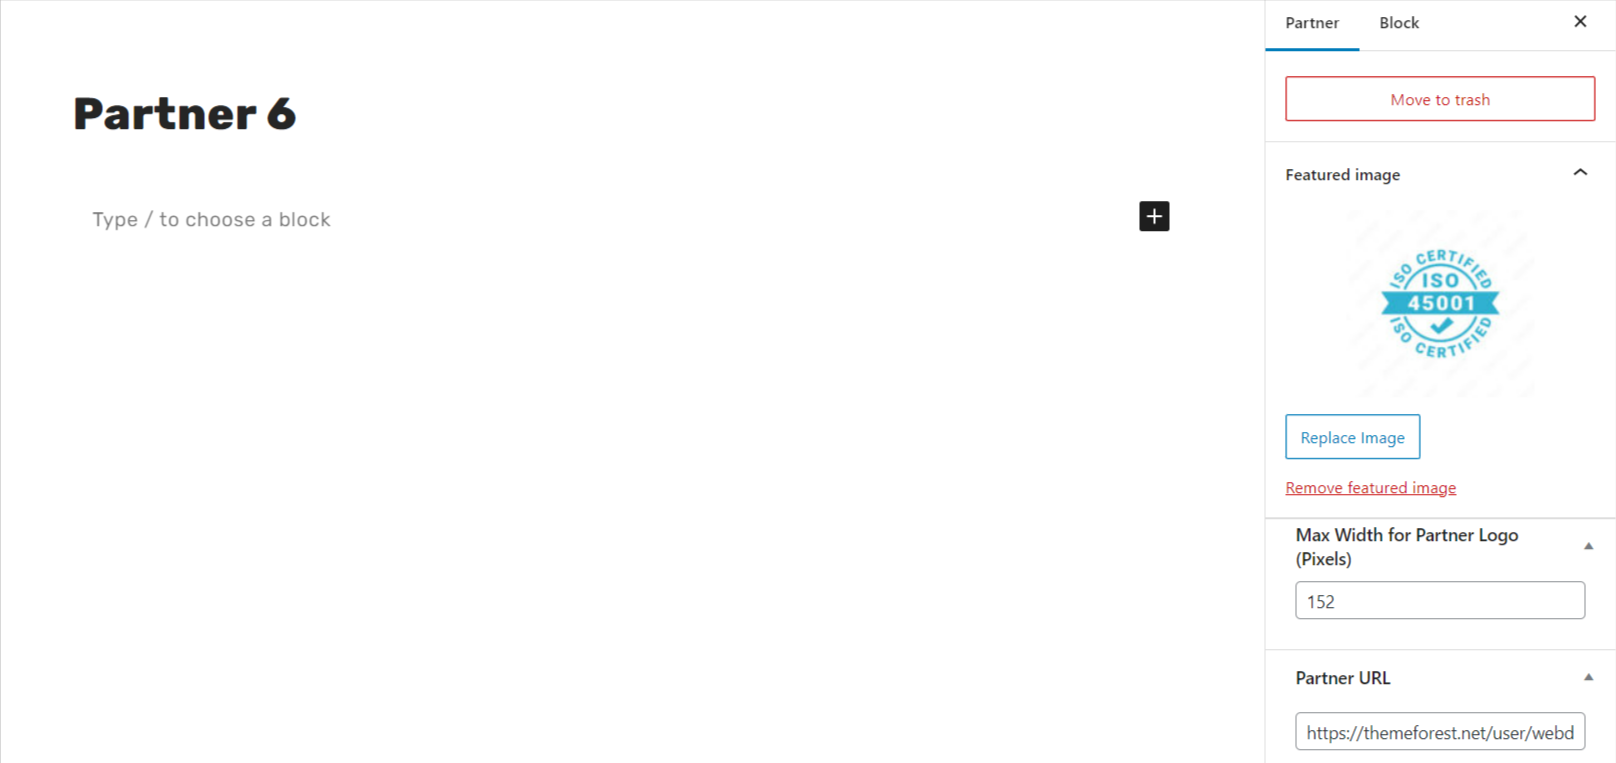
You can fill the title and description to keep your partner posts better organized, both contents won’t be available publicly.
Upload and set a ‘Featured Image’, i.e. the logo of the partner. Optionally, set a link to the ‘Partner URL’, i.e. the partner website, social network, etc. After finish, click on ‘Publish’ button.
Once you have published all partners, go to ‘Appearance / Widgets’ and drag the ‘Hubhood Partners’ widget to any sidebar / widgetized sections available.
This is how the ‘Hubhood – Partners’ widget looks like when configured to front page:
Translation
Translation
Hubhood (theme) and Hubhood Addons (plugin) are both translation ready. You can start the translation with very popular WordPress plugins, like:
You can also use Poedit. These are the translation files:
- wp-content/themes/hubhood/languages/hubhood.pot
- wp-content/plugins/hubhood-addons/languages/hubhood.pot
The ‘wp-content’ folder is inside the root directory of your WordPress installation.
If you have successfully translated Hubhood to your native language, please share your .pot file with us. You can send it to [email protected], and we’ll be very thankful by that.
Gutenberg Editor
Intro
Hubhood is compatible with Gutenberg, the WordPress editor that replaced the Classic Editor and is bundled since WordPress 5.0+.
The Gutenberg editor looks like this:
How to Use
If you need more detailed instructions about the usage of every Gutenberg block, there is a lot of video tutorials available on Youtube, like this one.
You can also refer to this chapter of this documentation.
Wide and Full Alignments
The following changes are needed to make Gutenberg ‘wide’ and ‘full’ alignments work properly.
For Blog Posts
WordPress can’t deal with a sidebar and wide/full alignments together, so you need to empty the ‘Blog sidebar’. Before proceed, make sure you don’t have interest on keep the data of current widgets .
Go to ‘Appearance/Widgets’ and remove all widgets from ‘Blog Sidebar’.
For Listing Posts
When creating or editing a listing, enable the ‘Full width’ option.
For Pages
No changes needed.
Aligning Blocks
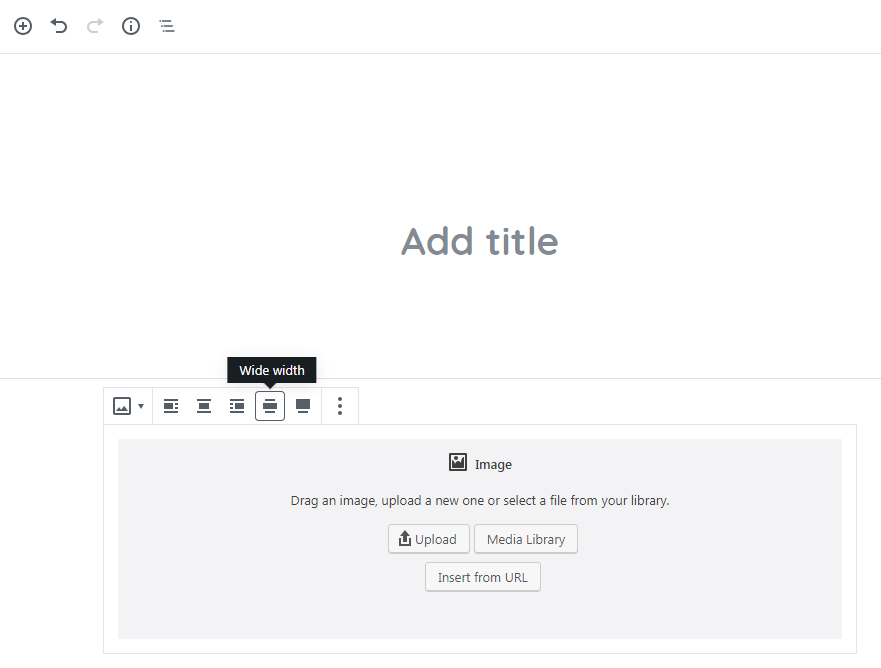
Start editing a Post, Page or Listing with the WordPress 5.0+ editor, click on the ‘plus’ ( + ) button to add a new block to the content area. Keep the block selected and check if the new ‘Wide width’ and ‘Full width’ alignment options are available for current block:
You can check more info here and see a post sample with these alignments in action here.
Fallback Alignments
In case you decide to keep the ‘Blog Sidebar’ populated with widgets, or publish listings without enable the ‘Full width’ option, both ‘wide’ and ‘full’ alignments will work the same way and make blocks occupy 100% of the width of its parent (wrapping) content area.
Solutions For Developers
Rewritable Functions
* For Hubhood 1.5.4+ Only
Please note that as a developer, you need to handle responsibility for code changes and must resolve conflicts for future versions of the theme.
You can use the Hubhood Child theme to customize functions of the main theme (Hubhood) or Hubhood Addons plugin:
- Make sure that Hubhood Child is activated (instead of Hubhood)
- Create a folder inside “hubhood-child” folder called “hubhood-rewrite-function”
- Open any original PHP file found on Hubhood theme or Hubhood Addons plugin, the one that contains the function you want to customize
- Copy the name of the function, for example: hubhood_get_workers_icon
- Create a new PHP file inside the “hubhood_overwrite_function” folder, for example: hubhood_get_workers_icon.php
- For this example, the file path must be: …/hubhood-child/hubhood_overwrite_function/hubhood_get_workers_icon.php
- Copy the whole function code, example:
hubhood_overwrite_function( 'hubhood_get_workers_icon' ); // No need to copy this line, but that is OK if you do.
if ( ! function_exists( 'hubhood_get_workers_icon' ) ) :
	function hubhood_get_workers_icon() {
		$input = get_option( 'hubhood_custom_icon_workers' );

		if ( empty( $input ) ) {
			$input = 'fa fa-user';
		}

		return $input;
	}
endif;
- Edit the new PHP file and paste the code of the function. Remember: this is a PHP file, so you need to start the document with:
<?php
- The final code for this example:
<?php
hubhood_overwrite_function( 'hubhood_get_workers_icon' ); // No need to copy this line, but that is OK if you do.
if ( ! function_exists( 'hubhood_get_workers_icon' ) ) :
	function hubhood_get_workers_icon() {
		$input = get_option( 'hubhood_custom_icon_workers' );

		if ( empty( $input ) ) {
			$input = 'fa fa-user';
		}

		return $input;
	}
endif;
Do the changes you need for the new function and Save.
Repeat the steps above for every function you want to edit. Review the details:
- Only one function per file
- The PHP file must be named with the same name of the original function
- The unique function inside that file must have the same name of its own PHP file
- The new PHP file must be created inside “hubhood-child/hubhood_overwrite_function” folder.
Rewritable PHP Files
* For Hubhood 1.5.4+ Only
Please note that as a developer, you need to handle responsibility for these file changes and must resolve conflicts for future versions of the theme.
If you are used to work with a Child theme, you are aware that you can customize “template” files of the main theme by simply copying these into the Child theme folder and doing the changes you need. With Hubhood you can do more than that: certain files are not template files, but you can customize these too.
You can customize via Hubhood Child theme:
- The PHP files of the Hubhood theme
- The PHP files of the Hubhood Addons plugin
Example of usage: Customize the HTML output for the listing cards of the Hubhood Listings widget.
To modify PHP files of the Hubhood theme:
- Make sure that Hubhood Child is activated (instead of Hubhood)
- Go to wp-content/themes/hubhood
- Copy any PHP file of this folder or subfolders, except “functions.php” (not rewritable)
- Paste the file inside wp-content/themes/hubhood-child/
- If the file you want to edit is inside a sub folder or sub sub folder, you must keep the directory tree until the file, for example: wp-content/themes/hubhood-child/template-parts/directory-parts/loop/card-content/card-content-design-1.php
- Don’t copy all PHP files of a folder and keep the copies, mainly if it is inside the root folder of the Hubhood theme. Instead of that, you can copy all the folder (example: template-parts) and sub folders, delete all unwanted PHP files and keep only the file you want to customize.
- That is it, do the changes that you need.
To modify PHP files of the Hubhood Addons Plugin:
- Make sure that Hubhood Child is activated (instead of Hubhood)
- Create a folder inside the Hubhood Child folder called “hubhood-addons-files“
- Go to wp-content/plugins/hubhood-addons/hubhood-addons-files/
- Copy any PHP file of this folder or subfolders
- Paste the file inside wp-content/themes/hubhood-child/hubhood-addons-files/
- If the file you want to edit is inside a sub folder or sub sub folder, you must keep the directory tree until the file, for example: wp-content/themes/hubhood-child/hubhood-addons-files/widgets/widget-parts/widget-listings/card-content/card-content-design-1.php
- Don’t copy all PHP files of a folder and keep the copies, mainly if it is inside the “hubhood-addons-files” folder of Hubhood Addons. Instead of that, you can copy all the folder (example: widgets) and sub folders, delete all unwanted PHP files and keep only the file you want to customize.
- That is it, do the changes that you need.
Theme Support
Support
We offer support on Themeforest, or you can reach us directly on [email protected].